This month I am the featured artist on the great facebook group The Crochet Lounge. Posts will be done every other day and will be posted in this post in numerical order. Please feel free to comment below or contact me with any questions. You can also follow along in The Crochet Lounge.


Pictures will be posted of progress as well. Please share your finished projects with me so that I can feature them on my blog.
Hope you enjoy this Mystery Crochet A Long.
Happy Hookin’
Materials:
1/3 skein Red Heart
5.0mm hook (or a 5.5mm if you crochet tight)
tapestry needle to weave ends
Abbreviations and Stiches Used:
mc/r– magic circle/ring
ch– Chain
hdc– half double crochet
yarn over, insert hook, yarn over, pull through (three loops on hook), yarn over, pull through all three loops
tc– triple crochet
wrap yarn around hook two times, insert hook, yo, pull through (4 loops on hook), yo, pull through 1st two loops (3loops on hook), yo, pull through next two loops (two loops left on hook), yo and pull through last two loops
s1c– single crochet|
insert hook, yarn over, pull through (two loops on hook), yarn over, pull through both loops
Rounds 2-4 are X stitch increasing rounds- each sp will contain two stitches
Round 5 is a normal X stitch
Rounds 6-8 are decreasing X stitch rows (there will be one skipped sp in each decrease section)
Just a heads up… This will be explained further as we go along
Step 1- January 3rd 2013-
this will actually be two steps to get us started since step one is so basic on its own
- Magic circle with 10 hdc, join with sl st to close
- Chain 3, sk next sp, 1tc in next sp, 1tc in previous sp, 1tc in next sp, 1tc in previous sp (will already have a stitch in sp). Continue around in this way, last tc will be placed right after the ch3 that began round (in the same space but after the stitches), sl st into the ch3 sp (3rd ch)
- This will give you 10 tc X’s – for a total of 20 stitches completed

Step 2- January 4, 2013-
- This round will be completed the same way as the previous round. Chain 3, sk next sp, 1tc in next sp, 1tc in previous sp, 1tc in next sp, 1tc in previous sp, (there will already be a st in this sp). Continue around in this way, last tc will be placed right after the ch3 that began round (in the same space but after the stitches), sl st into the ch3 sp (3rd ch)
- This will give you 20tc X’s – for a total of 40 stitches completed
- finished step measures 4 1/4 inches, but if yours is 1/4 inch or so off it will be fine
**NEW NOTES: If you don’t end up with 20tc X’s in this round you probably put the sl st in the previous round in the wrong sp (probably at the top of the 1st tc instead of at the top of the ch3 sp)… you’ll have to pull out this round and start again. Always be sure to put your sl stitches at the top of the ch 3 space in the beginning of the round or your count will be wrong at the end of the next round.**

Follow along with the facebook group Crochet Lounge
Step 3- January 7, 2013
This round will be completed the same way as the previous two rounds. Chain 3, sk next sp, 1tc in next sp, 1tc in previous sp, 1tc in next sp, 1tc in previous sp, (there will already be a st in this sp). Continue around in this way, last tc will be placed right after the ch3 that began round (in the same space but after the stitches), sl st into the ch3 sp (3rd ch)
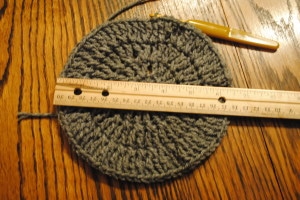
This will give you 40tc X’s – for a total of 80 stitches completed- At this point the round will begin to look a little wonky…. But it will all work out in the end. Round will measure 6.5 inches at the end of step 3.
Note- this used to say measured 7.5 inches… that was a typo. Sorry for any confusion it may have caused.
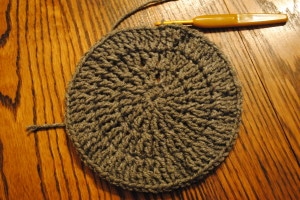
Step 4- January 9, 2013
This round will be completed differently as you will no longer be increasing.
Chain 3, skip two spaces, 1tc in third sp, 1tc in previous (2nd) sp. *Sk 1sp, 1tc in next sp, 1tc in previous sp, repeat from * around, for a 40tc X’s- a total of 80 stitches.
Project will measure 8” at the end of step 4.

Step 5- January 12, 2013
This will be the first decreasing round. You will decrease in every 4th set of X’s. Chain3, skip three spaces, tc in 4th sp, tc in previous sp, sk 1 sp, tc in next sp, tc in previous sp, skip 1sp, tc in previous sp, skip two spaces, tc in 1st skipped sp, leaving one empty stitch in between. Repeat around, decreasing in every 4th st. When you get to the last stitch you will leave the one in the center empty and crochet into the second original skipped space. This will give you 36 TC X’s.
The piece will begin to take on a curved shape as you decrease your rounds. The next two rounds will be decreasing rounds as well.
If you have measured correctly up until now there is no need to continue to measure.
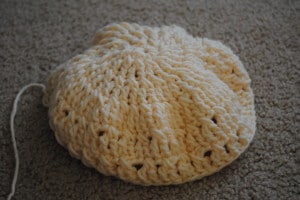
No need to adjust your screen… my hat did change colors. Turns out I needed that last bit of grey I had for a custom order. Good news is this one measured up the same as the previous one!
Step 6- January 16, 2013
Some people had a little confusion with the last step so I have changed the way this step is written. Once the CAL is over I will revamp the entire pattern, in the meantime if anyone has any specific questions feel free to either inbox me or ask directly on the comment section of my blog. Thanks.
Chain 3, tc in previous space (creating your first “x”). Skip next space, tc in the following space and then tc in previous (skipped) space (creating your 2nd “x”). In the third “x” you will decrease by one space, to do this skip 2 spaces, tc in following space and then tc in the first skipped space (leaving one empty space in between). This will give you one decreased “x”. Continue around decreasing in every 3rd “x” space. {Two normal “x” stitches (skip one space, tc in following space, then tc in previous (skipped) space) and one decreased “x” space (skip 2, tc in following space, then tc in first skipped space, leaving one empty space in between}
*This doesn’t work out completely even and you will end up on a regular “x” stitch (right after having completed a decreased “x” stitch)
This will give you a total of 31 tc “x”’s

Step 7- January 19, 2013
This will be the last decreasing round. You will decrease in every 2nd tc “x”. This will not work out perfectly even and as such you will NOT decrease in the 24th “x”. You should end up with a total of 25 tc “x”’s.
Chain 3, tc in previous space (creating first “x”). Skip two spaces, tc in first skipped space (leaving one open space in between). This will give you one decreased “x”.
Continue around decreasing in every 2nd “x” space.
– One normal “x” stitch (skip one space, tc in following space, then tc in previous (skipped) space)
– One decreased “x” space (skip 2, tc in following space, then tc in first skipped space, leaving one empty space in between}.
Join with sl st to the top of the chain 3.


Step 8- January 23, 2013
We are almost done. I will be giving you the last four rows in this step.
To finish you will do 4 rounds of sc <50stitches per round>. This will finish off the body of the CAL… have you guessed it yet, lol.
Click here for my method to do an invisible finish.
This is my Fiona Hipster Hat. The only thing left is the bow embellishment which we will complete in the next step.
This hat is designed to fit differently than most hats. It mimics the hipster hats that are popular in all the “hip” clothing stores. I personally love the way it fits. When you put it on for the first time simply adjust the way it fits on your head by manipulating it. The “bunches” just need to be adjusted evenly.
Next step we will finish it off… hope you enjoyed making this with me.


