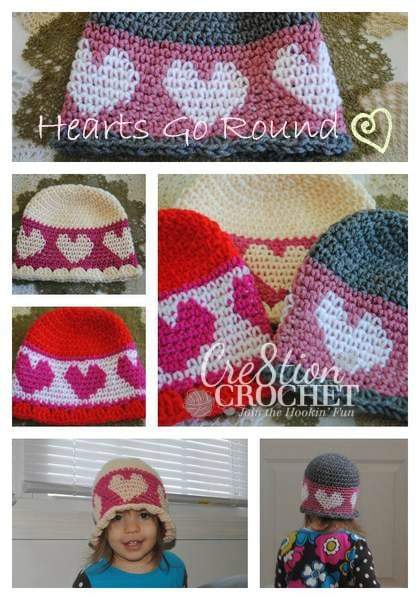
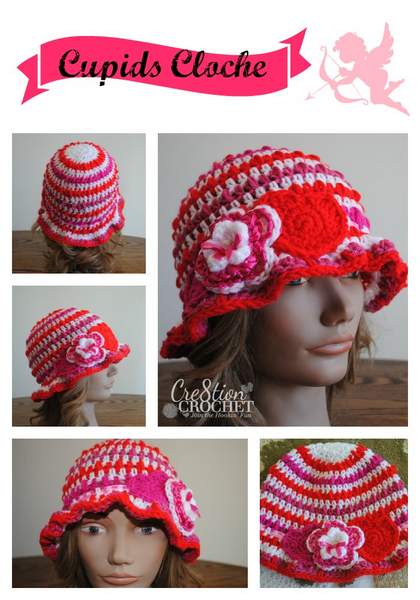
Hearts go Round
Valentine’s Day Crochet Hat Pattern
Toddler Hat- fits child 1-2 years old
This Valentine’s Day crochet hat pattern can be made in ANY size. The body of the hat must be in multiples of 5 (ending in 5, such as 35, 45, 55, etc) and border of hat must be in multiples of 10 (5 stitches larger than hat, 40, 50, 60, etc). Send me a comment or email if you need help changing size of hat or if you have any other questions.
Materials Used:
Red Heart yarn in colors of your choice, at least two but as many as you want
5.0mm hook
tapestry needle for weaving in ends

Abbreviations and Stitches used:
st– stitch
sp– space
mc/r– magic circle/ring
sl st– slip stitch
insert hook, yarn over, pull through, (two loops on hook), pull loop closest to hook through other loop
ch– chain
sc– single crochet|
insert hook, yarn over, pull through (two loops on hook), yarn over, pull through both loops
hdc– half double crochet
yarn over, insert hook, yarn over, pull through (three loops on hook), yarn over, pull through all three loops
dc– double crochet
yarn over, insert hook, yarn over, pull through (three loops on hook), yarn over, pull through first two loops on hook, yarn over and pull through last two loops
Increase– 2 of the designated stitch in one space
Notes:
- Watch this video by Moogly prior to making hat- How to change colors in the middle of a row
- When working in the border and picking up different colors be sure to always pick colors up the same way so that they don’t get tangled. I pick Color A up from the top and Color B from the bottom, making sure it’s the same each time. If your yarn happens to get tangled be sure to untangle (by moving skeins) as you go or else it will be a mess.
- When working in the heart portion (border) you will not cut your yarn, it will follow along and be stitched over in each row.
- BE SURE not to crochet the heart portion (border) too tightly or to pull the following yarn tight as it will make the hat tight in that section and it won’t fit.
- I highly suggest following my seamless method found here for a professional look and to ensure that all the rows line up properly. Use the 1st method for the border/heart section and the 2nd method for hdc rows and color change rows.
Pattern:
- Mc/r with 10hdc, join round with sl st
- Increase (2hdc) in every sp <20hdc>, join round with sl st
- Increase in every other sp <30hdc, join round with sl st
- Increase in every 3rd sp <40hdc>, join round with sl st
- Increase in every 8th sp <45hdc>, join round with sl st
- 1hdc in every sp <45hdc> around, join round with sl st
- 1hdc in every sp <45hdc> around, join round with sl st
- 1hdc in every sp <45hdc> around, join round with sl st
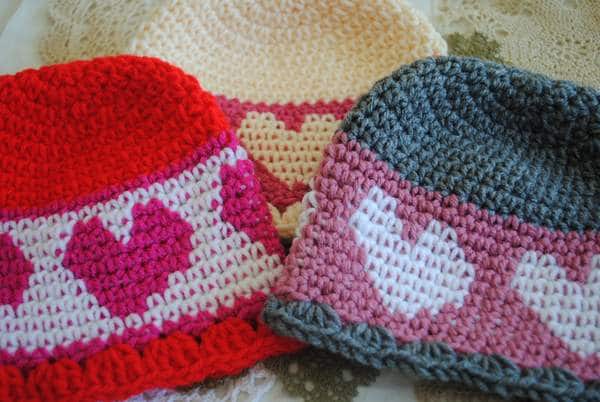
- Change to border color (here on referred to as Color A) You will change completely and cut end of hat color. sc around, increase in every 9th sp <50sc>, join round with sl st
- 1sc in every sp <50sc>, join round with sl st
- Please be sure to read notes before moving on if you haven’t already
- 1sc in each of the next four spaces and pick up heart color at the top of 4th st (here on referred to as Color B), do NOT cut Color A, stitch over non working color as you work the heart portion of the hat. Crochet around as follows *Color B B A A B B A A A A. Repeat from * all the way around, join round with sl st <50sc> Figure A
- 1sc in each of the next 3 spaces (1st Color B stitch will go into the 1st Color B stitch in previous row) and crochet along as follows *Color B B B A B B B A A A. Repeat from * all the way around, join round with sl st <50sc>
- 1sc in each of the next 2 spaces (1st Color B stitch will go into the 1st Color B stitch in previous row) and crochet along as follows *Color B B B B B B B B A A. Repeat from * all the way around, join round with sl st <50sc>
- 1sc in each of the next 2 spaces (this time the 1st Color B stitch will go into the 2nd Color B stitch in previous row, the first stitch will be with Color A) and crochet along as follows *Color B B B B B B B A A A. Repeat from * all the way around, join round with sl st <50sc>
- 1sc in each of the next 2 spaces (1st Color B stitch will go into the 2nd Color B stitch in previous row) and crochet along as follows *Color B B B B B B A A A A. Repeat from * all the way around, join round with sl st <50sc> Figure B
- 1sc in each of the next 2 spaces (1st Color B stitch will go into the 2nd Color B stitch in previous row) and crochet along as follows *Color B B B B A A A A A A. Repeat from * all the way around, join round with sl st <50sc> Figure C
- 1sc in each of the next 2 spaces (1st Color B stitch will go into the 2nd Color B stitch in previous row) and crochet along as follows *Color B B A A A A A A A A. Repeat from * all the way around, join round with sl st <50sc>Figure D
- Cut Color B leaving a 6” long tail. Continue with Color A 1sc in each sp <50sc>. Crochet over Color B tail for a few stitches to secure. Join round with sl st
- 1sc in every sp around with Color A <50sc>. Join round with sl st
- Change to trim color (tie short tail of trim color to Color A to secure) and ch2, 3dc in same space. *Skip two spaces and 4dc in next sp. Repeat from * around entire piece. Join with sl st to top of ch2.
- Weave in all ends.
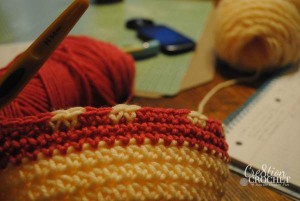
Figure A
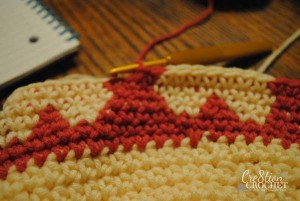
Figure B
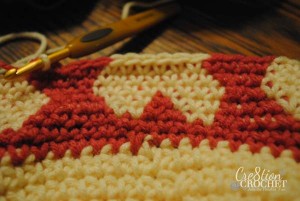
Figure C
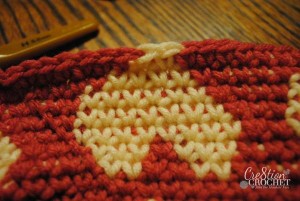
Figure D
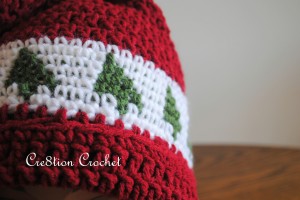
I hope you enjoyed making this hat with me and I hope that your loved one enjoys it as much as mine does. I also have a Christmas version of this hat made with Christmas Tree’s you can find the pattern here. More Go Round hats to come in the future.
I hope you enjoyed this free Valentine’s Day Crochet Hat Pattern. If you have any questions or need help please feel free to comment on the blog, my fb page or email me. If you like what you see please share it and as always…
Click HERE for lots more free Valentine’s Day Patterns
Happy Valentine’s Hookin’!


