Crochet Hipster Hat
Fiona
This crochet hipster hat is super stylish and was designed in a hipster style that is popular in all of the stores right now. It fits very much like a semi slouch and requires the wearer to pull the hat all the way on the head and may require a little shaping when placed on the head as it has a lot of give to it.
I was inspired to make this hat after doing some online shopping and noticing that all the knit and crochet style hats that were popular right now were shaped very different than the basic beanie style. They were shorter and rounder. I love the way the triple crochet X’s give the hat so much stretch. I hope you enjoy this crochet hipster hat as much as I do.

Skill Level: Intermediate
Materials:
1/3 skein of Red Heart yarn
(you can use any comparable worsted weight but I have only tested this in Red Heart so I can’t tell you what size hook you will need to obtain gauge)
5.5mm (I) hook
or whatever size necessary to obtain gauge, if you crochet tight you will probably require a 6.0mm(J) hook
tapestry needle to weave ends
Gauge:
1st round- 1 ¼”- gauge will change with next round so be sure to check round 2 as well
2nd round- 2 ¾”
Finished Hat Size:
Circumference- 20” (but very stretchy and very giving)
Length- 7”
Abbreviations and Stitches Used:
Mc/r– magic circle/ring (watch video here)
ch– chain
st– stitch (sp– space)
hdc– half double crochet
yarn over, insert hook, yarn over, pull through (three loops on hook), yarn over, pull through all three loops
tc– triple crochet
wrap yarn around hook two times, insert hook, yo, pull through (4 loops on hook), yo, pull through 1st two loops (3loops on hook), yo, pull through next two loops (two loops left on hook), yo and pull through last two loops
(pattern is done in tc X’s- each X will contain one tc and one tc in the stitch to the right, forming the X)
sc– single crochet|
insert hook, yarn over, pull through (two loops on hook), yarn over, pull through both loops
Notes:
This pattern is slightly complicated and is intended for intermediate crocheters, however once you understand the way the stitch is worked a beginner may be successful at it as well. Please email me if you have any questions at [email protected]
I have included labeled pictures, click on any one to make larger
This pattern requires minimal tension and a light hand
Rounds 2-4 are X stitch increasing rounds- each st/sp will contain two stitches
Round 5 is a normal X stitch- each st/sp will contain one stitch
Rounds 6-8 are decreasing X stitch rows- there will be one skipped sp in between the specific decreasing sets of X’s in each round
This is just a heads up… This will be explained further as we go along


Pattern:
Round 1: Magic circle with 10hdc, join with sl st to close
should measure 1 ¼”
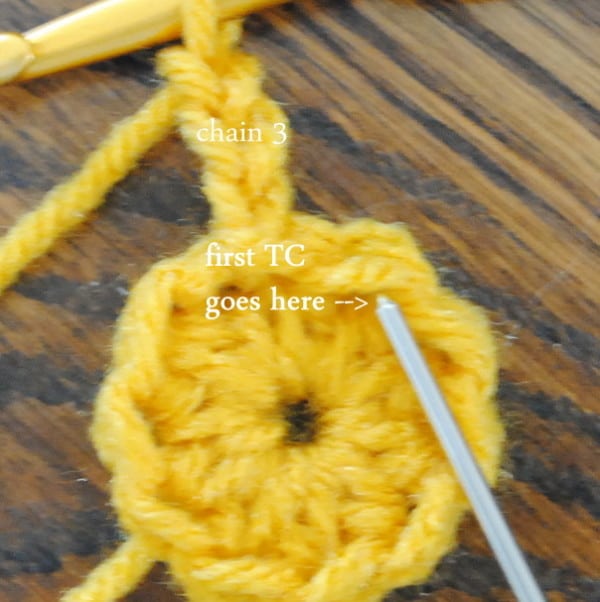
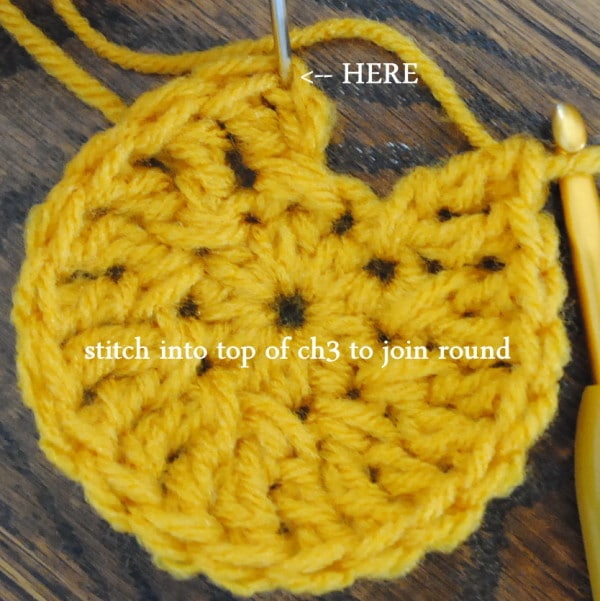
Round 2: Ch3 (this will count as your first tc). 1tc the stitch to the right of where you just chained. This will be your first X stitch. *1tc in next empty st. 1tc in the stitch to the right (this st will already have a st in it). Repeat from * around. sl st into the top of the ch3 to join round
This will give you 10 tc X’s – for a total of 20 stitches completed
Finished step measures 2 ¾ inches, but if yours is ¼ inch or less off it will be fine, just change to a 6.00mm hook now
Round 3: This round will be completed the same way as the previous round
Ch3 (this will count as your first tc). 1tc in the stitch to the right of where you just chained.
*1tc in next empty st. 1tc in the st to the right (this st will already have a st in it). Repeat from * around. sl st into the top of the ch3 to join round
This will give you 20 X’s – for a total of 40 stitches completed
Round will measure 4 ¼ inches at the end of step 3- be sure to check your gauge!
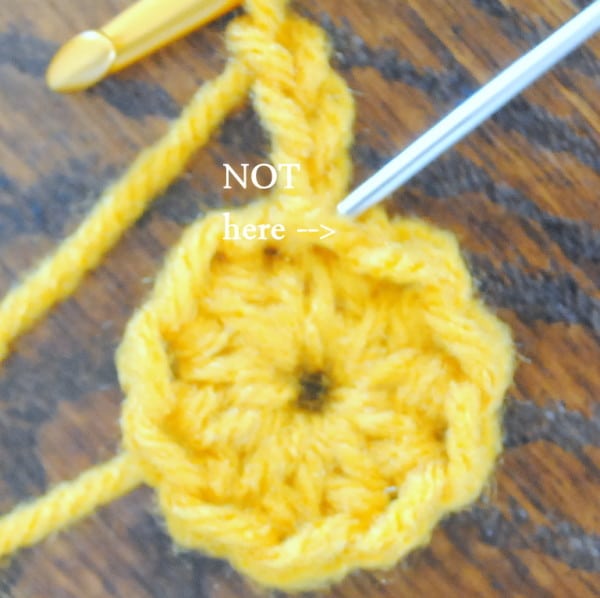
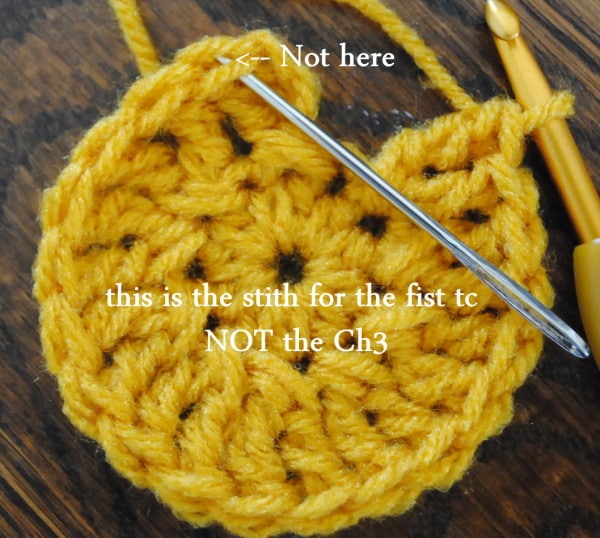
**NOTES: If you don’t end up with 20tc X’s in this round you probably put the sl st in the previous round in the wrong sp (probably at the top of the 1st tc instead of at the top of the ch3 sp)… you’ll have to pull out this round and start again. Always be sure to put your sl stitches at the top of the ch 3 space in the beginning of the round or your count will be wrong at the end of the next round.**
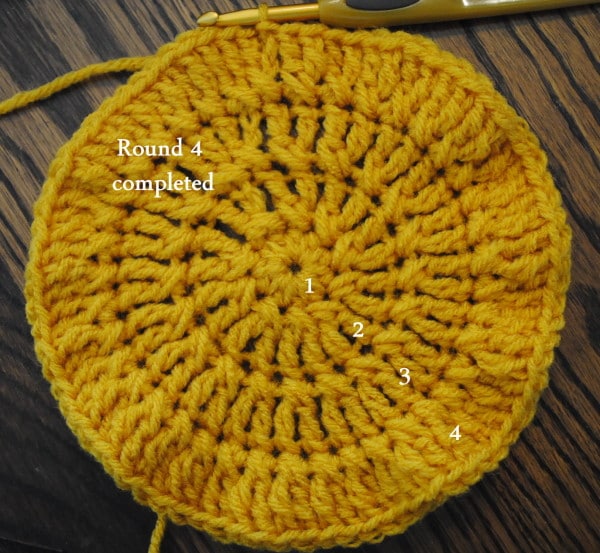
Round 4: This round will be completed the same way as the previous two rounds
Ch3 (this will count as your first tc). 1tc in the stitch to the right of where you just chained. *1tc in next empty st. 1tc in the st to the right (this st will already have a st in it). Repeat from * around. sl st into the top of the ch3 to join round
This will give you 40 X’s – for a total of 80 stitches
At this point the round will begin to look a little wonky…. But it will all work out in the end.
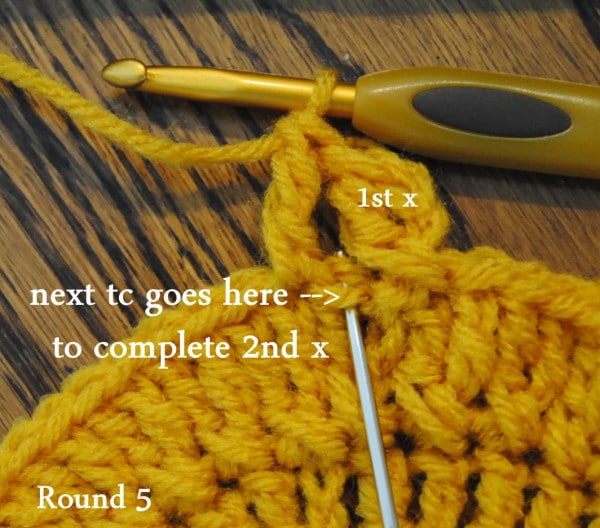
Round 5: This round will be completed a little differently as you will no longer be increasing.
Ch 3 (this will count as your first tc). 1tc in the st to the right of where you just chained. *Sk 1 st and leave empty. 1tc in next st (leaving the one empty st in between). 1tc in the stitch to the right (into the st previously left empty). Repeat from * around. sl st into top of the ch3 to join rounds
This will give you 40 X’s- a total of 80 stitches
Project will measure 8” at the end of step 4

Round 6: This will be the first decreasing round. You will decrease in every 4th set of X’s (leaving one st or sp empty in the middle of the X)
Ch3. 1tc in the st to the right of where you just chained. sk 1st st and leave empty. 1tc in next st (leaving the one empty st in between). 1tc in the stitch to the right (into the st previously left empty). sk 1st st and leave empty. 1tc in next st (leaving the one empty st in between). 1tc in the stitch to the right (the st previously left empty). sk 2 sts and leave both empty. 1tc in next st (leaving the two empty in between). 1tc into the st that is two stitches to the right (leaving the one empty space in between the finished X. * sk 1st st and leave empty. 1tc in next st (leaving the one empty st in between). 1tc in the stitch to the right (into the st previously left empty). sk 1st st and leave empty. 1tc in next st (leaving the one empty st in between). 1tc in the stitch to the right (into the st previously left empty). sk 1st st and leave empty. 1tc in next st (leaving the one empty st in between). 1tc in the stitch to the right (the st previously left empty). sk 2 sts and leave both empty. 1tc in next st (leaving the two empty in between). 1tc into the st that is two stitches to the right (leaving the one empty space in between the finished X. Repeat from * around. sl st into the top of the ch3 to join rounds.
This will give you 36 X’s or 72 stitches
The piece will begin to take on a curved shape as you decrease your rounds. The next two rounds will be decreasing rounds as well.
If you have measured correctly up until now there is no need to continue to measure, if not you need to go back to the first round and begin again with a larger hook
Round 7: This will be the 2nd decreasing round. You will be decreasing in every 3rd set of X’s.
Ch3. 1tc in the st to the right of where you just chained. sk 1st st and leave empty. 1tc in next st (leaving the one empty st in between). 1tc in the stitch to the right (the st previously left empty). sk 2 sts and leave both empty. 1tc in next st (leaving the two empty in between). 1tc into the st that is two stitches to the right (leaving the one empty space in between the finished X. * sk 1st st and leave empty. 1tc in next st (leaving the one empty st in between). 1tc in the stitch to the right (into the st previously left empty). sk 1st st and leave empty. 1tc in next st (leaving the one empty st in between). 1tc in the stitch to the right (the st previously left empty). sk 2 sts and leave both empty. 1tc in next st (leaving the two empty in between). 1tc into the st that is two stitches to the right (leaving the one empty space in between the finished X. Repeat from * around. sl st into the top of the ch3 to join rounds.
^This doesn’t work out completely even and you will end up on a regular “x” stitch (right after having completed a decreased “x” stitch) This will give you a total of 31 Xs or 62 stitches
Round 8: This will be the last decreasing round. You will decrease in every 2nd tc “x”. This will not work out perfectly even and as such you will NOT decrease in the 24th “x”. You should end up with a total of 25 tc “x”’s or 50 stitches total
Ch3 (this will count as your first tc). 1tc in the space to the right of where you just chained. sk 2 sts. 1tc in next st (leaving the two empty in between). 1tc into the st that is two stitches to the right (leaving the one empty space in between the finished X). *sk 1st st and leave empty. 1tc in next st (leaving the one empty st in between). 1tc in the stitch to the right (the st previously left empty). sk 2 sts and leave both empty. 1tc in next st (leaving the two empty in between). 1tc into the st that is two stitches to the right (leaving the one empty space in between the finished X. Repeat from * around. sl st into the top of the ch3 to join rounds.
Round 9: 1sc in every st around <50>
Round 10: 1sc in every st around <50>
Round 11: 1sc in every st around <50>
Round 12: 1sc in every st around <50>
Use my invisible finish method for a more professional finished look
This is my Fiona Hipster Hat. This hat is designed to fit differently than most hats. It mimics the hipster hats that are popular in all the “hip” clothing stores. I personally love the way it fits. When you put it on for the first time simply adjust the way it fits on your head by manipulating it; the “bunches” just need to be adjusted evenly. Pull it down as far as it can go, slightly lower in the back.
To finish this hat you can add a flower (lots of free designs in the flower repository) or bow of your choice. My favorite embellishment is this little bow:
Bow Pattern:
- Ch5
- 3tc in 1st ch
- Ch4 and sl st into 1st ch
- Repeat steps 1-3
- Knot in back and wrap yarn around center of bow a few times, knot in back and cut leaving a 10″ long tail

This pattern is also available as a PDF for the cost of $2. This fee is to offset revenue lost when the pattern is printed and a visit to this site is not required. Click HERE to go to Ravelry.
This hat goes great with the Bulky Striped Cowl

I hope you enjoyed making this crochet hipster hat with me. If you have any questions please feel free to comment below or email me at [email protected]
Have fun and…
Happy “Hipster” Hookin’


