Easy Peasy
Toddler Striped Sweater with Hood
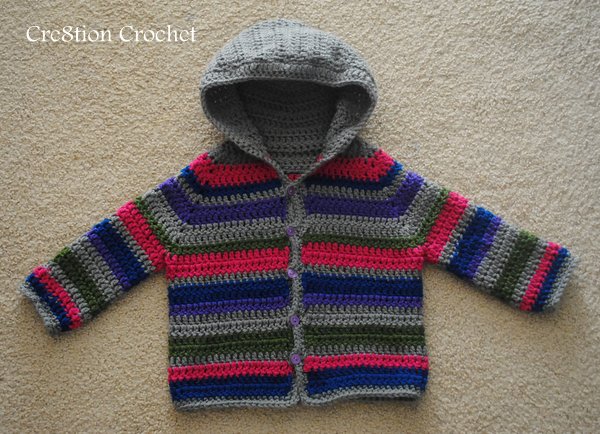
This adorable striped sweater comes complete with hood and buttons up the front. Can be made to suit either gender.
This may just be the simplest sweater pattern you’ll ever find. I designed it with simplicity in mind. The directions are written using my color changes, though you can make the stripes in any fashion you like, or even make this sweater in all one color!
Finished Size:
Fits my 2.5 yo 28lb daughter perfectly, there is even a little room to grow.
Neck to waist- 13.5”
Side to side- 13”
Total sleeve length- 13”
Sleeve length from armpit to cuff- 8”
Neck opening- 7” wide or 14” in diameter
Total wingspan- 30”
Gauge
12sts and 7 rows = 4″
Washing Instructions:
Machine Wash Gentle
or follow manufacturers washing instructions for the yarn you use
Cost of Materials:
$8
Time Involved:
I honestly couldn’t tell you on this one… I frogged it quite a few times, but probably 4-5 hours
Recommended Retail Price:
$55-65
Notes:
- The ch3 will count as your 1st dc in each row, the next dc should be placed in the 2nd st. Except for the hood, where the ch3 will still count as the 1st dc BUT you will place the next dc in the same st, this is specified in the pattern as well.
- You can do color changes any way that works best for you. The method I use: Begin last dc in each row After the first yarn over and pull through you will have two loops remaining on hook, pull up new color and draw through last two remaining loops on hook. Tie tails tightly.
- There are two parts of the directions that require that you place stitch markers. This is so that you can properly line up the hood and the button holes. I recommend using yarn of an alternate color to mark these rows. You may want to use two different colors for the two different places where you need to mark.
Materials:
Total 2 skeins of worsted weight yarn in whatever colors you desire
I used Redheart’s With Love
5.5mm (I) hook
Embroidery needle

Abbreviations and Stitches Used:
CA– color A (grey)
CB– color B (pink)
CC– color C (blue)
CD– color D (purple)
CE– color E (green)
fdc– foundation double crochet (tutorial HERE)
Chain 3 (counts as 1st fdc). Yarn over and insert hook in 3rd chain from hook. *Yarn over and pull up loop (3 loops on hook), yarn over and pull through 1 loop creating a sl st, (this is an important step but easy to forget). Yarn over again and pull through first two loops on hook (two loops remaining). Yarn over again and pull through last two loops on hook. This completes the second fdc (remember your 1st ch3 counted as the 1st fdc). To stitch the next fdc, yarn over and insert the hook into the sl st made in the 2nd fdc and repeat from *
ch– chain
st– stitch
sp– space
sk– skip
sl st– slip stitch
insert hook into stitch or space, yarn over and pull through stitch, (two loops on hook), pull loop closest to hook through other loop
sc– single crochet
insert hook into stitch or space, yarn over and pull through stitch (two loops on hook), yarn over and pull through both loops on hook
dc– double crochet
yarn over, insert hook into stitch or space, yarn over and pull through stitch (three loops on hook), yarn over, pull through first two loops on hook, yarn over and pull through last two loops
V st– V Stitch- Each V st= [1dc. ch1. 1dc]
dc2tog– double crochet two together
yarn over, insert hook into 1st st, yarn over and pull through st, (three loops on hook), insert hook in next st, yarn over, pull through, (four loops on hook), yarn over, pull through first two loops on hook, yarn over again and pull through last two loops on hook
Instructions:
1. Starting with CA (grey) Fdc 56- change to CB (pink)
2. Ch3 (counts as the 1st dc in every row) and turn. 1dc in each of the next 9 sts. V st in the next st. 1dc in each of the next 6sts. V st in the next st. 1dc in each of the next 20sts. V st in the next st. 1dc in each of the next 6sts. V st in the next st. 1dc in each of the remaining 10sts. <52dc and 4 V sts>
3. Ch3 and turn. 1dc in each of the next 10sts. V st in the ch1 sp. 1dc in each of the next 8sts. V st in the ch1 sp. 1dc in each of the next 22sts. V st in the ch1 sp. 1dc in each of the next 8sts. V st in the ch1 sp. 1dc in each of the remaining 11sts. Change to CC (blue). <60dc and 4 V sts>
4. Ch3 and turn. 1dc in each of the next 11sts. V st in the ch1 sp. 1dc in each of the next 10sts. V st in the ch1 sp. 1dc in each of the next 24sts. V st in the ch1 sp. 1dc in each of the next 10sts. V st in the ch1 sp. 1dc in each of the remaining 12sts. Change to CA (grey). <68dc and 4 V sts>
5. Ch3 and turn. 1dc in each of the next 12sts. V st in the ch1 sp. 1dc in each of the next 12sts. V st in the ch1 sp. 1dc in each of the next 26sts. V st in the ch1 sp. 1dc in each of the next 12sts. V st in the ch1 sp. 1dc in each of the remaining 13sts. Change to CD (purple). <76dc and 4 V sts>
6. Ch3 and turn. 1dc in each of the next 13sts. V st in the ch1 sp. 1dc in each of the next 14s.ts V st in the ch1 sp. 1dc in each of the next 28sts. V st in the ch1 sp. 1dc in each of the next 14sts. V st in the ch1 sp. 1dc in each of the remaining 14sts. <84dc and 4 V sts>
7. Ch3 and turn. 1dc in each of the next 14sts. V st in the ch1 sp. 1dc in each of the next 16sts. V st in the ch1 sp. 1dc in each of the next 30sts. V st in the ch1 sp. 1dc in each of the next 16sts. V st in the ch1 sp. 1dc in each of the remaining 15sts. Change to CA (grey). <92dc and 4 V sts>
8. Ch3 and turn. 1dc in each of the next 15sts. V st in the ch1 sp. 1dc in each of the next 18sts. V st in the ch1 sp. 1dc in each of the next 32sts. V st in the ch1 sp. 1dc in each of the next 18sts. V st in the ch1 sp. 1dc in each of the remaining 16sts. <100dc and 4 V sts>
9. Ch3 and turn. 1dc in each of the next 16sts. V st in the ch1 sp. 1dc in each of the next 20sts. V st in the ch1 sp. 1dc in each of the next 34sts. V st in the ch1 sp. 1dc in each of the next 20sts. V st in the ch1 sp. 1dc in each of the remaining 17sts. Change to CE (green). <108dc and 4 V sts>
10. Ch3 and turn. 1dc in each of the next 17sts. V st in the ch1 sp. 1dc in each of the next 22sts. V st in the ch1 sp. 1dc in each of the next 36sts. V st in the ch1 sp. 1dc in each of the next 22sts. V st in the ch1 sp. 1dc in each of the remaining 18sts. Change to CB (pink). <116dc and 4 V sts>
11. Ch3 and turn. 1dc in each of the next 18sts. 1dc in the ch1 sp (mark this st). Ch1 and skip the next 24sts, fold the piece in half and 1dc in the next ch1 sp (mark this st) (this space will become your 1st arm hole, you will stitch the sleeve in a later step). 1dc in each of the next 38sts. 1dc in the ch1 sp (mark this st). Ch1 and skip the next 24sts, fold the piece in half again and 1dc in the next ch1 sp (mark this st) (this space will become your 2nd arm hole, you will stitch the sleeve in a later step). 1dc in each of the remaining 19sts. <20dc, 1ch, 40dc, 1ch, 20dc>
12. Ch3 and turn. 1dc in each of the next 19sts. 1dc in the ch1 sp. 1dc in each of the next 40sts. 1dc in the ch1 sp. 1dc in each of the remaining 20sts. Change to CA (grey). <82dc>
13. Ch3 and turn. 1dc in every st across. Change to CC (blue). <82dc>
14. Ch3 and turn. 1dc in every st across. <82dc>
15. Ch3 and turn. 1dc in every st across. Change to CD (purple). <82dc>
16. Ch3 and turn. 1dc in every st across. Change to CA (grey). <82dc>
17. Ch3 and turn. 1dc in every st across. <82dc>
18. Ch3 and turn. 1dc in every st across. Change to CE (green). <82dc>
19. Ch3 and turn. 1dc in every st across. <82dc>
20. Ch3 and turn. 1dc in every st across. Change to CA (grey). <82dc>
21. Ch3 and turn. 1dc in every st across. Change to CB (pink). <82dc>
22. Ch3 and turn. 1dc in every st across. Change to CC (blue). <82dc>
23. Ch3 and turn. 1dc in every st across. <82dc>
24. Ch3 and turn. 1dc in every st across. <82dc>. Fasten off
25. Place stitch markers in the first (fdc) row. (I use a different color piece of yarn tied in a loop). Place stitch markers in a bit so that they don’t interfere when you stitch the edging.
Sleeves– follow color changes of the body for sleeves
1. Attach yarn to the ch in center under arm. Ch3 (counts as first dc). dc2tog using the marked st and the next dc. dc in each of the next 23 dcs. dc2tog using the next dc and the marked st. Sl st into the top of the Ch3 to join round. <25>
2. Ch3 (counts as first dc). Dc in each dc around. <25>
3. Repeat previous row for 10 more rows. Following the color changes of the body of sweater. <25>
3. Ch2 and skip the next st. 1dc in each of the next 6sts. dc2tog. 1dc in each of the remaining 17sts. <25>
4. Ch2 and skip the next st. 1dc in each of the next 5sts. dc2tog. 1dc in each of the remaining 16sts. <23>
5. Change to CA (grey). 1sc in every st. join round with sl st. <23>
6. 1sc in every st. join round with sl st. <23>
7. Sl st around to finish. Be sure not to sl st too tightly. Fasten off and weave in tail. <23>
Repeat for other arm.
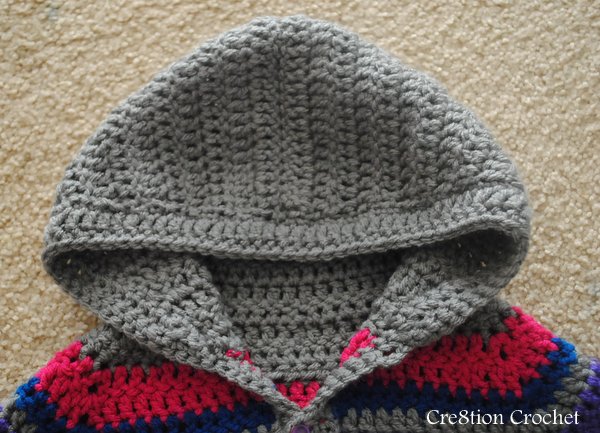
Hood
1. With sweater facing you. Attach CA yarn at top left hand corner. Ch3 and 1dc in the same st. 1dc in each of the next 6sts. dc2tog 3x. 1dc in the next st. dc2tog 3x. 1dc in each of the next 16sts. dc2tog 3x. 1dc in the next st. dc2tog 3x. 1dc in each of the remaining 7sts. <45>
2. Ch3 and turn. 1dc in the same st. 1dc in each of the next 6sts. dc2tog 3x. 1dc in each of the next 18sts. dc2tog 3x. 1dc in each of the remaining 8sts. <40>
3. Ch3 and turn. 1dc in the same st. 1dc in each of the next 18sts. dc2tog. 1dc in each of the remaining 19sts. <40>
4. Ch3 and turn. 1dc in the same st. 1dc in every st across. <41>
5. Ch3 and turn. 1dc in the same st. 1dc in every st across. <42>
6. Ch3 and turn. 1dc in the same st. 1dc in every st across. <43>
7. Ch3 and turn. 1dc in the same st. 1dc in each of the next 19sts. dc2tog. 1dc in each of the remaining 21sts. <43>
8- 17. Repeat Line 7- (for 10 repeats of line 7)
18. Ch3 and turn. 1dc in the same st. 1dc in each of the next 18sts. dc2tog 2x. 1dc in each of the remaining 20sts. <42> Mark rows 3, 6, 9, 12 & 15 with stitch markers on either side (I use a different color piece of yarn tied in a loop). Place stitch markers in a bit so that they don’t interfere when you stitch the edging.
19. The correct side of the sweater should be facing you. Fold hood in half towards the back. Turn entire piece around and line up edges. You can either sl st or whip st to the center fold to close off. Fasten off and weave in tail.
Finishing off:
- You can stitch over the tails from color changes when you finish off or you can leave them till the end and weave them in. I weave them in for a neater finished look.
- Where you begin your finishing is very important. Be sure to start in the space you started the hood. Insert your needle in the ridge where the first row of the hood meets the body of the sweater. At the 1st st marker.
- The hood will be stitched around 3x. The body will only be stitched around 2x.
- The 2nd row around the hood will be dc. All other rows will be sc.
- Attach CA and sc around the entire hood and body of sweater (to space evenly place 1sc in the ridge of every row and 1sc in the center of the ch in every row). Place 3sc in corners both front corners of sweater. Sl st to join.
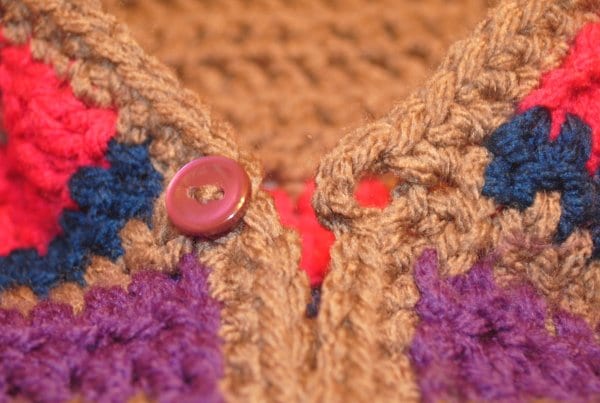
- 1hdc in the next st (at the first set of stitch markers) 1dc in every st around the hood. When you get to your stitch markers at rows 3, 6, 9, 12 on either side, and when you get to the top (ridge) of the hood you will dc2tog. 1hdc in the last st of the hood (where you placed your first set of stitch markers). [1sc in the next st. Ch3. 1sc in the next st] to make 1st button hole (this first button hole should line up with the bottom ridge of the CA row, where it meets the CB row) Continue to sc around the body of the sweater placing button holes at the bottom of every CA (grey) row [1sc in the next st. ch3. 1sc in next st]. 3sc in both front corners of sweater. Sl st to join row.
- 1sc in every st around the hood. Where hood meets body of sweater fasten off and weave in ends. Finish weaving in all tails.
- Stitch on buttons to coordinate with the button holes. They should be placed in the ridge on the bottom of where CA meets the next color for added security.
This pattern is now available in Baby (3m-18mo), Child (2y-12y), and adult (S-2x). You can also purchase every size as part of an ebook, Striped Hoodies for the Whole Family.


