Xanadu Texting Mittens
Months ago, I began creating a line of patterns that use pleating to create “X’s” or bows. It reminded me of my favorite movie as a child, with all of her headbands, and legwarmers, “Xanadu”. This free crochet mitten pattern is part of that series of patterns.
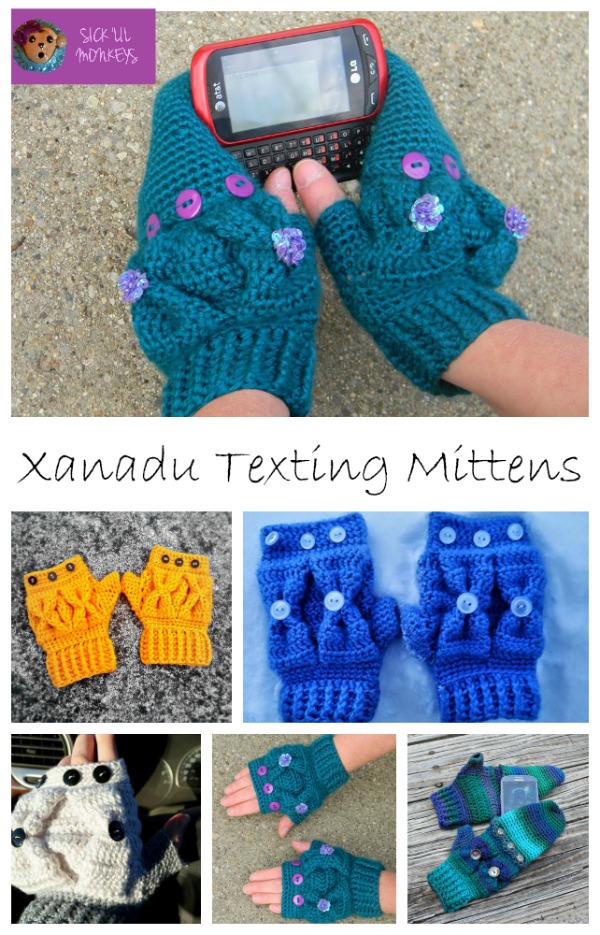
This pattern was designed by Kelli Wohlgemuth of Sick ‘Lil Monkeys, exclusively for Cre8tion Crochet
• This post may contain affiliate links
• By using this pattern you agree to the Pattern Terms of Use set forth by Sick ‘Lil Monkeys
This pattern is the intellectual property of Kelli Wohlgemuth. SICK ‘LIL MONKEYS reserves all rights to the photos and de-signs with in this document. You may sell all items made from this pattern but please credit SICK ‘LIL MONKEYS with the pattern. SICK ‘LIL MONKEYS operates with the goal of sponsoring one “sick little monkey” at a time making the world a tiny bit better than we found it. If you are interested in helping us with our annual Christmas wish boxes please let us know.
Click HERE to add this pattern to your Ravelry Favorites
Click HERE to Pin It for later
YARN
S/M – 220 yards or 4.2 ounces of Hobby Lobby I Love This Cotton or Caron Simply Soft or 250yrds Red Heart Boutique
L/XL – 270 yards or 5.1 ounces of Hobby Lobby I Love This Cotton or Caron Simply Soft or 300yrds Red Heart Boutique
XXL – 300 yards or 6 ounces of Hobby Lobby I Love This Cotton or Caron Simply Soft or 330yrds Red Heart Boutique
MATERIALS
12 1/2″ buttons, 7/4.5mm crochet hook, G-6/4.0mm crochet hook, stitch markers
DIFFICULTY
Intermediate
SIZES
Small – 3.5-4 inches wrist to base of fingers
Medium – 4-4.5 inches wrist to base of fingers
Large – 4.5-5 inches wrist to base of fingers
Extra Large – 5-5.5 inches wrist to base of fingers
XX Large – 5.5 – 6.5 inches wrist to base of fingers
GAUGE
9 dc x 5 rows = 2″ x 2″ with larger hook
STITCH GUIDE
ch(s) – chain(s), fsc – foundation single crochet, sc – single crochet, sc inc, work 2 sc in the same st, sc dec, sc 2 st together, hdc – half double crochet, dc – double crochet, st(s) – stitch(es), BLO – back loop only, slst – slip stitch, back ridge – note this is a loop created on the side of the stitch below it is NOT the BLO, fpdc – front post double crochet, bpdc – back post double crochet
SPECIAL STITCHES
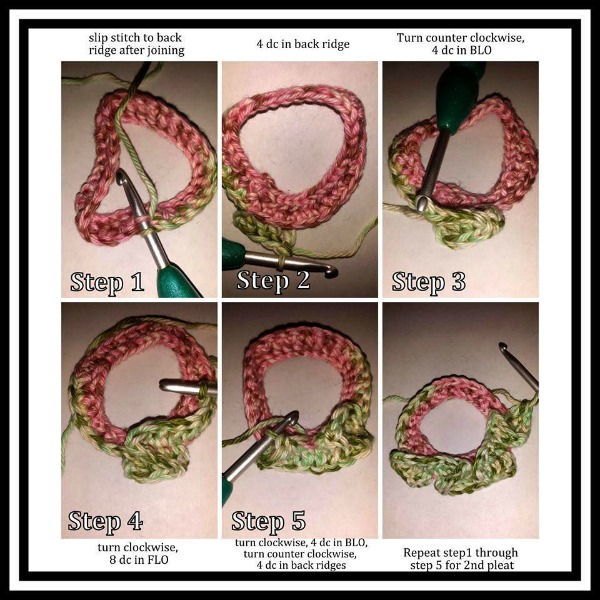
Pleat – Before starting pleat, determine which loops are the back and front loops and do not change the designation through the pat-tern. (4 dc in back ridge, turn 4 dc in BLO, turn 8 dc in FLO, turn, 4 dc in BLO, turn 4 dc in back ridge) < 24 sts> (See Photo 1)
NOTES
General Notes
- Beginning chs and turning chs do not count as sts.
- All rounds are joined with a slst to the first st of the round.
- For the mitten tops, my testers found that finger lengths varied greatly. If from knuckles to fingertip, your measurement is:
3 inches, you will need a total of 15 rows
3.5 inches, you will need a total of 18 rows
4 inches, you will need a total of 20 rows
4.5-5 inches, you will need a total of 24 rows
Notes for Rounds
- For all rounds join to first st with a slst unless indicated to work in the round
- 1st st in same st as join
- Beginning ch never counts as a st
Notes for Rows
- 1st ST in same ST as turn
- Beginning Ch never counts as a stitch
- CH indicated # and Turn
PATTERN
Right hand mitten
Round 1: fsc 28 (32, 36), join < 28 (32, 36) st>
Note: be sure to join the chain side of your foundation row as well
Round 2: ch1, *(6 (7, 8) sc, sc inc), rep from * around, join < 32 (36, 40) st>
Round 3 – 4: ch1, sc around, join < 32 (36, 40) st>
Round 5: slst to BLO, ch1, sc around in BLO, join < 32 (36, 40) st>
Round 6: ch1, sc around, join < 32 (36, 40) st>
Switch to G/4.0mm hook
Round 7: slst to back ridge, ch2, 0 (2, 4) dc, work 2 pleats, 16 (18, 20) dc, join < 64 (68, 72) st>
Switch back to size 7/4.5mm hook
Rounds 8 (8, 8) – 8 (10, 12): ch2, TURN, dc around, join < 64 (68, 72) st>
Rows 9 (11, 13) – 11(13, 15): ch2, TURN, dc around, do NOT join < 64 (68, 72) st>
Round 12 (14, 16): ch2, TURN, dc around, join < 64 (68, 72) st>
Round 13 (15, 17): ch1, TURN, 0 (2, 4) sc, then bring your pleats back together by placing a sc through all three layers of stitches, (this should lay the pleats in the exact same fashion as they began, forming perfect box pleats), 16 (18, 20) sc, join < 32 (36, 40) st>
Round 14 (16, 18): ch1, do NOT turn, sc around, join < 32 (36, 40) st>
Round 15 (17, 19): ch1, do not turn, *(6 (7, 8) sc, sc dec), rep from * around, join < 28 (32, 36) st>
Round 16 (18, 20): ch1, do NOT turn, sc around, join < 28 (32, 36) st>
Round 17 (19, 21): ch2, dc around in BLO < 28, (32, 36) st>
Round 18 (20, 22) – Round 22 (24, 26): ch2, *(fpdc, bpdc), rep from * around < 28, (32, 36) st> Finish off.
Left hand mitten
Round 1: fsc 28 (32, 36), join < 28 (32, 36) st>
Note: be sure to join the chain side of your foundation row as well
Round 2: ch1, *(6 (7, 8) sc, sc inc), rep from * around, join < 32 (36, 40) st>
Round 3 – 4: ch1, sc around, join < 32 (36, 40) st>
Round 5: slst to BLO, ch1, sc around in BLO, join < 32 (36, 40) st>
Round 6: ch1, sc around, join < 32 (36, 40) st>
Switch to G/4.0mm hook
Round 7: ch2, 16 (18, 20) dc through both loops, work 2 pleats, 0 (2, 4) dc through both loops, join < 64 (68, 72) st>
Switch back to size 7/4.5mm hook
Rounds 8 (8, 8) – 8 (10, 12): ch2, TURN, dc around, join < 64 (68, 72) st>
Rows 9 (11, 13) – 11 (13, 15): ch2, TURN, dc around, do NOT join < 64 (68, 72) st>
Round 12 (14, 16): ch2, TURN, dc around, join < 64 (68, 72) st>
Round 13 (15, 17): ch1, TURN, 16 (18, 20) sc, then bring your pleats back together by placing a sc through all three layers of stitches (this should lay the pleats in the exact same fashion as they began, forming perfect box pleats), 0 (2, 4) sc, join < 32 (36, 40) st>
Round 14 (16, 18): ch1, do NOT turn, sc around, join < 32 (36, 40) st>
Round 15 (17, 19): ch1, do not turn, *(6 (7, 8) sc, sc dec), rep from * around, join < 28 (32, 36) st>
Round 16 (18, 20): ch1, do NOT turn, sc around, join < 28 (32, 36) st>
Round 17 (19, 21): ch2, dc around in BLO < 28, (32, 36) st>
Round 18 (20, 22) – Round 22 (24, 26): ch2, *(fpdc, bpdc), rep from * around < 28, (32, 36) st>
Finish off.
Thumb
add to each mitten
Round 1: Join yarn to bottom of thumb hole, sc around, placing 2 sc along each dc post, join with a sc to the 1st sc and work in the round using a stitch marker for rounds < 16 (20, 24) st>
Round 2: sc dec, 5 (7, 9) sc, 2 sc inc, 5 (7, 9) sc, sc dec < 16 (20, 24) st>
Round 3: sc dec, 2 sc, sc dec, 1 (3, 5) sc, 2 sc inc, 1 (3, 5)sc, sc dec, 2 sc, sc dec < 14 (18, 22) st>
Round 4: sc dec, 1 (3, 5) sc, sc dec, sc, 2 sc inc, sc, sc dec, 1 (3, 5) sc, sc dec < 12 (16, 20) st>
Round 5: sc dec, 1 (3, 5) sc, sc dec, 2 sc inc, sc dec, 1 (3, 5) sc, sc dec < 10 (14, 18) st>
Round 6 – Round 7 (8, 9): sc around < 10 (14, 18) st>
Finish off.
Mitten top
Make 2 with size 7/4.5mm hook
Round 1: fsc 32 (36, 40) join < 32 (36, 40) st>
Note: be sure to join the chain side of your foundation row as well
Round 2: ch1, *[2 (3, 4) sc, **(ch2, sk 2st, 3 sc) rep from ** twice, ch2, sk 2st, 2 (3, 4) sc], rep from * 2 times. You should have 6 small “button holes” < 32 (36, 40) st>
Round 3 – Round 21 (25, 29): crocheting in the round now and using a st marker for rounds: sc around < 32 (36, 40) st>
Round 22 (26, 30): *( 6 (7, 8) sc, sc dec), rep from * 4 times < 28 (32, 36) st>
Round 23 (27, 31): sc dec around < 14 (16, 18) st>
Round 24 (28, 32): sc dec around < 7 (8, 9) st>
Finish off leaving a long tail. Weave the tail through the last round of sts and pull closed.
FINISHING
- Weave in ends.
- Add buttons to the glove right above where you left the FLO showing in R5 spaced evenly apart, three on the front and three on the back.
- Using ribbon or yarn create “bows” or “X’s” with the box pleats by cinching the pleats in the middle; for an extra pop, add a button to the middle of the “X”.
I hope you enjoyed The Xanadu Texting Mittens. You can purchase the entire Xanadu Series – 6 patterns- at 50% off HERE

Stay tuned for more contributor posts by Sick ‘Lil Monkeys. In the meantime…
Check out all their patterns on Ravelry


Kelli Wohlgemuth is the owner of SICK ‘LIL MONKEYS. She has been crocheting for 24 years. Her favorite things to design are items for little girls to play with or wear, patterns that allow you to incorporate graphs, and sometimes women’s fashion items. She also carries a line of ergonomically comfortable polymer clay crochet hooks. You can find her on Facebook and Ravelry. Also check out their Ergonomic Pearl Bubble Crochet Hooks on Etsy.


