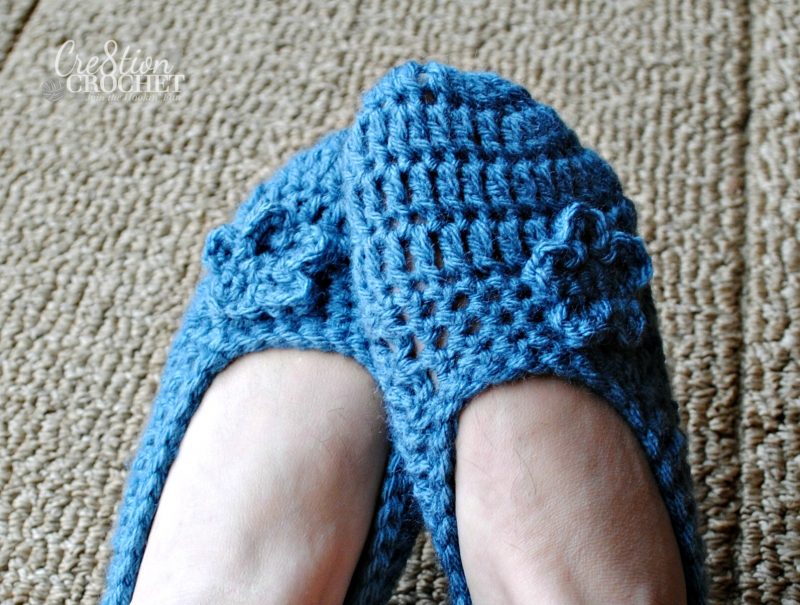
Fitted Slippers Crochet Pattern
I’m always excited when I have another free pattern to offer but I’m really proud of this one… maybe because when I first started making this it was the first time I had ever attempted a slipper or maybe it is because I had so many starts trying to perfect this cre8tion. I believe I have done it… I hope you agree.
This pattern is probably best for someone who has not just started out since there are quite a few increases and decreases and it is very detailed, but if you follow close attention and learn the necessary stitches then I’m sure anyone could make it. As always feel free to email me at [email protected] if you have any questions or need help.
I created this pattern because after following a slipper pattern I recently came across, I just wasn’t happy with the way it was turning out. A quick slipper pattern search proved to be more of the same. I wanted a slipper with a defined heel. Some other benefits to my pattern are that the toe and heel are more reinforced, it has an actual sole and sides, and the slipper holds its shape. I know that when I sell my items or give them away as gifts that I want them to look like their intended use. I just didn’t like the way the other slippers looked when they were not on my feet. My slipper is also made in one piece and does not require a fasten off except for at the end. And as an added bonus they can be easily adjusted to make different slipper sizes.
This pattern was designed for women’s size 7-8 but can be easily adapted to fit any size foot… see note at end of pattern for size changes and decoration ideas.
See this helpful post on Ladies Shoe Sizes by Pattern Paradise.

Check out this post more slipper options for other designs and information on making these slippers
Skill Level: Intermediate
Abbreviations and stitches used:
– magic circle– magic circle/ring (click on link for a tutorial on the magic circle/ring)
– ch– chain.
– sc– insert hook, yo <2 loops on hook> yo, pull through both loops
– hdc– yo, insert hook, yo, pull through <3 loops on hook> yo, pull through all three loops
– dc– yo, insert hook, yo, pull through <3 loops on hook> yo, pull through 1st 2 loops on hook, yo <two loops on hook> yo, pull through both loops on hook.
– st(s)– stitch(es)
– Sl st– insert hook, yo, pull through, <2 loops on hook> pull 1st loop through 2nd loop
– dec2tog=
In SC- insert hook, yo, pull through <2 loops on hook> insert hook, yo, pull through <3 loops on hook> yo, pull through all three loops
In DC- insert hook, yo, pull through <2 loops on hook> insert hook, yo, pull through <3 loops on hook> yo, pull through first 2 loops, yo, pull through last 2 loops
– dec3tog= insert hook, yo, pull through <2 loops on hook> insert hook, yo, pull through <3 loops on hook> insert hook, yo, pull through <4 loops on hook> yo, pull through all four loops
Materials:
Size 4.0mm hook
Medium or worsted weight yarn (I used Vanna’s Choice but RedHeart would work just as well)
one skein of Vanna’s will make one pair of slippers. You can make 3 pairs with one skein of Red Heart
Tapestry needle for weaving in end
4 stitch markers- optional
Notes:
-Be sure not to make your sl st’s too tight in entire pattern- but they must not be loose during the final edging.
-IF you have obvious seams you can “hide” this by making the seams be on the inside of either slipper… at the end of Rnd 7, the directions say ch 2 and turn. Make one this way and make the other one by doing, ch 2 and continue to crochet in that direction. This way your seams will be on opposite sides and you can make it the inside of each finished slipper. The way I avoid seams in this project is to NOT chain 2 to start my rounds. I simply make the dc in the 1st space and sl st into it at the end of each round to complete the round. You can see in my picture at the end of Rnd 6 that the seam is barely noticeable.
-For a more contoured look, you can make the sides of the slipper indent by intermingling hdc or sc along sides and keeping dc along the back.
Pattern:
Round 1 – Magic circle 5sc, join with sl st

Round 2 – 2sc in each st, join with sl st <10sc>

Round 3 – 2dc in each st, join with sl st <20dc>

Round 4 – dc in each st, with 2dc in every 4th st* repeat all the way around, join with sl st <25dc>
Rounds 5 thru 6 – dc in every st, join with sl st <25dc> ch 3 turn*

You are now working in ROWS instead of ROUNDS
*From here on you will ch3 at the end of every row and it is assumed that 1st dc in each row is the turning ch 3 from previous row.
Row 7 – turning ch counts as 1st dc, 12 more dc <13dc total>
Row 8 – 13 dc
Row 9 – 5dc, dec2tog in 6th st, dc to end <12dc total>
Row 10 – 4dc, dec2tog in 5th st, dc to end <11dc total>
Row 11 – 4dc, dec2tog in 5th, dc to end <10dc>
Row 12 – 10dc

Rows 13 thru 14 – 10 sc
Row 15 – sc in each st with 2 sc in 5th st <11sc>
Row 16 – sc in each st with 2sc in 6th st <12sc>
Row 17 – sc in each st with 2sc in 7th st <13>
Row 18 – 13sc
Row 19 – sc in every stitch BUT sl st instead in sts 7&8 <13 total stitches (11sc, 2sl st)>
Row 20 – sc in every st BUT sl st instead into sts 6,7,8 &9 <13 total stitches (9sc, 4sl st)>
Row 21 – sc in every st BUT sl st instead into sts 4-10 <13 total stitches (6sc, 7 sl st)>
at the end of this row you will have a “u” shaped indent in top of rows

Row 22 – sc in every st BUT dec2tog for sts 3&4, 5&6, 7&8, 9&10, 11&12 <8sc>
Row 23 – sc in every st BUT dec2tog for sts 2&3, 4&5, 6&7 <5sc>
Row 24 – with only 5 sts left you will dec3tog and dec2tog- this will give you your heel and complete basic slipper sole and toe shape.

2nd Round 1 (row 25) – Sc around entire outside perimeter of slipper, you will be doing this blindly but it will be approx. 1sc for every sc st and 2sc for every dc st that you are stitching in to. Be sure to insert hook under at least two strands of yarn so that you don’t get “holes” around the stitches, but try not to go through too many strands or it will look sloppy.

-Before moving on to next step determine these two points- 1) The most narrow part of the slipper (which should be between the last dc row and 1st sc row of sole) AND 2) the desired width of toe section, paying mind to the two corners where toes meet sides. In each subsequent round, you will be placing a dec2tog at these 4 places. It may be easier to mark these points with stitch markers.
2nd Round 2 (row 26) – dc around back and sides of slipper, at most narrow part dec2tog. Skip ONE stitch right before the stitch where you will dec2tog at 1st corner of toe section. Sc across toe section and skip ONE stitch right before where you will dec2tog in 2nd corner of toe section. (*if you can’t figure that step out or where to skip the one step then just dec2tog in corner, the finished look will only be slightly different and will still look nice)
2nd Rounds 3 thru 4 (rows 27-28) – dc around back and sides of slipper, at most narrow part dec2tog (starting the dec2tog stitch in the stitch that was created with the dec2tog of the previous row. Dec2tog at 1st corner of toe section, sc across toe section, dec2tog at 2nd corner.
2nd Round 5 (row 29) – sl st around entire perimeter of slipper and fasten off. Finish off beginning magic circle by weaving in ends.

You have now completed one slipper… repeat steps for 2nd slipper. Embellish any way you like… some ideas are:
-Run ribbon through perimeter and tie in cute bow in front
-Attach a flower (or two or three) to top of toe- small flower pattern
-Make into an Owl face by adding two eyes (either crocheted or buttons) and a beak
-Add buttons to the top of toe
Or you can use two different colors in any combo, some ideas are:
-Make toe and sole one color and sides and back another color (change colors after Row 26)
-If you make an Owl face to finish then it looks cute if you make the toe one color and the rest of slipper another color (change color after Round 7)
Different Sizes
For every shoe size decrease (6-7, 5-6 etc) simply decrease 2 stitches in rounds 5-7, and decrease one round completely for every shoe size lower (remember to subtract a 1 from every subsequent row when finishing pattern). Also decrease 1 stitch in all subsequent rows (1 stitch for each shoe size lower). You may also need to omit Row 12 completely (if you do then you will need to subtract another 1 from each row for the rest of the pattern)
For every shoe size increase (8-9, 9-10, 11-12) add two stitches to rounds 5-7, increase one row (so you will have rows 5-8 and remember to add a 1 to every subsequent row when finishing pattern). You will also add 1 stitch for every shoe size increase in the rest of the rows. You may also need to repeat Row 12 (also remember to add a 1 to every subsequent row when finishing pattern)
The best way to change size is to measure to your own foot. Email me with any questions at [email protected]
This pattern is also available as a PDF for the cost of $2. This fee is to offset revenue lost when the pattern is printed and a visit to this site is not required. Click HERE to go to Ravelry.
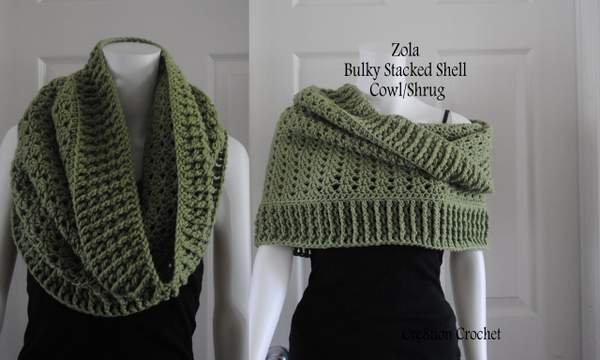
You may also enjoy…
Zola Bulky Stacked Shell Cowl/Shrug
You can find all my FREE crochet patterns here