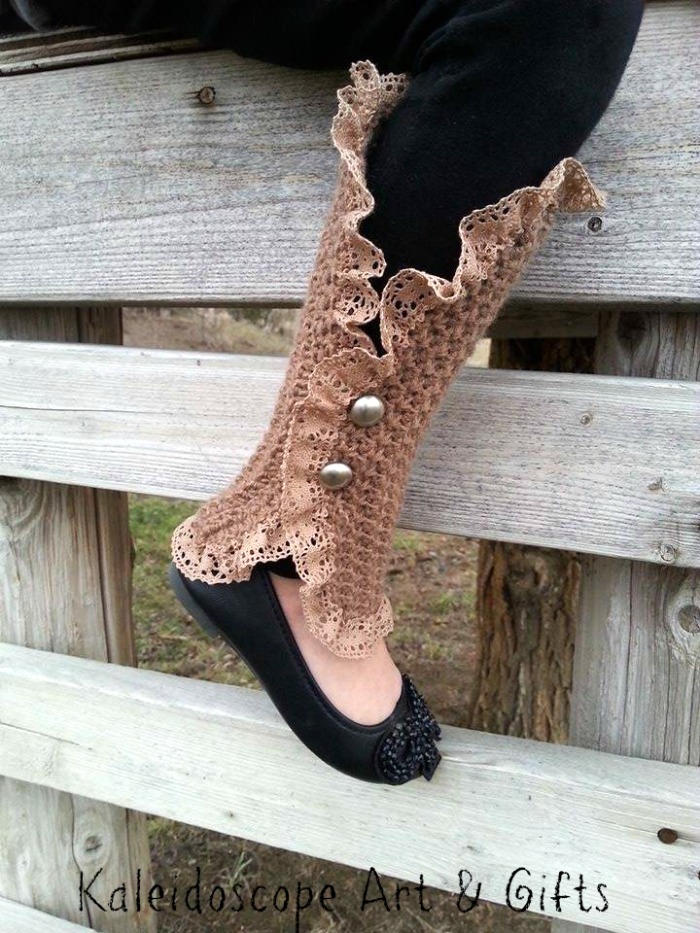
Mara Legwarmer Spats
This free crochet leg warmers pattern, the Mara Legwarmer Spats are versatile and feminine with a timeless feel to them that can be translated from romantic Victorian inspired to edgy Steampunk inspired, depending on the colors and embellishments used. Wear them with delicate flats or over boots. There are other coordinating items in the Mara Collection, these are currently available in an exclusive pre sale offer on Ravelry.
This pattern was designed by Lisa Jelle of Kaleidoscope Art&Gifts, exclusively for Cre8tion Crochet
- This post may contain affiliate links
- By using this pattern you agree to the Pattern Terms of Use set forth by Kaleidoscope Art&Gifts- This pattern is the intellectual property of Lisa Jelle/Kaleidoscope Art&Gifts. Rewriting, reselling, distributing, or copying this pattern as your own, and/or without my consent is prohibited. If you wish to sell finished items produced from this pattern, feel free to do so. However, I ask that you please credit me as the pattern designer and link back to me as follows: Pattern by Lisa Jelle/Kaleidoscope Art&Gifts. Facebook, Etsy, Ravelry.
Click HERE to add this pattern to your Ravelry Favorites
Click HERE to Pin It for later
YARN
DK (#3) light worsted weight. Approx 400yds(child)/600yds(PreTeen-Adult Med)/800yds(Ad Lg-Ad XL)
MATERIALS
H/8 (5.0 mm) hook, tapestry needle, scissors, tape measure, sewing needle and thread, decorative buttons (approx 35mm, quantity 1 or 2 PER legwarmer), 1”-1 ½” lace (6yds for child, 8yds for PT-Ad Med, 10yds for AD Lg-Ad XL), OPTIONAL 4 sets of hooks & eyes (to keep top and bottom of legwarmer closed)
DIFFICULTY
Easy
SIZE(S)
Child Small(4y-8y)=approx 10” tall
PreTeen-Adult Med=approx 11” tall
Adult Lg-Adult XL=approx 12” tall
GAUGE
10sts x 8 rows= 2”x2” square swatch
STITCH GUIDE
ch(s) – chain(s), sc – single crochet, sc2tog – single crochet TWO together(decrease), sc3tog – single crochet THREE together (decrease), st(s) – stitch(es), sl st – slip stitch
SPECIAL STITCHES
This pattern uses a stitch called the Rocking Stitch, which is a combination of ch1 spaces and sc2tog/sc3tog stitches. No additional techniques are required.


INSTRUCTIONS
Child(4y-8y)
Ch50
Row 1: sc2tog over the 2nd st from hook and the next st, *ch1, sc3tog over previously worked st and next two sts*, repeat from *-* across until one st remains, ch1, sc2tog over previously worked st and last st (49sts)

Row 2: ch1, turn, sc2tog over first st and next ch1 SPACE, *ch1, sc3tog over previously worked ch1 SPACE, next st and next ch1 SPACE*, repeat from *-* across until one st remains, ch1, sc2tog over previously worked ch1 SPACE and last st (49sts)
Repeat R2 until piece measures approximately: 6” wide for 4y-6y, 8” wide for 7y-8y. Do NOT fasten off. Proceed to ‘Finishing Rows’.
PreTeen-Adult Medium
Ch58
Row 1: sc2tog over the 2nd st from hook and the next st, *ch1, sc3tog over previously worked st and next two sts*, repeat from *-* across until one st remains, ch1, sc2tog over previously worked st and last st (57sts)
Row 2: ch1, turn, sc2tog over first st and next ch1 SPACE, *ch1, sc3tog over previously worked ch1 SPACE, next st and next ch1 SPACE*, repeat from *-* across until one st remains, ch1, sc2tog over previously worked ch1 SPACE and last st (57sts)
Repeat R2 until piece measures approximately: 10” wide for PreTeen&Ad.SM, 11 ½” wide for Ad.Med. Do NOT fasten off. Proceed to ‘Finishing Rows’.
Adult LG-Adult XL
Ch66
Row 1: sc2tog over the 2nd st from hook and the next st, *ch1, sc3tog over previously worked st and next two sts*, repeat from *-* across until one st remains, ch1, sc2tog over previously worked st and last st (65sts)
Row 2: ch1, turn, sc2tog over first st and next ch1 SPACE, *ch1, sc3tog over previously worked ch1 SPACE, next st and next ch1 SPACE*, repeat from *-* across until one st remains, ch1, sc2tog over previously worked ch1 SPACE and last st (65sts)
Repeat R2 until piece measures approximately: 14” wide for Ad.LG, 17” wide for Ad.XL. Do NOT fasten off. Proceed to ‘Finishing Rows’.
FINSHING ROWS (all sizes)
F.Row 1: turn (NO chain), sc2tog over previously worked st and next ch1 SPACE, sc3tog(do NOT ch1 first) over previously worked ch1 SPACE, next st and next ch1 SPACE, *ch1, sc3tog over previously worked st and next two sts*, repeat from *-* until three sts remain, sc3tog(do NOT ch1 first) over previously worked st and next two sts, sc2tog(do NOT ch1 first) over previously worked st and last st
F.Row 2: : turn (NO chain), sc2tog over previously worked st and next st, sc3tog(do NOT ch1 first) over previously worked st and next two sts, *ch1, sc3tog over previously worked st and next two sts*, repeat from *-* until three sts remain, sc3tog(do NOT ch1 first) over previously worked st and next two sts, sc2tog(do NOT ch1 first) over previously worked st and last st
F.Row 3: repeat F.Row2
F.Row 4: turn piece 90 degrees clockwise (COUNTERCLOCKWISE for LEFT handed), sc in ends of rows until you reach the next corner, turn piece 90 degrees clockwise (COUNTERCLOCKWISE for LEFT handed)
F.Row 5: repeat F.Row1
F.Rows-7: repeat F.Row2
F.Row 8: repeat F.Row4, fasten off and weave in ends
FINISHING DETAILS
ATTACHING LACE EDGING
- With ‘right side’ facing you line up end of lace in the center of the long side (overlapping the crocheted edge by about 1/8”-1/4”), pin in place
- With sewing needle and thread, stitch the lace on to the edge all the way around (slightly gathering the lace, but not the crocheted edge, as you go), when you reach the starting end of the lace cut lace and stitch ends together. Fasten off and weave in ends.
ADDING BUTTONS
- Fold one long side 1/3 lengthwise , fold the OTHER long side 1/3 lengthwise overlapping the bottom layer so that the crocheted edges touch
- Sew one button in the center where the layers overlap (be sure to sew THROUGH both layers)
- Add additional buttons if you like for decoration purposes or to keep top and bottom closed tighter without using the hooks and eyes
ADDING HOOKS & EYES (optional)
- Sew ‘hook’ piece to underside (wrong side) of top layer approximately 3” from top edge, sew ‘eye’ piece to top side (right side) of bottom layer approximately 3” from top edge.
- Repeat these steps approximately 3” from the BOTTOM edge if you wish to close up the bottom of the legwarmer tighter.

I hope you enjoyed the Mara Legwarmer Spats pattern.
Check out all other contributor patterns by Kaleidoscope Art&Gifts.
Pre Order the entire Mara Collection ebook here

 Lisa Jelle is the owner of Kaleidoscope Art&Gifts. She has been crocheting (since restarting as an adult) for 6 years. Her favorite things to design are ‘outside of the box’ things you don’t expect to see in crochet. You can find her on Facebook and Ravelry. Lisa Jelle is the owner of Kaleidoscope Art&Gifts. She has been crocheting (since restarting as an adult) for 6 years. Her favorite things to design are ‘outside of the box’ things you don’t expect to see in crochet. You can find her on Facebook and Ravelry. |


