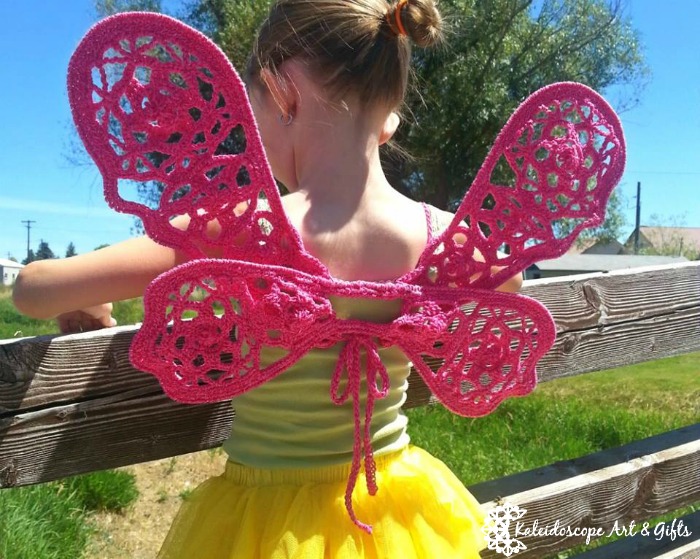
Enchanted Ivy Wings
Does she yearn for secret forests where one can hear the melodic whispers of woodland fairies? Does she pretend to be a fairy princess on her first magical adventure? These Enchanted Ivy Wings will get her to wherever her imagination leads…..the possibilities for fun are endless!
This pattern was designed by Lisa Jelle of Kaleidoscope Art&Gifts, exclusively for Cre8tion Crochet
- This post may contain affiliate links
- By using this pattern you agree to the Pattern Terms of Use set forth by Kaleidoscope Art&Gifts- This pattern is the intellectual property of Lisa Jelle/Kaleidoscope Art&Gifts. Rewriting, reselling, distributing, or copying this pattern as your own, and/or without my consent is prohibited. If you wish to sell finished items produced from this pattern, feel free to do so. However, I ask that you please credit me as the pattern designer and link back to me as follows: Pattern by Lisa Jelle/Kaleidoscope Art&Gifts. Facebook, Etsy, Ravelry.
Click HERE to add this pattern to your Ravelry Favorites
Click HERE to Pin It for later

YARN
#2/Fine weight yarn (approximately 200-300 yds)
MATERIALS
H/8(5mm)-F/5(3.75mm)-C/2(2.75mm) hooks
TEMPLATE for wings here –> Enchanted Ivy Wings Template only
when template is printed out, make sure to check the ‘gauge’ box included on each template page (which should measure 1″x1″ when printed out)
tapestry/yarn needle
stitch markers
measuring tape
14 gauge wire (approximately 12yds)
20 gauge wire (approximately 2yds)
needle nose pliers/wire nippers
DIFFICULTY
Intermediate
SIZE(S)
One size (finished wings measure approximately 19” wide and 14” tall)
GAUGE
5scs=1” wide
STITCH GUIDE
ch(s) – chain(s), sc – single crochet, sc2tog – single crochet two together(decrease), dc- double crochet, st(s) – stitch(es)
SPECIAL STITCHES
- dc-cl- double crochet cluster: [Yarn over, insert the hook into the indicated stitch, yarn over and draw up a loop, yarn over and draw through two loops on the hook] (specified number of times) in the same st, yarn over and draw through the remaining loops on the hook.
- dtr2tog- double treble/triple crochet two together (decrease): (Yarn over) 3 times, insert hook in indicated st and draw up a loop, (yarn over and draw through 2 loops on hook) 3 times; (yarn over) 3 times, insert hook in next indicated st and draw up a loop, (yarn over and draw through 2 loops on hook) 3 times; yarn over and draw through all loops on hook.
- Brynwood Hexagon motif (partial). Found in Robyn Chachula’s book ‘Crochet Stitches Visual Encyclopedia’:
Rnd 1 (right side): Make an adjustable ring. Ch2, 2 dc-cl in ring, [ch4, 3 dc-cl] into ring 3 times, ch1, dc in top of 2 dc-cl, pull ring closed, do not turn.
Rnd 2: Ch1, 4 sc around post of dc, 6sc in each ch4 SPACE around, 2sc in 1st ch SPACE, sl st to first sc, do not turn (24scs)
Rnd 3: Ch3 (counts as dc), dc in next 2 sc, [ch5, skip 1 sc, dc in next 3 sc] 5 times, ch2, dc in top of turning ch (counts as ch space), do not turn (18dcs)
Rnd 4: Ch1, 5sc around post of dc, skip turning ch, *sc in next dc, 9scs in next ch5 SPACE (arch made), skip 1 dc*, repeat from * – * around, sc in next dc, 4scs in 1st ch SPACE, sl st to 1st sc, do not turn (6 arches)
Rnd 5: Ch6 (counts as dc, ch3 space), dc in 1st st, *ch4, dtr2tog over previous sc and middle sc of next arch, ch4, [dc, ch3, dc] in same sc*, repeat from * – * around, ch4, dtr2tog over previous sc and middle sc of next arch, ch4, sl st to 3rd ch of turning ch, do not turn (18 ch SPACES)
Rnd 6: Ch1, *5scs in next ch SPACE, 4 scs in next ch4 SPACE, sc around dtr2tog, 4 scs in next ch4 SPACE*, repeat from * – * around, sl st to top of turning chain (84scs)
NOTES
- All “sc2tog” sts are worked INSIDE curves of wings (note: you can move the sts around on the wire frame after fastening off so that the decreases sit inside the curves)
- Wing template pages are included in the pattern, it is IMPERATIVE that you print them off WITHOUT resizing. There is a box on each template page that should measure 1”x1” square, if it doesn’t, your template will not print out the right size.
WINGS FRAME
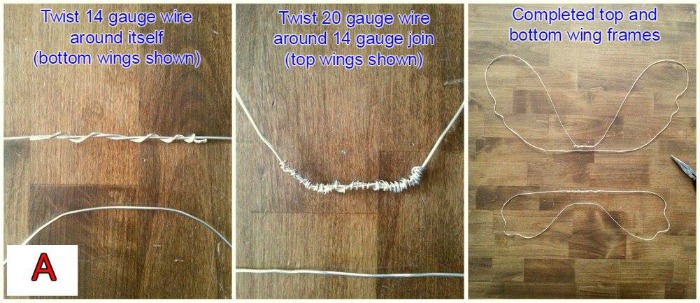
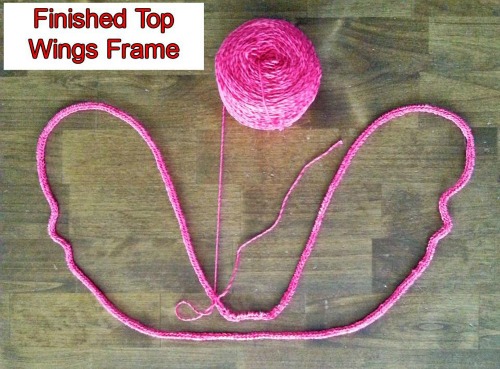
Step 1: Print out template pages, cut out pieces, match up pieces for “top wings” and tape together. Match up pieces for “bottom wings” and tape together. Use these templates to bend your 14 gauge (thicker diameter) wire around to achieve the correct shape (for both the top wings and bottom wings). (make note where the template says to start and end your wire so that the two ends overlap each other for frame strength) You now have two pieces of completed frame, one for the top wings and one for the bottom wings.
Step 2: Twist ends around each other (don’t worry if you distort the rest of the frame some, you can put the frame back on the template and reshape later). Using the 20 gauge wire (thinner diameter), nip off a piece approximately 8” long and wrap it around the overlapped/twisted ends of the thicker wire, being careful to cover all rough ends/edges <see pic A>. When the ends of the thicker wire are adequately covered, tuck end of thinner wire in so that it doesn’t poke out anywhere.
PATTERN
TOP WINGS (Using H hook)
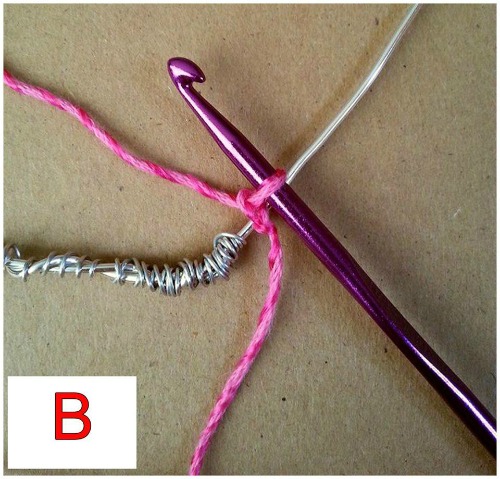
Holding wings upside down, attach yarn and begin working sts AROUND wire just to the right of where the wire ends have been joined <see pic B>
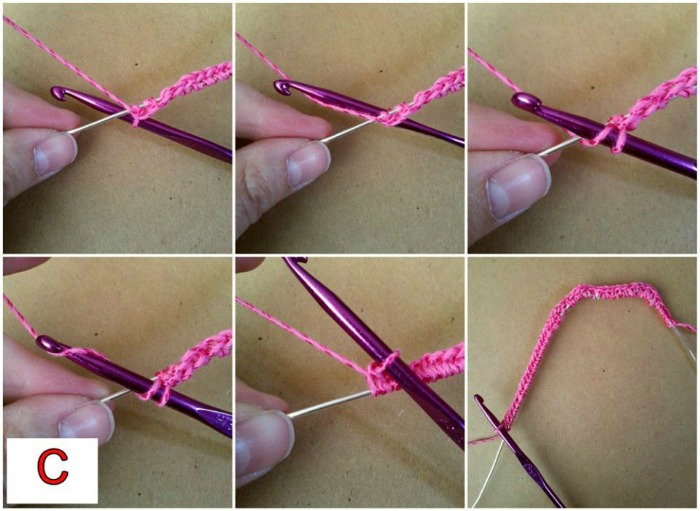
Round 1: ch1, sc AROUND wire <see pic C> 378 times, join w/sl st in first st (378sts)
Round 2: ch1, sc in same st, sc in next SIXTY-FOUR sts, *sc2tog, sc*, repeat from * – * over next FIFTY-ONE sts, sc in next NINE sts, repeat from * – * over the next TWELVE sts, sc in next EIGHTEEN sts, repeat from * – * over next TWENTY-ONE sts, sc in next FORTY sts, repeat from * – * over next TWENTY-ONE sts, sc in next EIGHTEEN sts, repeat from * – * over next TWELVE sts, sc in next NINE sts, repeat from * – * over next FIFTY-FOUR sts, sc in last FORTY-SIX sts, join w/sl st in first st (316sts), FASTEN OFF AND WEAVE IN ENDS
BOTTOM WINGS (Using H hook)
Holding wings upside down, attach yarn and begin working sts AROUND wire just to the right of where the wire ends have been joined (refer to pic B above)
Round 1: ch1, sc AROUND wire (refer to pic C above) 272 times, join w/sl st in first st (272sts)
Round 2: ch1, sc in same st, sc in next SEVENTY-TWO sts, *sc2tog, sc*, repeat from * – * over next SIX sts, sc in next FIVE sts, repeat from * – * over the next TWELVE sts, sc in next FIVE sts, repeat from * – * over next NINE sts, sc in next SIXTY sts, repeat from * – * over next NINE sts, sc in next FIVE sts, repeat from * – * over next TWELVE sts, sc in next FIVE sts, repeat from * – * over next NINE sts, sc in last THIRTY-NINE sts, join w/sl st in first st (252sts), FASTEN OFF AND WEAVE IN ENDS
MOTIFS
Using instructions provided at beginning of pattern create the following motifs:
Top wings: Two XL motifs (using F hook and all six rounds), two large motifs (using F hook and Rnds 1-4 only), two small motifs (using C hook and Rnds 1-4 only)
Bottom wings: Two medium motifs (using C hook and all six rounds), two small motifs (using C hook and Rnds 1-4 only)
NOTE: Fasten off and weave in ends after completing last round called for in each size as stated above.
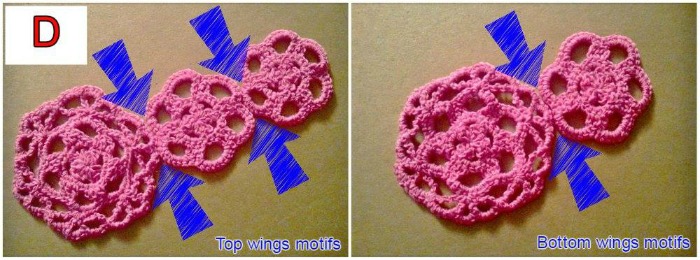
ASSEMBLE MOTIFS
Using tapestry needle and a length of yarn whip stitch motifs together as marked in tutorial pics. Fasten off and weave in all ends. <see pic D>
FINISHING
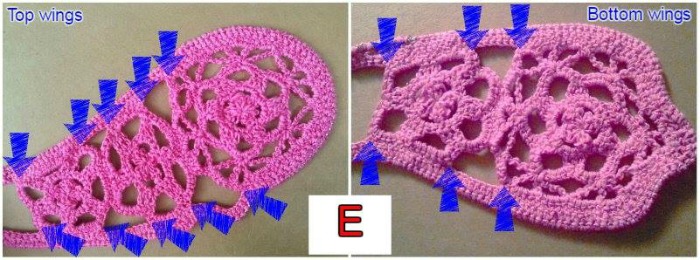
Attaching motifs to wing frames: Using tapestry needle and length of yarn whip stitch assembled motif pieces to the wire frames as marked in tutorial pics. <see pic E>
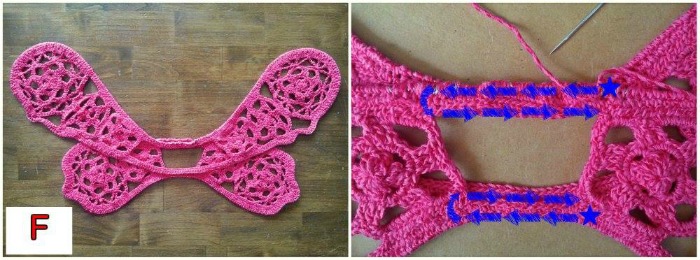
Connecting top and bottom wings: Place bottom wings frame right side down then place top wings frame right side down on top of them. <see pic F> Using tapestry needle and length of yarn whip stitch around upper wire frame edges of BOTH the top AND bottom wing frames, then turn and whip stitch through ‘stitches’ edge of BOTH the top AND bottom wing frames, fasten off and weave in ends (shown with blue arrows in pic F). Repeat for lower edges of frames.
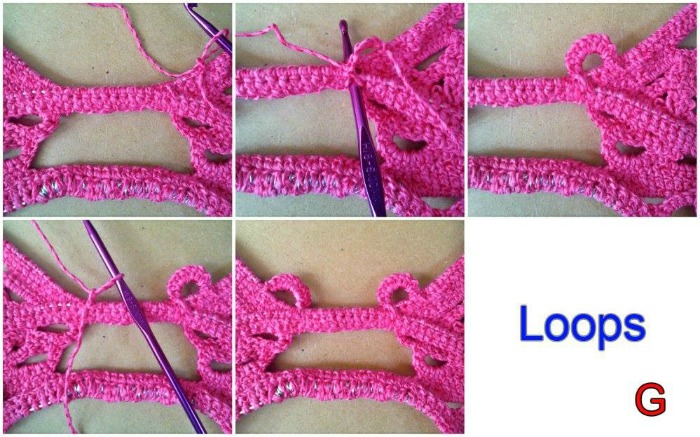
Adding the loops: (Using H hook) Attach yarn with slip stitch as shown in pic, ch4, sl st to frame (around both wire edges) as shown in pic, ch1, turn, 10 scs into ch4 SPACE, sl st where yarn was attached, fasten off and weave in ends. Turn wings over. REPEAT FOR 2ND LOOP. <see pic G>
Adding the ties: (Using H hook) Attach yarn with sl st as shown in pic <insert pic H>, ch115, sl st in 2nd ch from hook and across, sl st where yarn was attached, fasten off and weave in ends. Turn wings over. REPEAT FOR 2ND TIE.
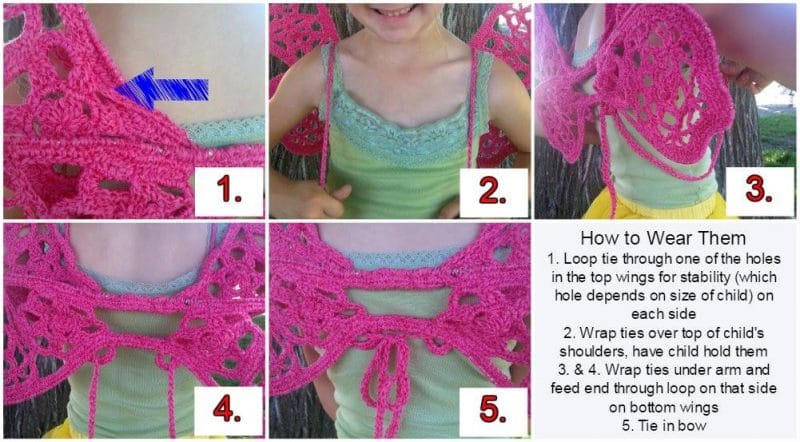
HOW TO WEAR THEM
I hope you enjoyed the Enchanted Ivy free crochet wings pattern
Check out all other contributor patterns by Kaleidoscope Art&Gifts.
 Lisa Jelle is the owner of Kaleidoscope Art&Gifts. She has been crocheting (since restarting as an adult) for 6 years. Her favorite things to design are ‘outside of the box’ things you don’t expect to see in crochet. You can find her on Facebook and Ravelry. Lisa Jelle is the owner of Kaleidoscope Art&Gifts. She has been crocheting (since restarting as an adult) for 6 years. Her favorite things to design are ‘outside of the box’ things you don’t expect to see in crochet. You can find her on Facebook and Ravelry. |


