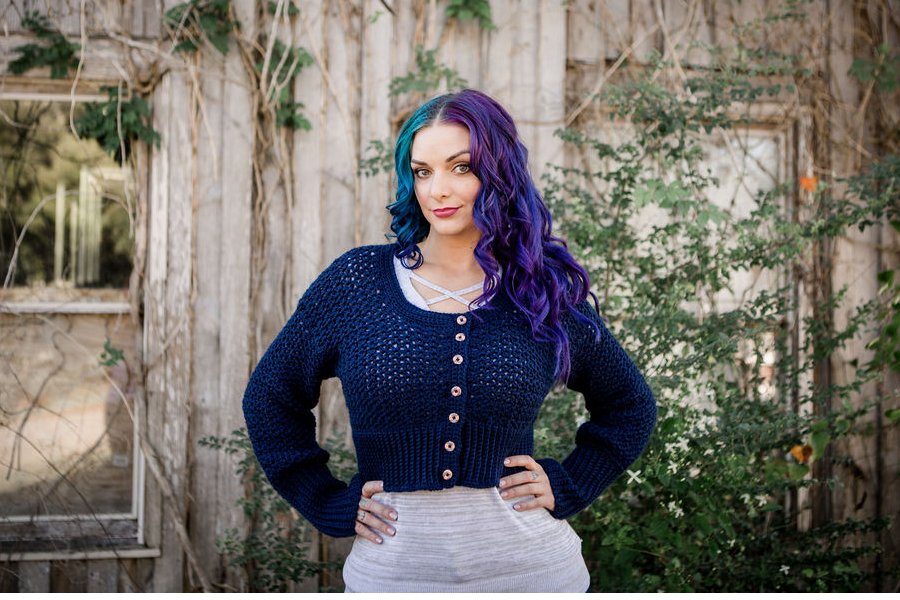
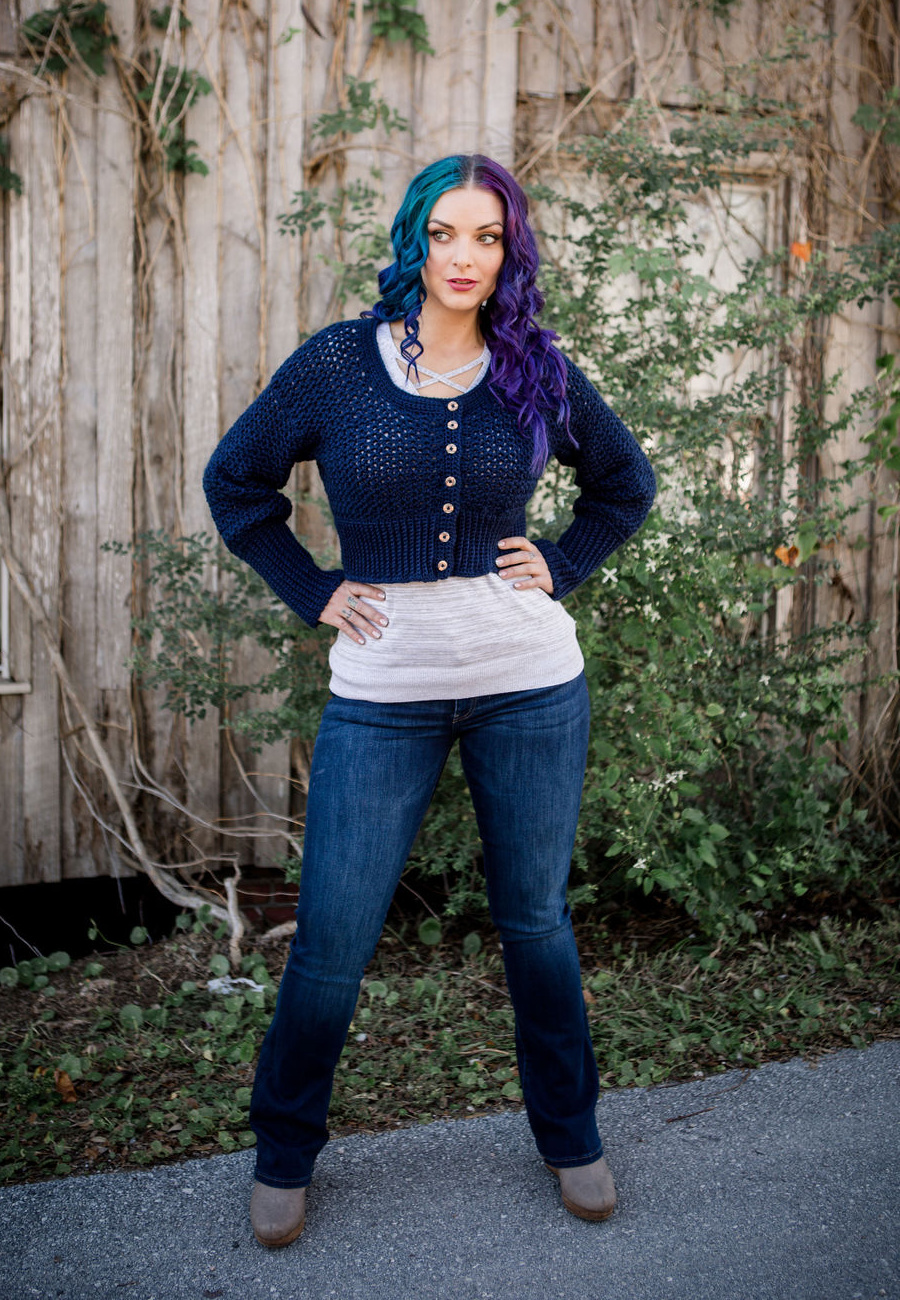
Layer the Starry Night Cropped Cardigan Crochet Pattern with your favorite fall top for those cool days when a simple cropped cardigan is all you need. The simple neckline and buttoned edge strikes the perfect balance to the bold, ribbed waist and ribbed sleeve cuffs. This cropped cardigan is worked simple, from the bottom up with seaming at the shoulders and sleeves attached while using a beautiful v-stitch combination as the center focus piece.
This post contains affiliate links. You can click on any yarn or material highlighted to purchase
By using this pattern you agree to the Pattern Terms of Use set forth by Cre8tion Crochet
MATERIALS NEEDED
Yarn
Mighty Stitch by at WeCrochet– #4 weight- 80% Acrylic 20% Superwash Wool
4 (5, 5, 6, 7, 7, 8, 9, 10) Skeins. Sample uses Navy.
OR
810 (899, 999, 1120, 1255, 1404, 1573, 1760, 1972)
Yards of comparable weight yarn
Hook
J/6.0mm, I/5.5mm and G/4.0mm crochet hooks, or hooks needed to obtain gauge
STITCH GUIDE
ch(s) – chain(s), sc – single crochet, hdc – half double crochet, st(s) – stitch(es), RS – right side, WS – wrong side, sl st – slip stitch
SPECIAL STITCHES
Fsc- Foundation Single Crochet – Tutorial
Ch 2, insert hook in first ch, *yarn over (YO) and pull up loop (2 loops on hook), YO and pull through one loop, creating a chain, (this is an important step but easy to forget). YO and pull through two re-maining loops on hook. This completes the first fsc. To stitch the next fsc insert the hook into the chain made in the first fsc and repeat from * to desired length or until the desired amount of sts are achieved.
GAUGE
With J/6.0mm hook, or hook needed to obtain gauge
5 repeats (or 15 sts) and 10 rows = 4”
Gauge Pattern
Row 1: Fhdc 25, ch 2, turn
Row 2: 2 hdc in first st, *skip 2 sts, [hdc, ch 2, hdc] in next st, repeat from * until 3 sts remain, skip 2 sts, 2 hdc in last st, ch 2, turn work. <7 Vsts with 2 hdc on both ends>
Row 3: 2 hdc in the first st, *skip the next 2 sts, [hdc, ch 2, hdc] in the ch-2 sp, repeat from * until all the ch-2 sps are worked, skip the next 2 sts, 2 hdc in the last st, ch 2, turn work.
Repeat Row 3: Until swatch measures 6” tall
SIZING INFORMATION
To Fit
XS (S, M, L, 1x, 2x, 3x, 4x, 5x)- follows CYC standards
Design Measurements
Bust
30 (34, 38, 42, 46, 50, 54, 58, 62)”
Waist
28 (31, 34, 38, 42, 46, 49, 52, 55)”
Underarm Depth
6.5 (7, 7.5, 8, 8.5, 9, 9.5, 10, 10.5)”
Sleeve Length
17 (17.5, 17.5, 18, 18, 18.5, 18.5, 19, 19)”
Total Length
17” all sizes (can be adjusted)
NOTES
- Pattern is written in size XS with changes for S-5X in parenthesis. If only one number is shown it pertains to all sizes.
- Beginning ch-2 of each round/rnd is not considered a st.
- St counts take place at the end of each rnd where a change takes place.
CONSTRUCTION
This design is designed bottom up, working the ribbing first. Vsts are then worked long edge of ribbing evenly. You will split for sleeves, creating two front panels and a back panel. The shoulders are then seamed. Sleeves are worked into the sleeve openings, in the round with no decreases, ribbing is added in rows to the bottom, creating a slight balloon sleeve. Final edging is added with button holes.
PATTERN- Begin with J/6.0mm hook
Ribbing
Row 1: Fsc 16, ch 1, turn work OR Ch 17, turn work, sc in 2nd ch from hook, sc in each ch to end, turn work. <16>
Row 2: Sc in first st, sc blo next 14 sts, sc last st, ch 1, turn work. <16>
Repeat Row 2: To a total of 112 (124, 139, 157, 172, 187, 202, 214, 229) rows.
Body- begins new row count
Row 1 (RS): Sc evenly across the unfinished end on the long side of the completed ribbing. Place one sc at the end of each row of the ribbing, ch 2, turn work. <112 (124, 139, 157, 172, 187, 202, 214, 229)>
Row 2: 2 hdc in the first st, *skip 2 sts, [hdc, ch 2, hdc] in the next st (one Vst made), repeat from * until 3 sts remain, skip 2 sts, 2 hdc in the last st, ch 2, turn work. <36 (40, 45, 51, 56, 61, 66, 70, 75) Vsts with 2 hdc on both ends>
Row 3: 2 hdc in the first st, *skip the next 2 sts, [hdc, ch 2, hdc] in the ch-2 sp, repeat from * until all the ch-2 sps are worked, skip the next 2 sts, 2 hdc in the last st, ch 2, turn work.
Repeat Row 3: To a total of 17 (15, 13, 13, 11, 9, 9, 7, 7) Rows; 16 (14, 12, 12, 10, 8, 8, 6, 6) rows of Vsts). This will give you a cropped length. If you would like the bottom of your cardigan to come to the top of your hips you can add 10 additional rows of Vsts.
Split for Sleeves- begins a new row count
Front Panel #1
Row 1: 2 hdc in the first st, *skip the next 2 sts, [hdc, ch 2, hdc] in the ch-2 sp, repeat from * 8 (9, 11, 12, 14, 15, 16, 17, 19) times, skip next 2 sts, hdc in the next ch-2 sp, hdc in the next st, ch 2, turn work. <9 (10, 12, 13, 15, 16, 17, 18, 20) Vsts with 2 hdc on both ends>
Row 2: 2 hdc in the first st, *skip the next 2 sts, [hdc, ch 2, hdc] in the ch-2 sp, repeat from * until all the ch-2 sps are worked, skip the next 2 sts, 2 hdc in the last st, ch 2, turn work.
Repeat Row 2: To a total of 7 (7, 9, 11, 11, 13, 13, 15, 15) rows (in the front panel).
Indent for Neck- continues with same row count
Next Row: 2 hdc in the first st, *skip the next 2 sts, [hdc, ch 2, hdc] in the ch-2 sp, repeat from *
3 (4, 6, 7, 8, 9, 10, 11, 13) times, skip 2 sts, hdc in the next ch-2, hdc in the next st, ch 2, turn work. <4 (5, 7, 8, 9, 10, 11, 12, 14) Vsts with 2 hdc on both ends>
Next Row: 2 hdc in the first st, *skip the next 2 sts, [hdc, ch 2, hdc] in the ch-2 sp, repeat from * until all the ch-2 sps are worked, skip the next 2 sts, 2 hdc in the last st, ch 2, turn work.
Repeat previous row: 7 (8, 8, 7, 8, 7, 9, 8, 9) times more.
Fasten off. You will have a total of 16 (17, 19, 20, 21, 22, 24, 25, 26) Rows
Back Panel- begins a new row count
Lay your work down so that the first front panel worked is on your dominant hand side (right side for right-handed and left side for left-handed). Leave 2 (2, 2, 3, 3, 3, 4, 4, 4) Vsts/ch-2 sps unworked. Join yarn in the st before the next Vst/ch-2, ch 2.
Row 1: Hdc in the joined st, hdc in the next ch-2 sp, *skip the next 2 sts, [hdc, ch 2, hdc] in the ch-2 sp, repeat from * 9 (11, 12, 14, 15, 18, 19, 21, 22) times, skip 2 sts, hdc in the next ch-2, hdc in the next st, ch 2, turn work. <10 (12, 13, 15, 16, 19, 20, 22, 23) Vsts with 2 hdc on both ends>
Row 2: 2 hdc in the first st, *skip the next 2 sts, [hdc, ch 2, hdc] in the ch-2 sp, repeat from * until all the ch-2 sps are worked, skip the next 2 sts, 2 hdc in the last st, ch 2, turn work.
Repeat Row 2: To a total of 16 (17, 19, 20, 21, 22, 24, 25, 26) Rows
Fasten off.
Front Panel #2
Lay your work down so that the first front panel worked and the back panel are on your dominant hand side (right side for right-handed and left side for left-handed). Leave 2 (2, 2, 3, 3, 3, 4, 4, 4) Vsts/ch-2 sps unworked. Join yarn in the st before the next Vst/ch-2, ch 2.
Row 1: Hdc in the joined st, hdc in the next ch-2 sp, *skip the next 2 sts, [hdc, ch 2, hdc] in the ch-2 sp, repeat from * 8 (9, 11, 12, 14, 15, 16, 17, 19) times, skip 2 sts, hdc in the next ch-2, hdc in the next st, ch 2, turn work. <9 (10, 12, 13, 15, 16, 17, 18, 20) Vsts with 2 hdc on both ends>
Row 2: 2 hdc in the first st, *skip the next 2 sts, [hdc, ch 2, hdc] in the ch-2 sp, repeat from * until all the ch-2 sps are worked, skip the next 2 sts, 2 hdc in the last st, ch 2, turn work.
Repeat Row 2: To a total of 7 (7, 9, 11, 11, 13, 13, 15, 15) rows (in the front panel).
Fasten off
Indent for Neck- continues with same row count
Join yarn in the st directly before the 4 (4, 4, 4, 5, 5, 5, 5, 5)th ch-2 sp, ch 2.
Next Row: Hdc in the joined st, hdc in the next ch-2 sp, *skip the next 2 sts, [hdc, ch 2, hdc] in the ch-2 sp, repeat from * 3 (4, 6, 7, 8, 9, 10, 11, 13) times, skip 2 sts, 2 hdc in the last st, ch 2, turn work. <4 (5, 7, 8, 9, 10, 11, 12, 14) Vsts with 2 hdc on both ends>
Next Row: 2 hdc in the first st, *skip the next 2 sts, [hdc, ch 2, hdc] in the ch-2 sp, repeat from * until all the ch-2 sps are worked, skip the next 2 sts, 2 hdc in the last st, ch 2, turn work.
Repeat previous row: 7 (8, 8, 7, 8, 7, 9, 8, 9) times more.
Fasten off. You will have a total of 16 (17, 19, 20, 21, 22, 24, 25, 26) Rows
Assemble Shoulders
With the wrong side facing out, match the shoulder seams up, with the outside edges lined up, leaving space in the center for the neck. Mattress seam the shoulders.
Turn the sweater right side out.
Sleeves- make two
Change to I/5.5mm hook. Working into the right side of the sleeve opening, join yarn in any st in the center of the underarm.
Rnd 1: Ch 1, sc evenly around the sleeve opening, ch 2 and turn work. <Exact st count is not mandatory, just ensure that the fabric is neither stretched tight or bunched up. What works best for me is alternating between one sc and 2 sc per hdc row end. Aim for the st count to be a multiple of 3. This may require sc2tog one or two times. Be sure both sleeves are worked with the same amount of sts for this row.>
Rnd 2: [hdc, ch 2, hdc] in the next st, *skip 2 sts, [hdc, ch 2, hdc] in the next st, repeat from * around until 2 sts remain, skip the next 2 sts, sl st in the top of the beginning ch-2, ch 2 and turn work.
Rnd 3: Skipping all sts, place [hdc, ch 2, hdc] in each ch-2 sp around, sl st in the top of the beginning ch-2, ch 2 and turn work.
Repeat Rnd 3: To a total of 21 (23, 23, 23, 25, 25, 25, 27, 27) rows or to desired length- sleeve ribbing will add an additional 7” to the sleeve length.
Next Rnd: Skipping all sts, place 2 hdc in each ch-2 sp around, sl st in the top of the beginning ch-2, ch one and turn work. This row will be referred to as the base row.
Sleeve Ribbing- begins a new row count
Row 1: Ch 27, turn work <27>
Row 2: Sc in second ch from hook, sc in next 24 chs, sc2tog over next ch and the first st on the base row, sl st into the next st on the base row, ch 1 and turn work. <26>
Row 3: Sc in the blo in the next 25 sts, sc in both loops of the last st, turn work. <26>
Row 4: Ch 1, sc in both loops of the first sc, sc in the blo of the next 24 sts, sc2tog over next ch and the first st on the base row, sl st into the next st on the base row, ch 1 and turn work. <26>
Repeat last two rows consecutively: until all the sts on the base row are worked. Fasten off, leaving long tail for seaming.
NOTE: The ribbing can be easily adjusted for fit. You can either add another sl st along the base row on some even row repeats, to make the ribbing section tighter, or you can omit the sl st along the base row on some even row repeats to make the ribbing section looser.
Turn the sleeve inside out and mattress stitch the ribbing closed. Turn sleeve right side out.
Final Edging- begins new row count
Beginning with I/5.5mm hook. Working into the right side, join yarn in either corner of the neckline, ch 1.
NOTE: Do not fasten off until the entire edging is completed.
Rows 1-4: Sc in the same st, sc evenly along the neckline to the opposite corner (do not continue along the front edge, work only the neckline for this section), ch 1, turn work.
Row 5: Sc evenly along the neckline to the opposite corner, ch 1, do not turn.
Next Row: Continue along the front of the cardigan opening, sc evenly to the bottom corner, ch 1, turn work.
Next Rows: Sc evenly along the front opening from bottom hem to corner of neckline, ch 1, turn work.
Place 7 stitch markers along the last completed row. Each st marker is where a button will be placed.
Next Row: *Sc in each st until you reach the first marked st, ch 2, skip the marked st and the next st, repeat from until all st markers are skipped, sc in each st to end, ch 1, turn work
Next Row: *Sc in each st until you reach the first ch-2 space, sc in each of the 2 chs, repeat from until all chain sts are worked, sc in each st to end, ch 1, turn work
Next Row: Sc in each st to end, ch 1, do not turn
Change to G/4.0mm hook, sc evenly along the bottom hem, working one sc in each row end of ribbing.
Change back to J/5.5mm hook, continue to sc evenly along the front of the cardigan opening, sc evenly to the top corner (do not continue along the neckline, work only the front opening for this section), ch 1, turn work
Next 4 Rows: Sc evenly along the front opening from neckline to bottom hem and vice versa, ch 1, turn work.
Continue across the neckline, sc evenly along the neckline, sl st into the first st of the front edging. Fasten off.
Attach buttons to coordinate with the ch-2 spaces made on the opposite side
Finishing
Weave in all ends. Block if necessary.
I hope you enjoyed this Cropped Cardigan Crochet Pattern. If you liked this pattern you may also like the Sightseer Cropped Crochet Pattern or the Herringbone Split Waist Tee.
Subscribe to the Cre8tion Crochet Weekly Newsletter for free crochet patterns, exclusive discounts on premium paid patterns, giveaways and more. As a bonus, when you sign up you will receive a promo code to purchase one of Lorene’s premium paid patterns from her Ravelry Shop, for free.

Lorene Eppolite is the designer behind Cre8tion Crochet- Where Beautiful is Easy. She has been designing since October 2012. She loves to create fun and easy crochet accessories and garments. Lorene strives to make her designs to be achievable for any skill level. Just because it is easy, doesn’t mean it can’t be beautiful. Lorene is also the COO of Furls Crochet. Follow Lorene on Facebook, Pinterest or Instagram
 |


