Learn how to crochet a pair of fingerless gloves using a fun combination of half double crochets and single crochets to create a lacy stitch pattern.
This post contains affiliate links. If you make a purchase by clicking on them, I make a small commission at no extra cost to you. I only recommend products I love and hope you’ll love them too! Click here to find out about the different affiliate programs I am apart of. This post also contains shop links to my yarn shop and craft store, Yarn Crafts & Coffee.
Find the free crochet pattern instructions below. Add it to your Queue and/or Favorite it on Ravelry.
In a hurry? Pin this for later when you have more time.
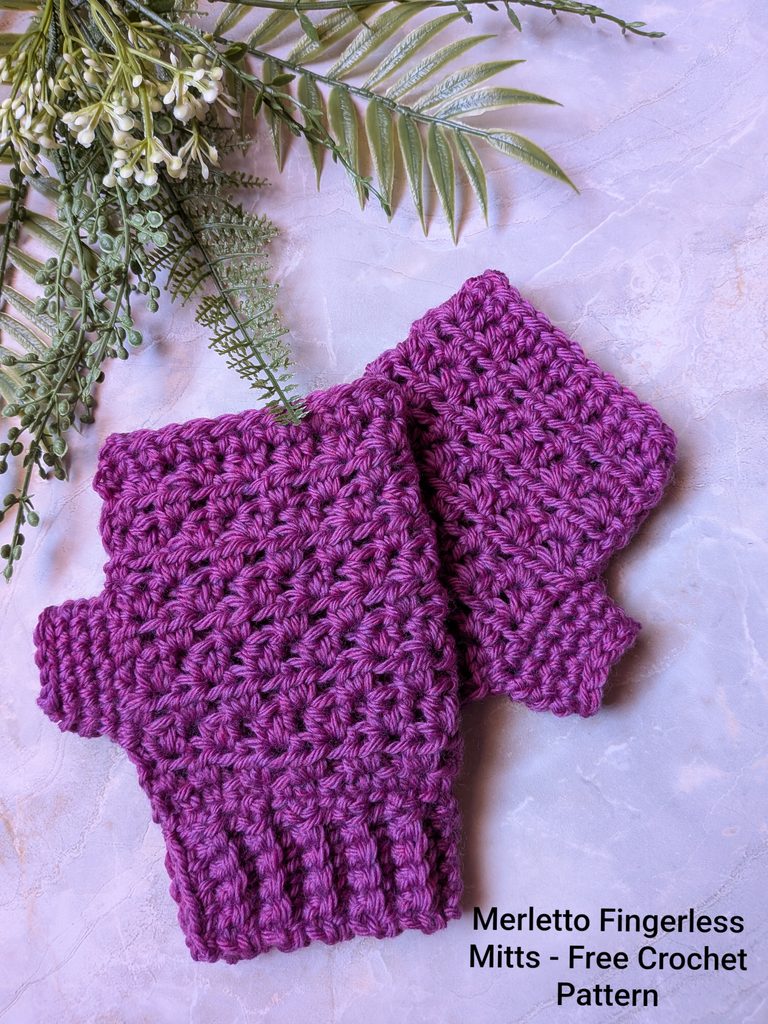
This crochet pattern was written and designed by Kami Jones. I have the honor and privilege of hosting it here on Cre8tion Crochet.
I had bought one skein of Knit Picks Swish to try out. I was just playing with the yarn and making some swatches when I decided to make some fingerless mitts. I wanted to make something small enough that I could make it with just one skein.
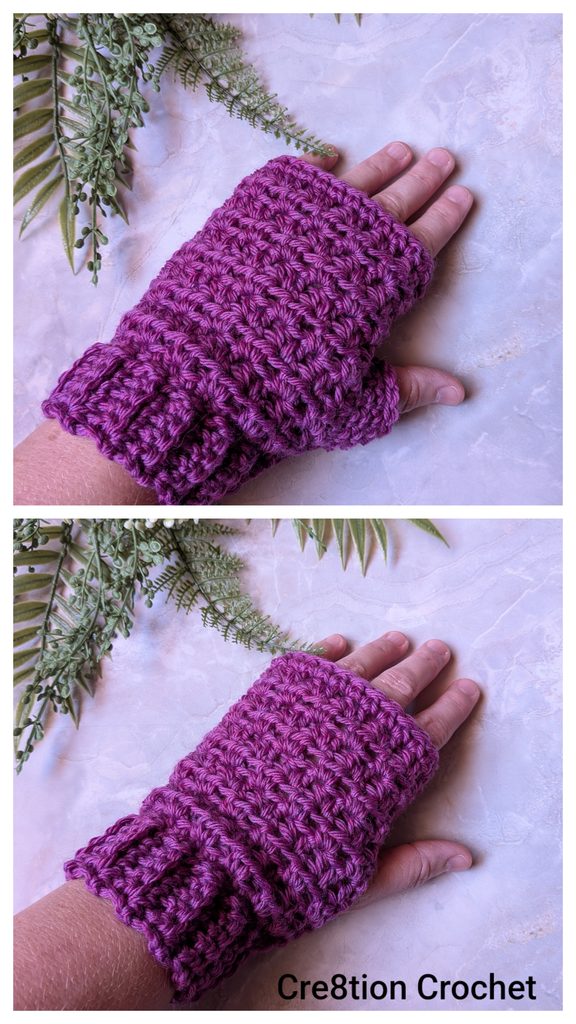
I chose the name Merletto for my fingerless mitts because of the lacy look on the hand portion. Merletto is Italian for lace, but it also refers to a specific type of cane work in glass blowing. This technique creates delicate mesh patterns in the glass that resembles lace. While this technique is very time consuming and labor intensive, my inspired mitts are easy to make and only take a couple hours of your time.
Although I have made my own crochet patterns before, I had never written one down until now. I hope you enjoy my first ever written pattern.
These crochet gloves are featured in the Yarn Crafts in a Snap Event hosted on our sister blog, Yarn Crafts & Coffee.
Add it to your Queue and/or Favorite it on Ravelry.
What Supplies Do I Need to Crochet Fingerless Gloves?
- 88 Yards of a Worsted Weight #4 Yarn
- J10/6mm Crochet Hook
- Soft Tape Measure (Gauge is essential)
- Optional, Stitch Markers (see Pattern Notes for use)
- Scissors
- Tapestry Needle
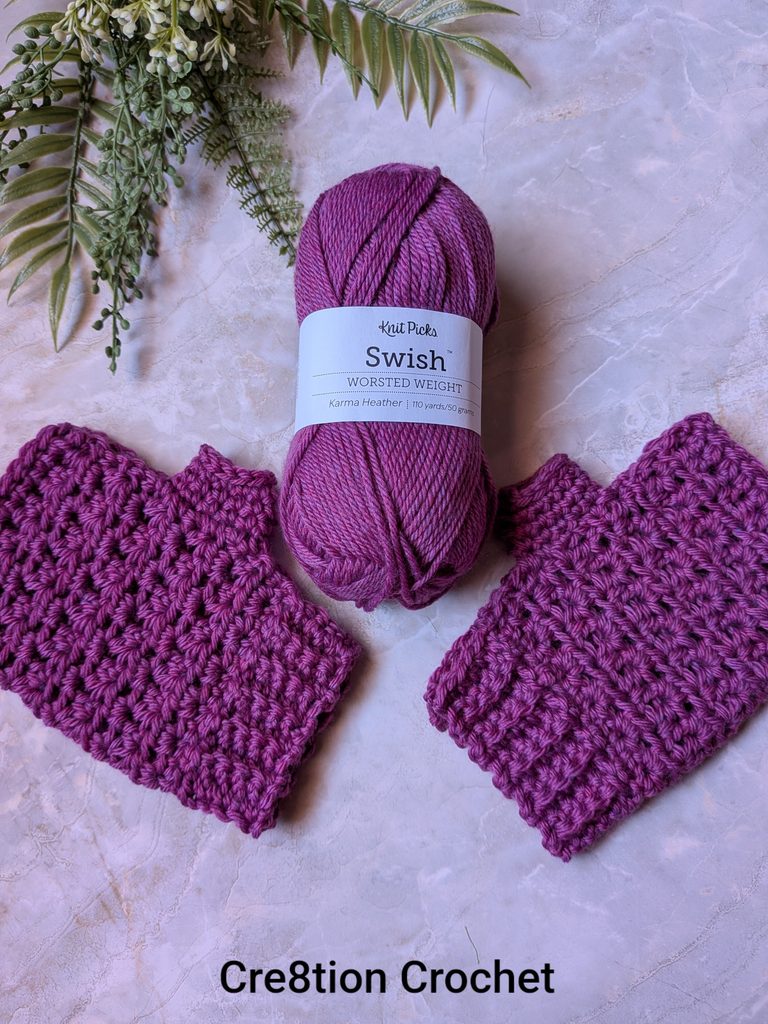
Yarn Talk:
I used Knit Picks Swish Worsted Weight in Karma Heather. This is a soft and squishy, 100% superwash merino wool yarn that is on the lighter side for a worsted weight. If you are substituting yarns, you may have better luck matching gauge with a DK weight yarn, though I do have some recommended substitutes that are still worsted weight: Cascade 220 Superwash Merino, Berroco Ultra Wool, Knit Picks Wool of the Andes Superwash, Rico Designs Essentials Soft Merino Aran, or Malabrigo Rios. Other yarns may need more adjustments for the best fit. See the Customization section for ways to adjust the fit.
The Swish yarn used and the recommended substitutes are wool yarns, which are the best for extra warmth. The more animal fiber, the warmer and better to protect against the cold and wind. Alpaca is another great animal fiber. If you prefer a cotton yarn, use a cotton blend so it adds durability, but also has a secondary fiber within it to help it bounce back to shape, like Lion Brand Coboo.
Tools & Notions:
We have lots of great crochet hooks in our Yarn Crafts and Coffee Yarn Shop. The most popular, and preferred by Candace and Emily, are the Clover Amour Crochet Hooks with the soft handles and smooth metal hook. Alexandra prefers metal crochet hooks with large, ergonomic clay handles and just loves the fun designs from SiennasBowtique and BronzeShepherdStudio! If your preference is wood, the LYKKE brand are lovely, smooth and sturdy.
A tape measure is an essential tool when trying to meet gauge and/or to measure as you go.
Scissors are an essential tool. When I’m working on the go, I like to carry a pair of folding scissors as they fit perfectly in even the tiniest of bags. When I am working at home or have more space in my bag for a larger notions pouch, I like to use a pair of lightweight, all-purpose scissors as they are so versatile and great for a variety of things from cutting yarn strands and trimming yarn ends after weaving in to cutting out a care tag to include with a handmade gift.
Tapestry Needles with the blunt, round end are essential for sewing and finishing in crocheting. The blunt, rounded end allows the needle to pass easily through the fabric created by yarn without snagging (or getting your fingers) in the process. Aside from the more common Straight Tapestry Needle, a Bent Tip Tapestry Needle makes weaving, grafting and sewing so much easier on the hands. The long oval eye makes threading strands of yarn easier, though you may still want to use a needle threader.
Time Spent:
The Merletto Fingerless Mitts can be worked up in around an hour.
This is a beginner friendly pattern with only a few rows. I timed myself making the second mitt. It took me about 15 minutes to make the hand portion, 10 minutes to make the ribbing and another 5 minutes to make the thumb. Seaming and weaving ends takes a little over 5 minutes. If you’re newer to crochet it might take 2 or 3 hours.
Measurements:
Hands vary widely in size and shape. These mitts are sized for a women’s medium using the Craft Yarn Council sizing chart, a standard in the industry. If needed, there is a Customization section below the Pattern Notes section with how to adjust the gloves to fit any size.
Finished Mitt is 7 inches in circumference and 6 inches long including the ribbing.
Before seaming the hand should measure approximately 7 inches x 4 3/4 inches. Ribbing adds approximately 1 1/4 inches to the length.
Gauge – Essential – Measured in Pattern:
14 stitches and 10 rows equals 4 inches in the hdc lace pattern
Gauge is important for gloves. If you do not meet gauge, and continue making your gloves, the finished size will either be too small or too big so make sure to stop and check it. If you’re measuring smaller than the given measurements, go up a crochet hook size, and if you’re measuring larger, go down a crochet hook size. Rework the sample, take gauge again, and see where you are.
Abbreviations (US Terms):
- RS – Right Side of Fabric aka the Front
- SC – Single Crochet (Photo Tutorial)
- WS – Wrong Side of Fabric aka the Back
- HDC – Half Double Crochet (Photo Tutorial | Video Tutorial)
- BLO – Back Loop Only (Photo Tutorial)
Pattern Notes:
The beginning chain 1 does not count as a stitch.
The hand is worked in turned rows, from bottom to top, then the ribbing is added directly to the bottom of the hand piece. There is an optional thumb section and it is worked in unturned rounds.
Stitch markers are optional, but recommended for marking space for the thumb for easier seaming later. It can also be helpful to use one when adding the ribbing to mark the next stitch to work into. See notes within pattern.
Customization:
Hands vary widely in size and shape. These mitts are sized for a women’s medium using the Craft Yarn Council sizing chart, a standard in the industry. This is a 7 1/2 inch circumference and a 6 1/2 inch length. I recommend measuring your hand and adjusting accordingly for the best fit.
The hand stitches can be increased or decreased by 2’s to change the circumference. Be sure to adjust the ribbing accordingly.
Rows can be removed from the hand portion, but the slip stitch row at the top should remain on the Right Side to match the thumb.
Chains can be added or removed from the ribbing to make it longer or shorter. A bigger or smaller hook can also be used to adjust the ribbing circumference.
The thumb space can be adjusted by seaming more or less rows. The thumb circumference can be adjusted by adding more or less stitches in the thumb space.
Fingerless Gloves Crochet Pattern – Make 2:
Hand:
Chain 25
Row 1 (RS): sc in 2nd chain from hook and each chain across, chain 1 and turn (24 sc)
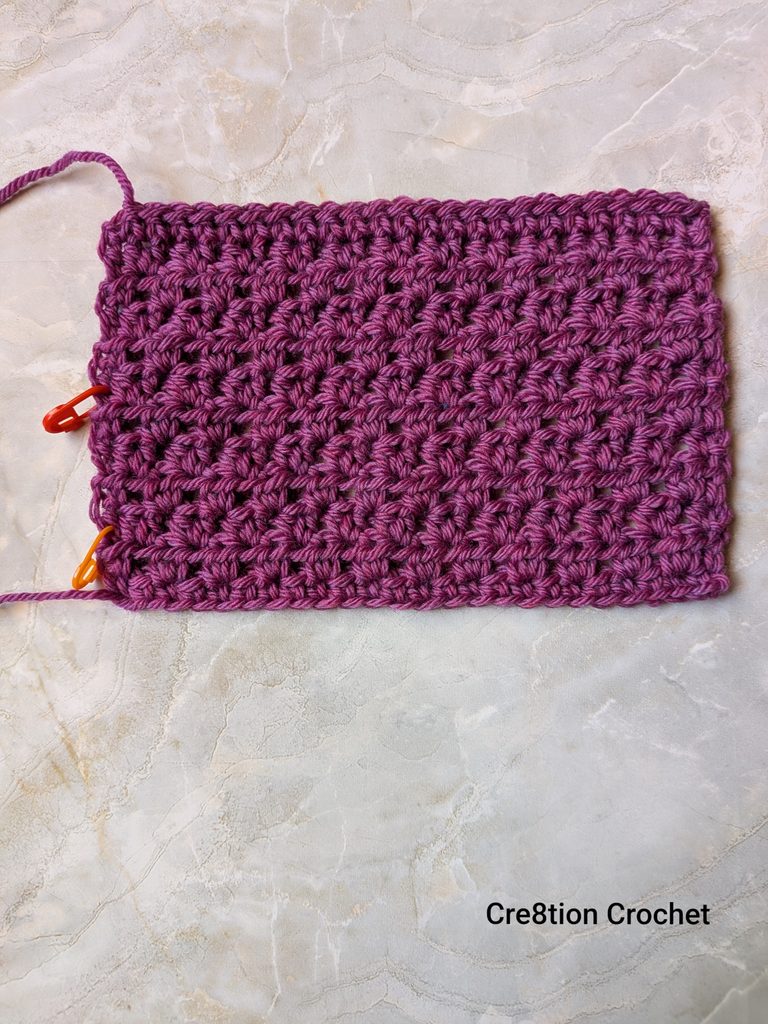
Note: Adding stitch markers in the sides of the first and last stitches on rows 3 and 7 while crocheting this section makes it easier to seam later.
Rows 2-11: hdc in first stitch, *Skip 1, 2 hdc in next* repeat between ** until 1 stitch remains, hdc in last, chain 1 and turn (24 hdc)
Row 12 (WS): sc in each stitch across, chain 1 and turn (24 sc)
Row 13 (RS): Slip stitch in each stitch across. (24 slip stitches)
Fasten off with a long tail for seaming.
Repeat for the 2nd mitt.
Ribbing:
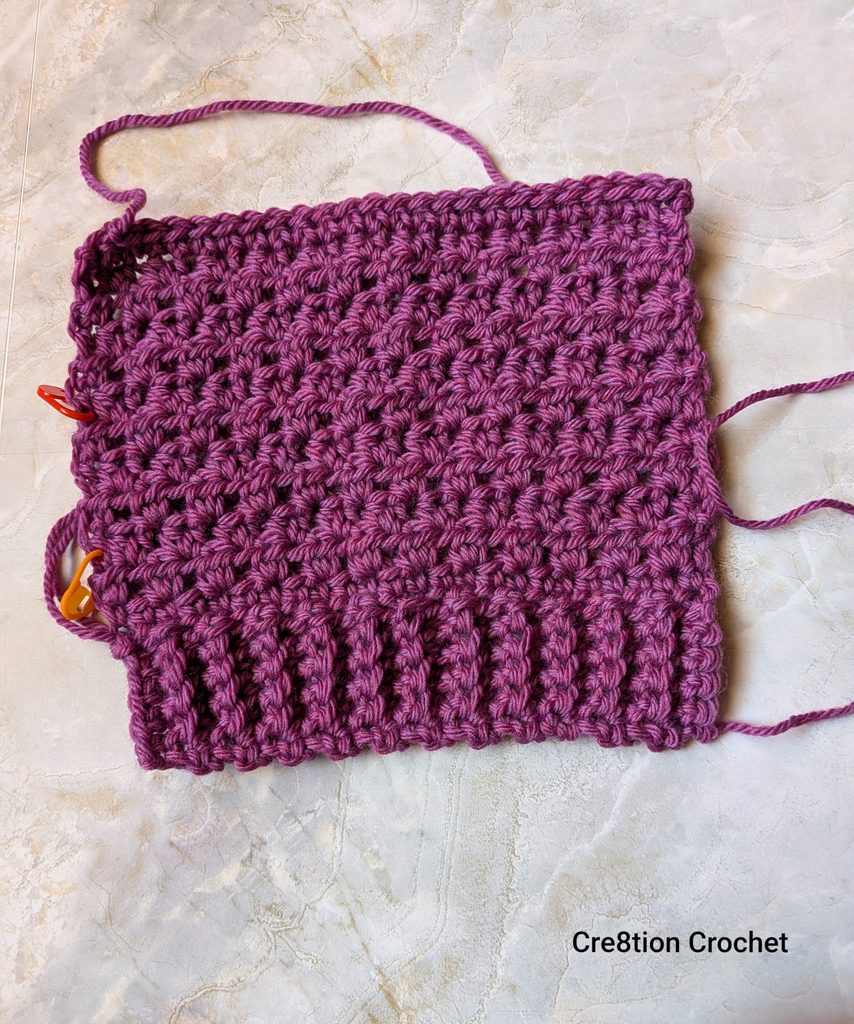
With the RS facing up, attach yarn to the bottom of the hand, chain 6
Row 1: sc in 2nd chain from hook and next 4 stitches, slip stitch into next 2 stitches of hand piece, turn, DO NOT chain (5 sc)
Note: Use a stitch marker to mark the stitch after your 2 slip stitches to make it easier to see which stitch to work into next. Move the stitch marker across the row as you work.
Row 2: Skip 2 slip stitches, sc BLO in next 4 stitch , sc in last, chain 1 and turn (5 sc)
Row 3: sc in first stitch, sc BLO in next 4 stitches, slip stitch into next 2 stitches of hand piece, turn, DO NOT chain (5 sc)
Rows 4-22: Repeat rows 2 and 3 (you will end on a repeat of row 2, with 1 stitch remaining on the hand piece)
Row 23: sc in first stitch, sc BLO in next 4 stitches, slip stitch into last stitch of hand piece, chain 1 and turn (5 sc)
Row 24: Skip the slip stitch, sc BLO in next 4 stitch, sc in last. (5 sc)
Fasten off with a long tail for seaming
Repeat for the 2nd mitt.
Seaming:
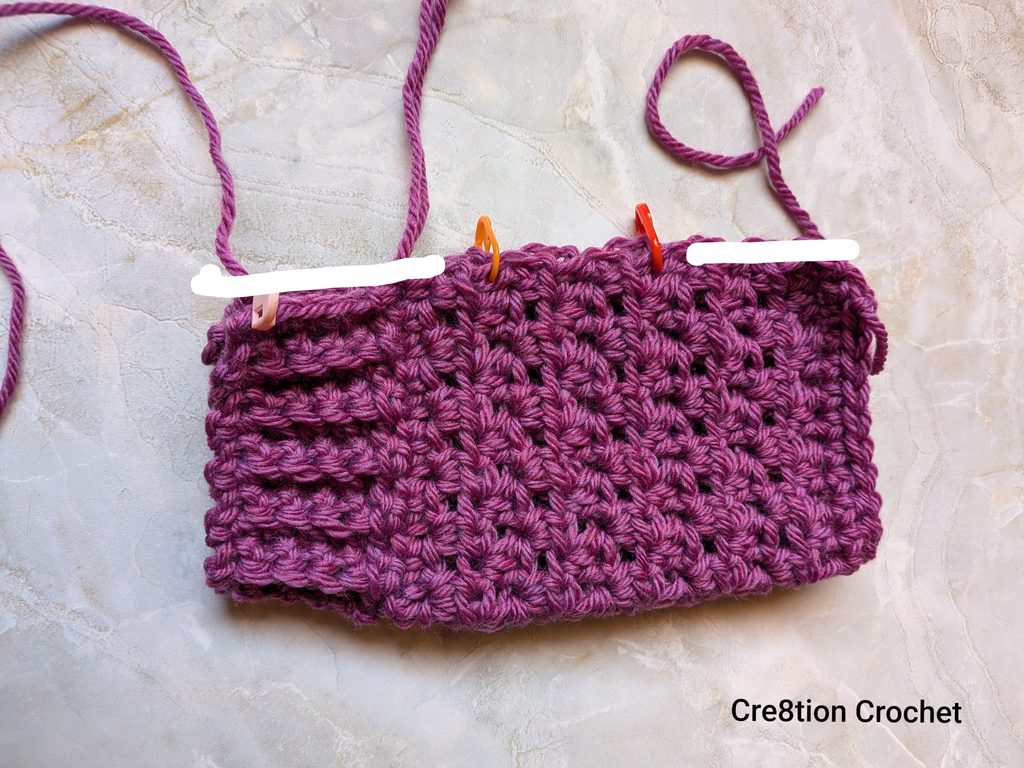
Fold the mitt in half with the right side of the fabric facing out. Refer to the image below.
Using the long tail from the hand, use the mattress stitch to seam from the top of the hand to row 7.
Using the long tail from the ribbing, use the mattress stitch to seam from the bottom of the ribbing to row 3.
This leaves a thumb space. If desired follow the thumb instructions below or finish here and weave in all of the ends.
Repeat for the 2nd mitt.
Optional Thumb:
Note: Slip stitch join to the 1st stitch.
Thumb Pattern:
Round 1: Attach yarn to the bottom of the thumb space, work 12 sc evenly around the thumb space. Join (12 sc)
Rounds 2-4: chain 1, sc in each stitch around. (12 sc)
Round 5: Slip stitch in each stitch around. (12 slip stitches)
Fasten off and weave in ends
Repeat for the 2nd mitt.
This crochet pattern was designed by Kami Jones. I have the honor and privilege of hosting it here on the Cre8tion Crochet blog.
Feel free to use this information to make and sell your own items. When sharing, designer credit is appreciated, but not required. All Cre8tion Crochet Patterns, Photos and PDF’s are protected under copyright. They are not to be copied, distributed or sold – doing so is copyright infringement and stealing! DO NOT copy and paste my pattern anywhere, and DO NOT share the written pattern with others, share the link to the pattern instead so others can find it themselves.
Leave a Reply