Christmas with Style
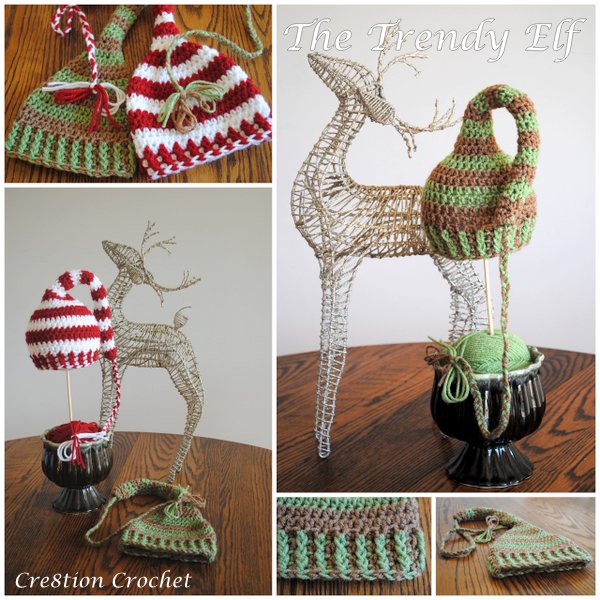
The Trendy Elf
I have updated the Trendy Elf pattern in all sizes, especially for The Red Heart Joy Makers Christmas in July Blog Hop.
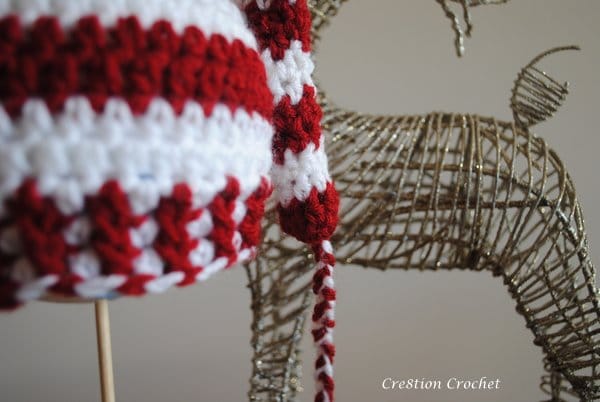
This hat is made with two strands that are carried throughout. During the body of the hat, you work one color each row, but you do not work over the unused yarn, you simply carry it. During the brim of the hat, you will work each color, alternating each stitch and you will work your stitches over the unused color.
This method creates ribbing in two colors for a really pretty finished look. You can use more than two colors if you like but I wouldn’t use more than three unless you want to cut the yarn at each row.
I will be updating this pattern in the next two days with additional pictures of The Trendy Elf in multiple sizes.
YARN
Approximately 150 (175, 225, 250, 300) yards of Red Heart With Love in two colors of choice
MATERIALS
6.0mm/J Hook – I used my Green Apple Candy Shop Furls Crochet to make The Trendy Elf hat.
Yarn needle
DIFFICULTY
Easy plus
FINISHED SIZE
Baby 14″
Toddler 16″
Child 18″
Teen/Small Adult- Women 21″
Adult- Men 23″
GAUGE
11sts and 10 rows = 4″
STITCH GUIDE
ch(s) – chain(s),hdc – half double crochet, st(s) – stitch(es), CA – color A, CB – color B
SPECIAL STITCHES
Magic Circle (watch this video tutorial)
exfphdc– extended front post half double crochet
Yarn over (YO), insert hook under post (from front to back), YO, draw through stitch (three loops on hook), YO and pull through one loop on hook, YO and pull through remaining three loops on hook.
NOTES
- Pattern is written in sizes Baby, Toddler, Child, Teen/Small Adult and Large Adult.
- Ch 1 at beginning of each round do not count as a stitch.
- Each round is ended with a sl st into the first hdc (skipping over the ch1) to join
- The entire hat is made by alternating between Color A and Color B. For the body you will carry the unused yarn up the inside of the hat. I recommend working over the unused strand on the first st only, just to help keep the yarn secure. You can choose to do two rows of each color or one row of each color. I wouldn’t do more than two rows of each color if you are using two colors, or one more than one row if each color if you are using more than two colors in your hat, unless you plan on fastening off each color and weaving in the tails at the end.
- To change colors in the body; change color on sl st, insert hook into first hdc, yarn over and pull through next color.
- To change colors on the edging; work the hdc as normal, but on the final yarn over, pick up the next color to finish the stitch.
PATTERN
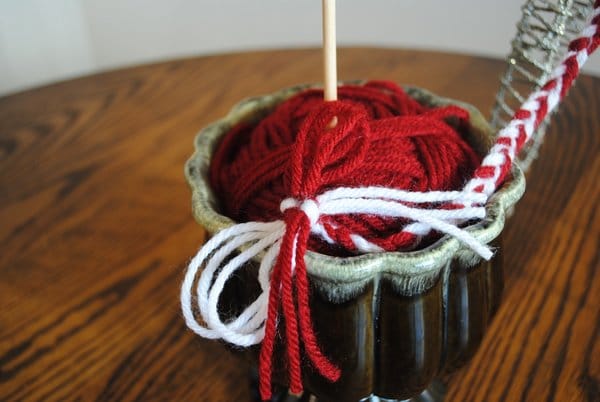
Before you begin crocheting you need to cut yarn for the braided tassel. Cut six strands of yarn (3 of each color, or 6 of one color, whatever your preference is) to 24” in length. Double knot 6 strands together at one end. You will place the knotted end inside your first round BEFORE you tighten up your magic ring. Use your tail from the magic ring to knot everything in place again to make sure it is secure. I also recommend stitching some of the ends of the tassel into the inside of the hat. You will need to do this after you have completed a few rounds, or else you will not be able to get to it easily after you finish the hat.
BABY
Round 1: Start with CA, magic circle, ch 1, 8hdc, sl st first hdc (see notes)
Round 2: Change color (see notes), ch 1, *hdc next 3, 2hdc next st, repeat from * around <10>
Rounds 3-17: ch 1, hdc every st <10>
Round 18: ch 1, *hdc next 4 sts, 2hdc next st, repeat from * around <12>
Round 19: ch 1, *hdc next 3 sts, 2hdc next st, repeat from * around <15>
Round 20: ch 1, *hdc next 2 sts, 2hdc next st, repeat from * around <20>
Round 21: ch1, *hdc next st, 2hdc next st, repeat from * around <30>
Round 22: ch 1, *hdc next 2 sts, 2hdc next st, repeat from * around <40>
Rows 23-32: ch1, hdc in every st <40>
Row 33: alternate between CA and CB hdc in each st. (see notes) <40>
Rows 34-35: ch 1, *hdc next st using same color as row below, fpexhdc next st using same color as row before, repeat from * around <40>
Fasten off and weave in ends. Finish off by braiding tail and tie into bow.
TODDLER
Round 1: Start with CA, magic circle, ch 1, 8hdc, sl st first hdc (see notes)
Round 2: Change color (see notes), ch 1, *hdc next 3, 2hdc next st, repeat from * around <10>
Rounds 3-18: ch 1, hdc every st <10>
Round 19: ch 1, *hdc next 4 sts, 2hdc next st, repeat from * around <12>
Round 20: ch 1, *hdc next 3 sts, 2hdc next st, repeat from * around <15>
Round 21: ch 1, *hdc next 2 sts, 2hdc next st, repeat from * around <20>
Round 22: ch1, *hdc next st, 2hdc next st, repeat from * around <30>
Round 23: ch 1, *hdc next 2 sts, 2hdc next st, repeat from * around <40>
Round 24: ch 1, *hdc next 7 sts, 2hdc next st, repeat from * around <45>
Rounds 25: ch1, hdc next 22 sts, 2hdc next st, hdc next 22 sts <46>
Rows 26-34: ch1, hdc in every st <46>
Row 35: alternate between CA and CB hdc in each st. (see notes) <46>
Rows 36-37: ch 1, *hdc next st using same color as row below, exfphdc next st using same color as row before, repeat from * around <46>
Fasten off and weave in ends. Finish off by braiding tail and tie into bow.
CHILD
Round 1: Start with CA, magic circle, ch 1, 8hdc, sl st first hdc (see notes)
Round 2: Change color (see notes), *hdc next 3, 2hdc next st, repeat from * around <10>
Rounds 3-19: ch 1, hdc every st <10>
Round 20: ch 1, *hdc next 4 sts, 2hdc next st, repeat from * around <12>
Round 21: ch 1, *hdc next 3 sts, 2hdc next st, repeat from * around <15>
Round 22: ch 1, *hdc next 2 sts, 2hdc next st, repeat from * around <20>
Round 23: ch1, *hdc next st, 2hdc next st, repeat from * around <30>
Round 24: ch 1, *hdc next 2 sts, 2hdc next st, repeat from * around <40>
Round 25: ch 1, *hdc next 3 sts, 2hdc next st, repeat from * around <50>
Rows 26-35: ch1, hdc in every st <50>
Row 36: alternate between CA and CB hdc in each st. (see notes) <50>
Rows 37-38: ch 1, *hdc next st using same color as row below, exfphdc next st using same color as row before, repeat from * around <50>
Fasten off and weave in ends. Finish off by braiding tail and tie into bow.
TEEN/SMALL ADULT- Women
Round 1: Start with CA, magic circle, ch 1, 8hdc, sl st first hdc (see notes)
Round 2: Change color (see notes), *hdc next 3, 2hdc next st, repeat from * around <10>
Rounds 3-20: ch 1, hdc every st <10>
Round 21: ch 1, *hdc next 4 sts, 2hdc next st, repeat from * around <12>
Round 22: ch 1, *hdc next 3 sts, 2hdc next st, repeat from * around <15>
Round 23: ch 1, *hdc next 2 sts, 2hdc next st, repeat from * around <20>
Round 24: ch1, *hdc next st, 2hdc next st, repeat from * around <30>
Round 25: ch 1, *hdc next 2 sts, 2hdc next st, repeat from * around <40>
Round 26: ch 1, *hdc next 3 sts, 2hdc next st, repeat from * around <50>
Round 27: ch 1, *hdc next 9 sts, 2hdc next st, repeat from around <55>
Round 28: ch 1, *hdc next 27 sts, 2hdc next st, hdc next 27 sts <56>
Rows 29-36: ch1, hdc in every st <56>
Row 37: alternate between CA and CB hdc in each st. (see notes) <56>
Rows 38-39: ch 1, *hdc next st using same color as row below, exfphdc next st using same color as row before, repeat from * around <56>
Fasten off and weave in ends. Finish off by braiding tail and tie into bow.
LARGE ADULT- Men
Round 1: Start with CA, magic circle, ch 1, 8hdc, sl st first hdc (see notes)
Round 2: Change color (see notes), *hdc next 3, 2hdc next st, repeat from * around <10>
Rounds 3-20: ch 1, hdc every st <10>
Round 21: ch 1, *hdc next 4 sts, 2hdc next st, repeat from * around <12>
Round 22: ch 1, *hdc next 3 sts, 2hdc next st, repeat from * around <15>
Round 23: ch 1, *hdc next 2 sts, 2hdc next st, repeat from * around <20>
Round 24: ch1, *hdc next st, 2hdc next st, repeat from * around <30>
Round 25: ch 1, *hdc next 2 sts, 2hdc next st, repeat from * around <40>
Round 26: ch 1, *hdc next 3 sts, 2hdc next st, repeat from * around <50>
Round 27: ch 1, *hdc next 4 sts, 2hdc next st, repeat from around <60>
Rows 28-36: ch1, hdc in every st <60>
Row 37: alternate between CA and CB hdc in each st. (see notes) <60>
Rows 38-39: ch 1, *hdc next st using same color as row below, exfphdc next st using same color as row before, repeat from * around <60>
Fasten off and weave in ends. Finish off by braiding tail and tie into bow.
Variations:
Make the thin part of hat longer or shorter by increasing or decreasing rows
Change how rows are done- one row of each color, or mix it up and do two rows of one color and one row of the other or any combination you can think of
Do the ribs in blocks of color. In first row of ribs do two of one color and two of the other and then follow colors when doing fpdc rows
Put a pom pom on the end of the braid or do a tassle and leave strands long, use your imagination and see what you can come up with… I’d love to see pictures. Email them to us at [email protected]
You can also check out all the other great Christmas in July patterns from the entire Joy Creators team, and share the projects you make using the patterns with the #joycreators and #redheartyarns hashtags! There is one more pattern left in the series, it will be posted on the Pattern Paradise blog on Friday, July 29
Wednesday, July 6: Joyful Star Teething Ring from Stitch11
Friday, July 8: Jolly Elf Hat from Jessie at Home
Monday, July 11: Victorian Pillow Cover from Beatrice Ryan Designs
Wednesday, July 13: Icicle Ike from Snappy Tots
Friday, July 15: Wild Orchid Cowl from ELK Studio
Monday, July 18: Glisten Holiday Throw from Marly Bird
Wednesday, July 20: Sparkle Ruby Cowl from Myhobbyiscrochet
Friday, July 22: Penguins in July from Oombawka Design
Monday, July 25: Tiny Angel Wings from Simply Collectible
Wednesday, July 27: Cre8tion Crochet (HERE)
Friday, July 29: Pattern Paradise

This pattern is also available as a PDF for the cost of $2. This fee is to offset revenue lost when the pattern is printed and a visit to this site is not required. Click HERE to go to Ravelry.


