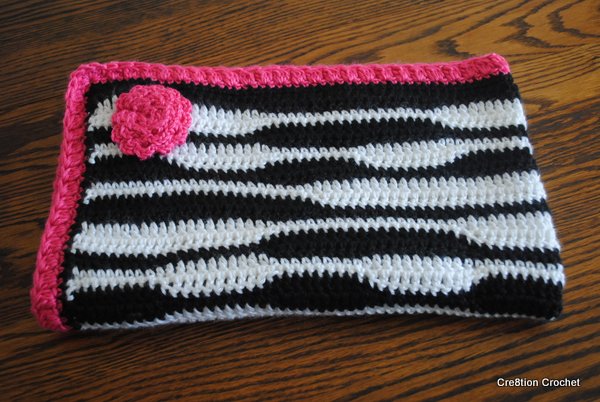
I love animal print, especially zebra print and I really love the way it looks with hot pink. I have a friend who is expecting her first girl any day now and she is also really into zebra print so I created this lovely blanket for her soon to be bundle of joy. It is VERY easy to work up and unlike some zebra prints I have seen it is varied in design. I hope you enjoy creating this cuddly Zebra Newborn Blanket for someone in your life.
This blanket can easily be made larger but must be worked in increments of 100 (200, 300). Make sure to chain one extra stitch for turning in the first chain.
- This post contains affiliate links
- By using this pattern you agree to the Pattern Terms of Use set forth by Cre8tion Crochet
Click HERE to add this pattern to your Ravelry Favorites
Click HERE to Pin It for later
YARN
Worsted Weight Yarn (I used Caron’s Simply Soft)
660 yards white
660 yards black yarn
approximately 80-100 yards of border color (I used Hot Pink)
MATERIALS
5.0mm hook
Tapestry needle for weaving in ends
DIFFICULTY
Intermediate
STITCH GUIDE
ch(s) – chain(s), sc – single crochet, hdc – half double crochet, dc – double crochet, st(s) – stitch(es)
GAUGE
Not important with this project.
NOTES
- You do not NEED to chain at the beginning of every row, however if you feel more comfortable chaining than you can Ch2 and turn at the end of every row… however that Ch2 does NOT count in your st count… the first hdc of each row will be stitched into the first st of each row.
- The first and last stitch of EVERY row are hdc, (as are each stitch between changes in height of rows).
- To make finishing easier, every time I make a color change I tie a knot, connecting the tails of the old color and the new color. Then I weave over the tails (if they are still sticking out when I’m done I just cut them shorter). That way I only have to weave in the first and last tails of the project. OR you can carry your unused yarn color up the side of the work, and cover over with your border.
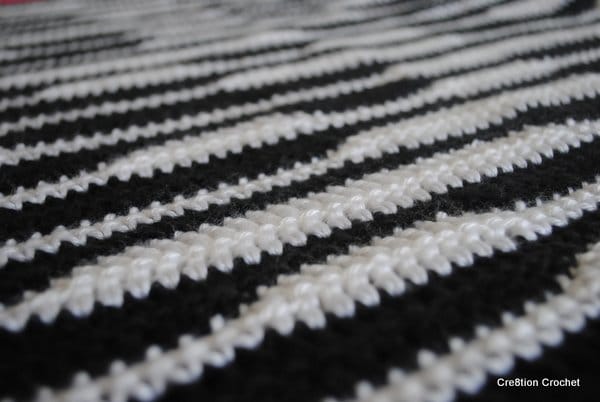
- At some point this pattern will look like its not “wavy” any longer, don’t worry it will all turn out. Each “block” of stripes (2 rows of black and 2 rows of white) will make a rectangle, with straight lines on each side. When you do the next two rows (of white) you will begin to see the next “wave”. When the blanket is finished you will not be able to see the straight lines.
- Every two rows in the same color are the same stitches stacked on top of each other, the next two rows (of the opposite color) are the opposite exact stitches stacked on top of each other. Eg, if the two black rows start with dc then the two white rows will start with sc. If you have any questions please comment below and I’ll get back to you as soon as I can.
FINISHED SIZE
The finished width of the blanket will vary depending on the yarn used and your gauge. Mine is 31″ x 28″ (including border).
Pattern:
- With color A (black)
Chain 101 - Hdc across <100>
- *hdc in first st, 1dc in each of the next 18sts, 1hdc in 20th st, 1sc in each of the next 19sts, 1hdc in 40th st, 1dc in each of the next 19sts, 1hdc in the 60th st, 1sc in each of the next 19sts, 1hdc in the 80th st, 1dc in each of the next 19sts, 1hdc in the 100th st.
- Using same color repeat instructions in row 3 for row 4
- Change to color B
hdc in first st, 1sc in each of the next 18sts, 1hdc in the 20th st, 1dc in each of the next 19sts, 1hdc in the 40th st, 1sc in each of the next 19sts, 1hdc in the 60th st, 1dc in each of the next 19sts, 1hdc in the 80th st, 1sc in each of the next 19sts, 1hdc in the 100th st. - Using same color repeat this pattern in next row.
- Change back to color A
hdc in first st, 1dc in each of the next 23sts, 1hdc in 25th st, 1sc in each of the next 24sts, 1hdc in 50th st, 1dc in each of the next 24sts, 1hdc in 75th st, 1sc in each of the next 24sts, 1hdc in 100th st. - Using same color crochet next row as follows, 1hdc in first st, 1sc in each of the next 23sts, 1hdc in 25th st, 1dc in each of the next 24sts, 1hdc in 50th st, 1sc in each of the next 24sts, 1hdc in 75th st, 1dc in each of the next 24sts, 1hdc in 100th st.
- Change to color B
hdc in first st, 1sc in each of the next 23sts, 1hdc in 25th st, 1dc in each of the next 24sts, 1hdc in 50th st, 1sc in each of the next 24sts, 1hdc in 75th st, 1dc in each of the next 24sts, 1hdc in 100th st. - Turn and using the same color crochet across as follows. hdc in first st, 1dc in each of the next 23sts, 1hdc in 25th st, 1sc in each of the next 24sts, 1hdc in 50th st, 1dc in each of the next 24sts, 1hdc in 75th st, 1sc in each of the next 24sts, 1hdc in 100th st.
- Change to color A
hdc in first st, 1dc in each of the next 8sts, 1hdc in 10th st, 1sc in each of the next 9sts, 1hdc in 20th st, 1dc in each of the next 9sts, 1hdc in 30th st, 1sc in each of the next 9sts, 1hdc in 40th st, 1 dc in each of the next 9st, 1hdc in 50th st, 1sc in each of the next 9sts, 1hdc in 60th st, 1dc in each of the next 9sts, 1hdc 70th st, 1 sc in each of the next 9sts, 1hdc in 80th st, 1 dc in each of the next 9sts, 1hdc 90th s, 1sc in each of the next 9sts, 1hdc in 100th st. - Using same color repeat this pattern in next row.
- Change to color B
hdc in first st, 1sc in each of the next 8sts, 1hdc in 10th st, 1dc in each of the next 9sts, 1hdc in 20th st, 1sc in each of the next 9sts, 1hdc in 30th st, 1dc in each of the next 9sts, 1hdc in 40th st, 1 sc in each of the next 9sts, 1hdc in 50th st, 1dc in each of the next 9sts, 1hdc in 60th st, 1sc in each of the next 9sts, 1hdc 70th st, 1 dc in each of the next 9sts, 1hdc in 80th st, 1 sc in each of the next 9sts, 1hdc 90th st, 1dc in each of the next 9sts, 1hdc in 100th st. - Turn and crochet across as follows, hdc in first st, 1dc in each of the next 8sts, 1hdc in 10th st, 1sc in each of the next 9sts, 1hdc in 20th st, 1dc in each of the next 9sts, 1hdc in 30th st, 1sc in each of the next 9sts, 1hdc in 40th st, 1dc in each of the next 9sts, 1hdc in 50th st, 1sc in each of the next 9sts, 1hdc in 60th st, 1dc in each of the next 9sts, 1hdc 70th st, 1sc in each of the next 9sts, 1hdc in 80th st, 1 dc in each of the next 9sts, 1hdc 90th st, 1sc in each of the next 9sts, 1hdc in 100th st.
- Repeat from * to desired length, finish off and weave in ends
- To END- each color has two rows, to finish off only do first row of new color (I recommend ending in black) and then one or two rows of hdc in same color.
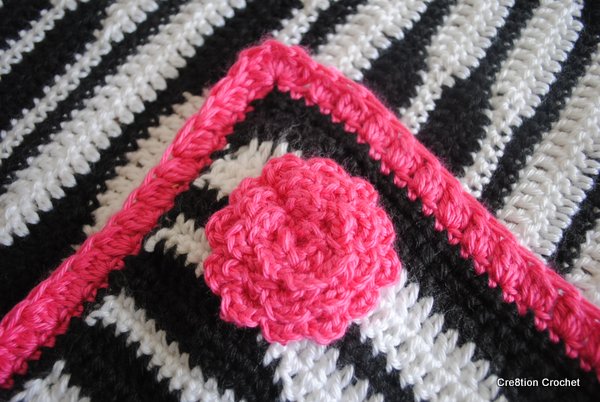
Border:
- Sc around entire blanket in color A (black) with 3sc in each corner
- Change to border color (pink) in 1st space, chain 2, yo, insert hook into same space, yarn over, pull through space (3 loops on hook), yo and pull through 1st two loops (2 loops left on hook), yo, insert hook into same sp, pull through (4 loops on hook), yo, pull through 1st two spaces (3 loops left on hook), yo and pull through all three loops.
- In next (and every) space crochet as follows; yo, insert hook into st, yo, pull through st, yo, and pull through the 1st two loops (2 loops on hook), yo again, and insert hook into same st, yo, and pull through st, (4 loops on hook), yo again and pull through 1st two loops (3 loops left on hook), yo and insert hook into same st, yo again, and pull through st, yo, and pull through 1st two loops on hook (4 loops left on hook), yo one last time and pull through all four loops.
- In all four corners; yo, insert hook, yo, pull through, yo, pull through 1st two sp (2 loops on hook), yo, insert hook into same sp, yo, pull through, (4 loops on hook), yo and pull through 1st two loops (3 loops left on hook), yo, pull through all three loops. Repeat 3 more times in each corner.
- Finish off and weave in ends.
If you like, add a flower of your choice to one corner of blanket on both sides. I used a modified version of the flower used in the Mermaid Tears Purse by Bernhart.
Check out the matching Zebra Newborn Hat Pattern
 |
 Lorene Eppolite is the designer behind Cre8tion Crochet and has been designing since October 2012. She loves to create fun and easy crochet accessories and garments and strives to make her designs to be achievable for any skill level. Just because it is easy, doesn’t mean it can’t be beautiful. Lorene was named one of the Top Ten Designers by The Yarn Box in 2012, by AllFreeCrochet in 2013 and two of her patterns appeared in the Top 100 of 2014 for AFC where she was named a Top Blogger. Lorene has many patterns published by Red Heart Yarns.
You can follow Lorene on Facebook or sign up for the Cre8tion Crochet Newsletter.


