This post contains affiliate links
Crochet Bridal Flowers Bridal Bouquet and Boutonniere
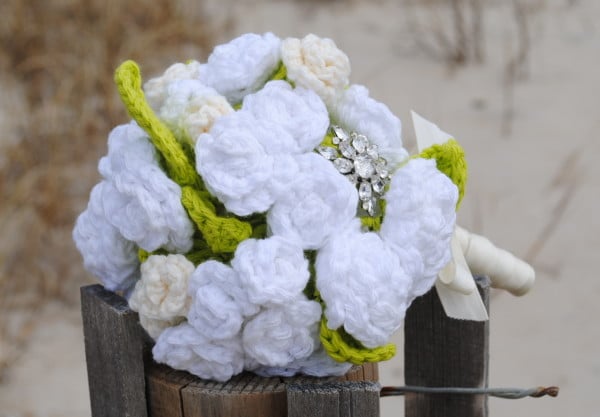
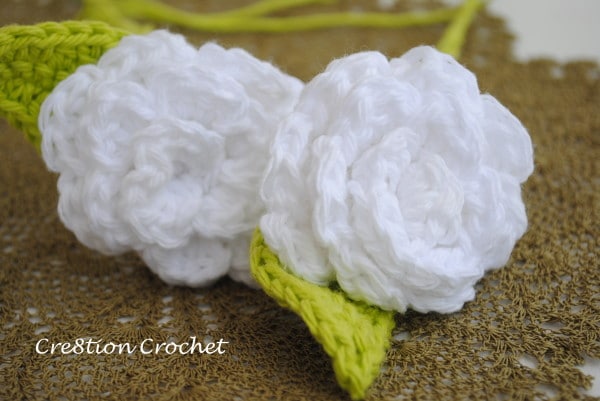
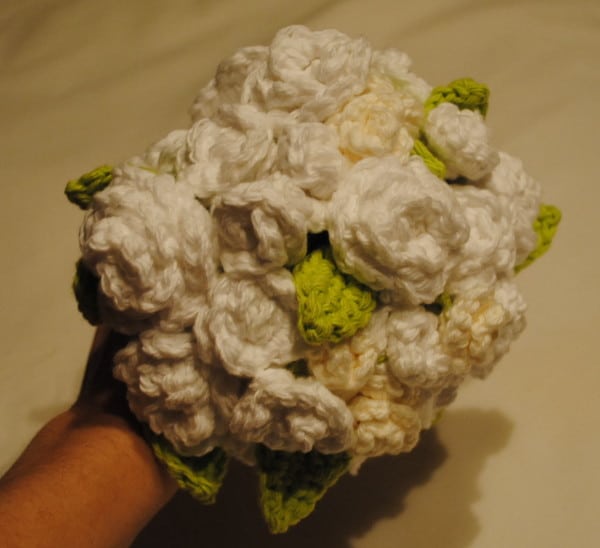
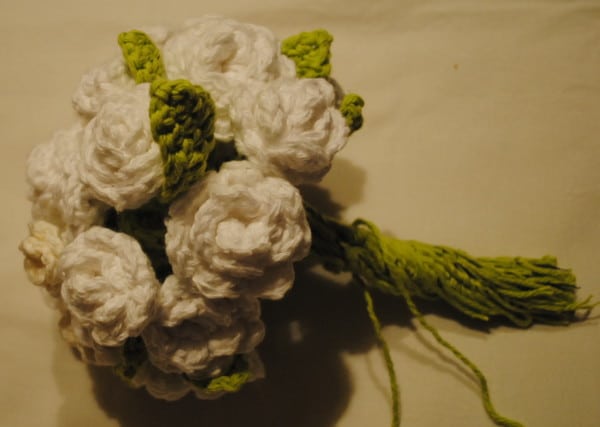
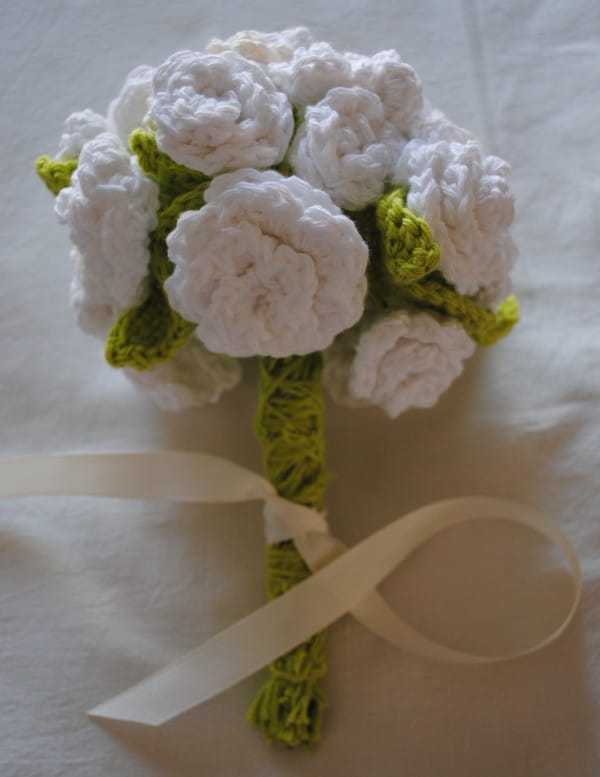
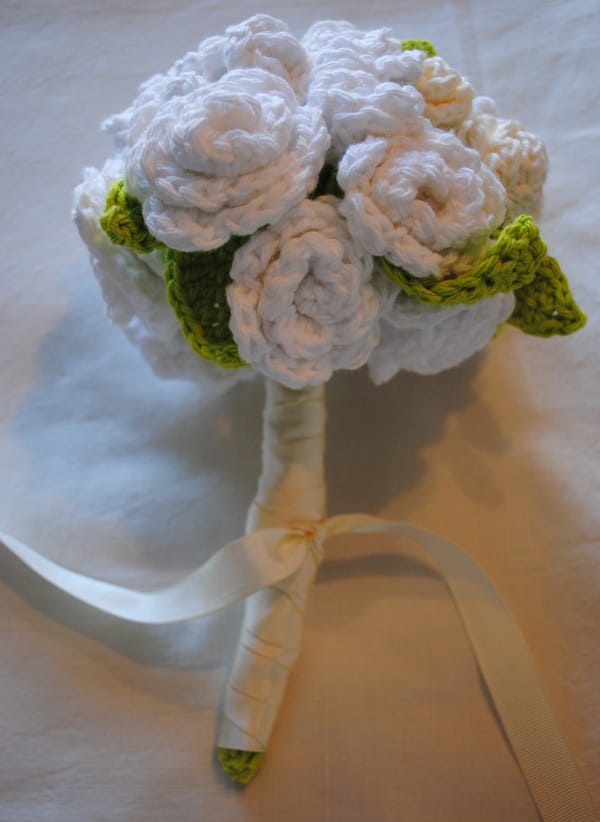
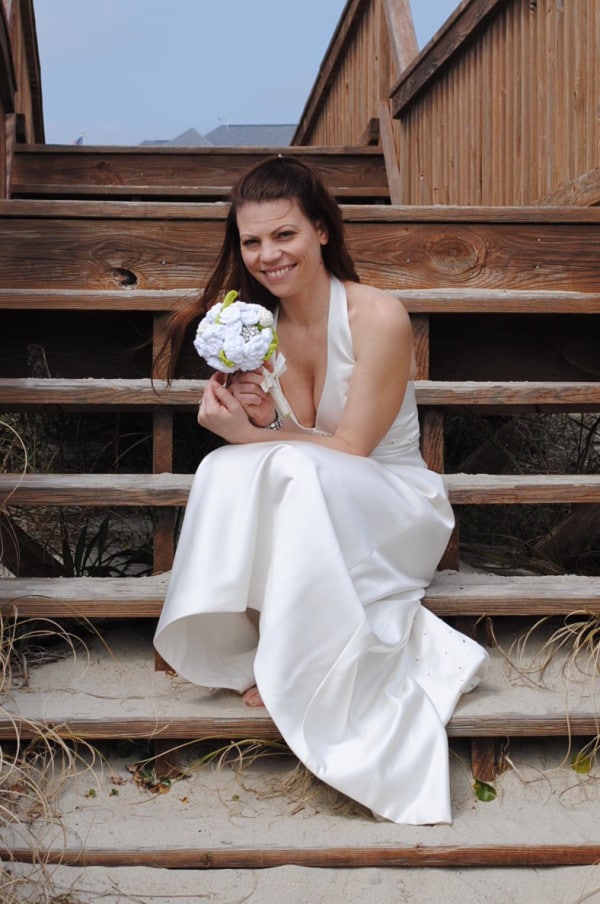
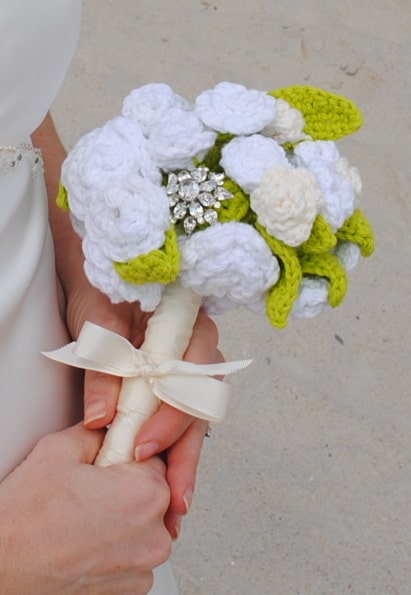
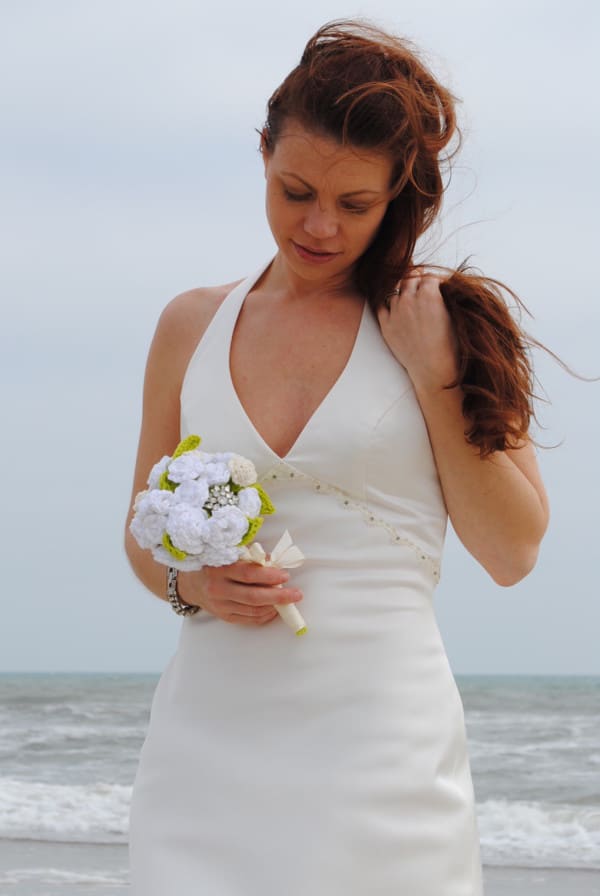
I was recently approached by The Green Bride Guide about using my Rosette’s Pattern in their blog for June Brides. Of course, I was honored to be asked, but it also kicked my brain into overdrive. I often have way too many ideas floating around in my head, which kinda makes it hard for me to get anything done because I have pattern ADD. I’m always distracted by the next idea, or pattern I want to make. I have a hard time staying focused. So of course I instantly had 20 idea’s for what I wanted to do… make boutiques, make boutonnieres, centerpieces, garlands, etc, etc. I was able to narrow it down to a couple things to start with. The first thing I made is this lovely boutique or nosegay featuring sweet roses in shades of white with bright lime green leaves. I weaved the finished pieces together with floral wire and yarn and then wrapped them in ribbon to finish it off. I wanted my boutique to have a vintage feel so I used one of my mother’s vintage brooches to finish my boutique off.
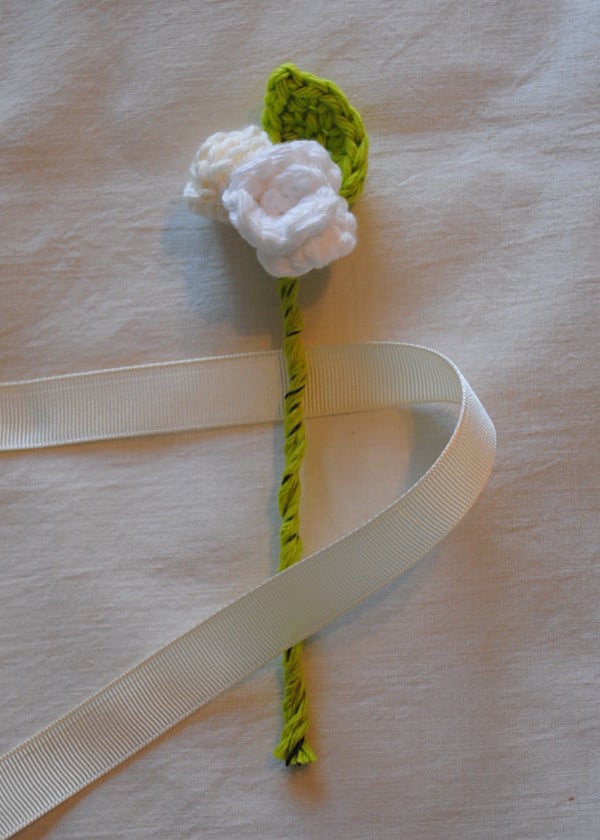
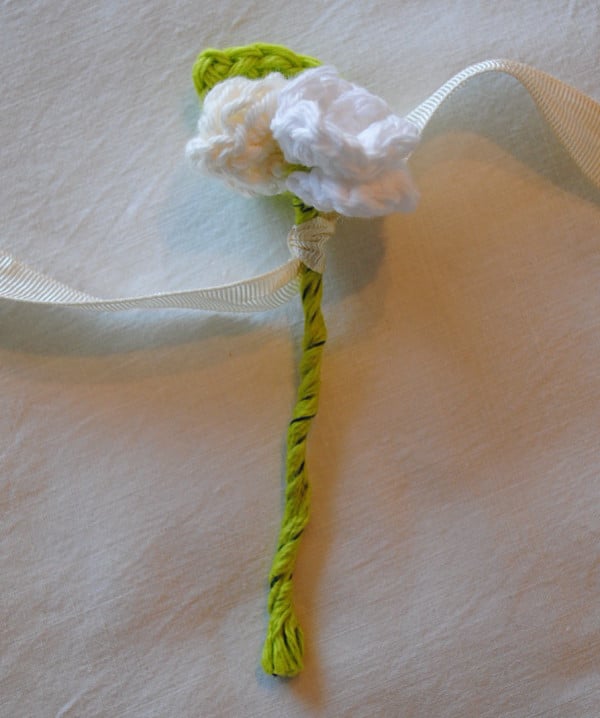
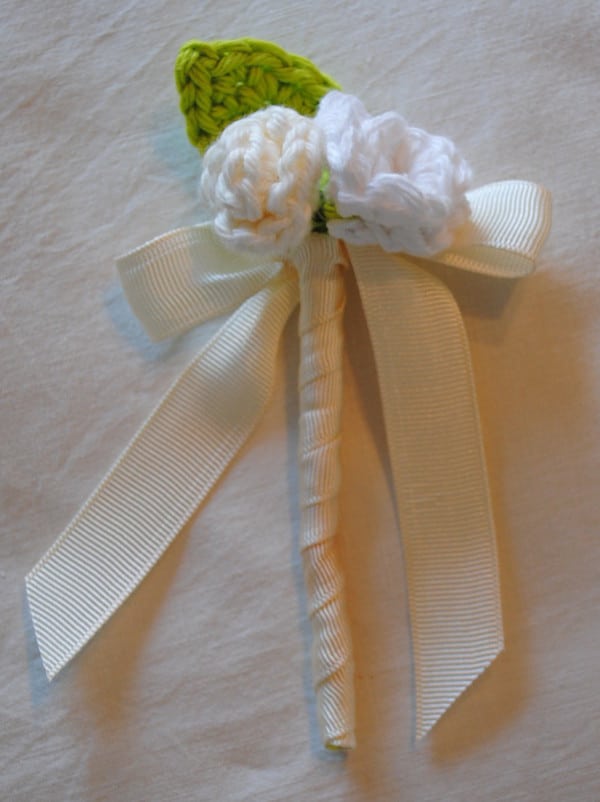 I also created this matching boutonniere.
These bridal flowers will last a lifetime and are made with 100% cotton. You can also use organic cotton. They will never wither or die. They can also be made in any color combination you can possibly imagine. The possibilities are endless. Stay tuned for more fabulous bridal flower idea’s to come… I’ve got a whole bunch that I just can’t wait to share with you! 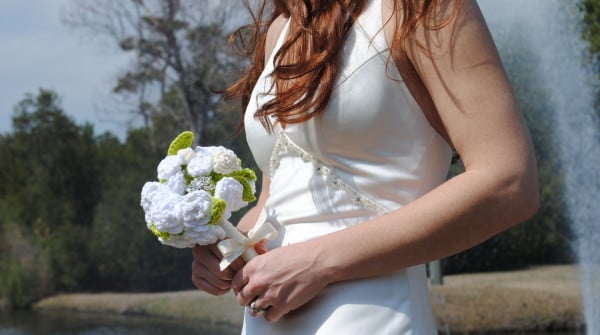
Abbreviations and Stitches used: ch– chain; st– stitch; sp– space; sl st– slip stitch insert hook in stitch, yarn over, pull through stitch, (two loops on hook), pull loop closest to hook through other loop; sc– single crochet insert hook in stitch, yarn over, pull through stitch (two loops on hook), yarn over, pull through both loops; hdc– half double crochet yarn over, insert hook in stitch, yarn over, pull through stitch (three loops on hook), yarn over, pull through all three loops; dc– double crochet yarn over, insert hook in stitch, yarn over, pull through stitch (three loops on hook), yarn over, pull through first two loops on hook, yarn over and pull through last two loops
Materials:
- 100% (70.9g) cotton yarn in your choice of colors (flowers and leaves). I used Peaches N’ Cream 100% (50g) cotton yarn in your choice of colors. (sweetheart roses). I used Rowan Handknit Cotton
- 5.0 mm hook (you can use any size hook, as different sizes will produce different results)
- embroidery needle
- floral wire ribbon in your choice of color (½ – 1” works best)
- decorative vintage brooch (optional)
- wire cutters scissors

Rosette Patterns
These rosettes are modified from my Spring Rosettes Pattern but since these roses are made in 100% cotton instead of acrylic the pattern has been adjusted some
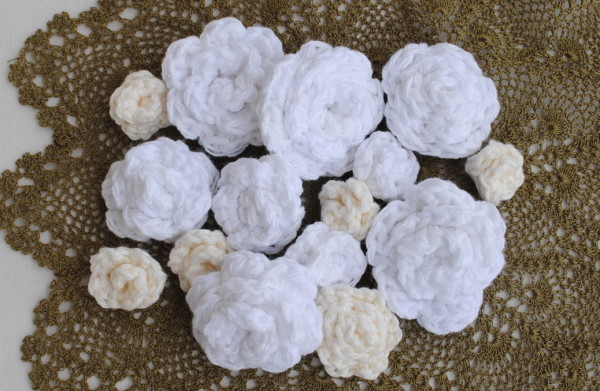
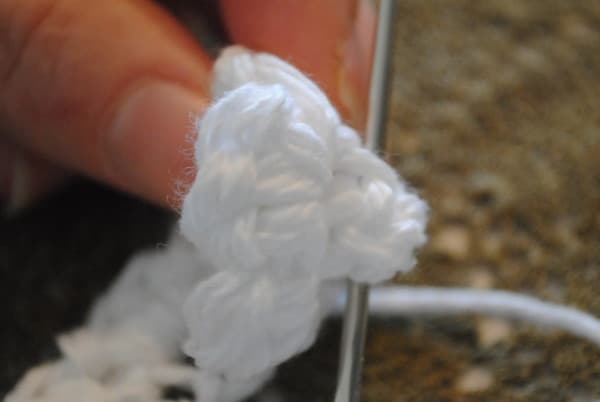
Large Roses
5.0mm hook (H)
medium weight cotton (70.9g)
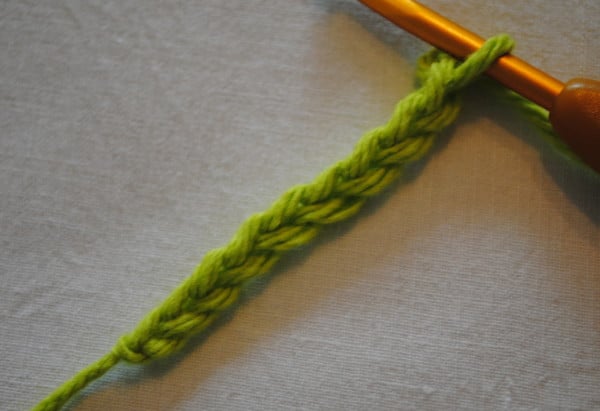
1. Leave long tail (18-24”) and chain 27
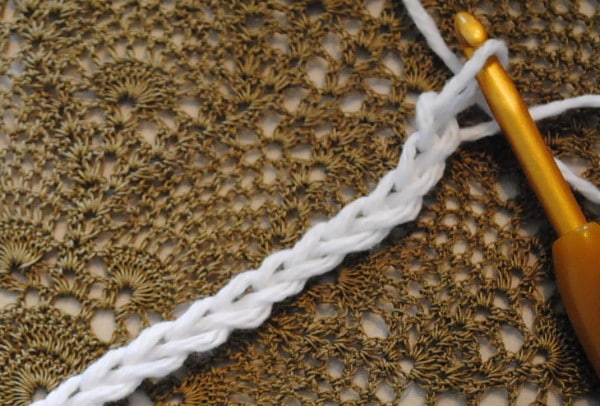
2. Skip first space and sc into second space from hook, * ch1 (skipping a space) and sc into next space. Repeat from* till end. This will give you 13 holes or spaces
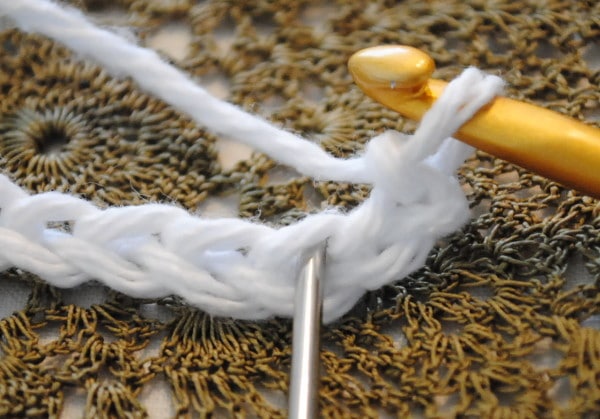
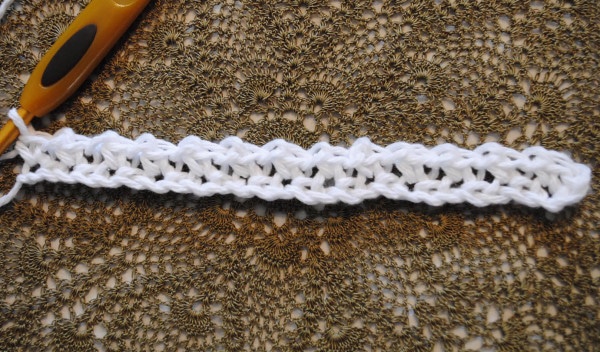
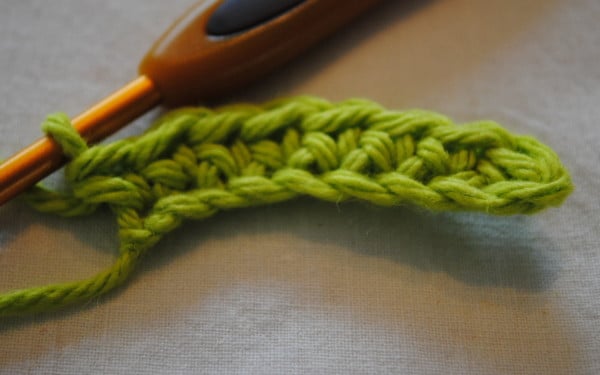
3. Turn, into the first three spaces crochet 3sc and 1sl st, giving you 3 petals. Make sure you are crocheting into the next space, space will be divided by the sc of previous row
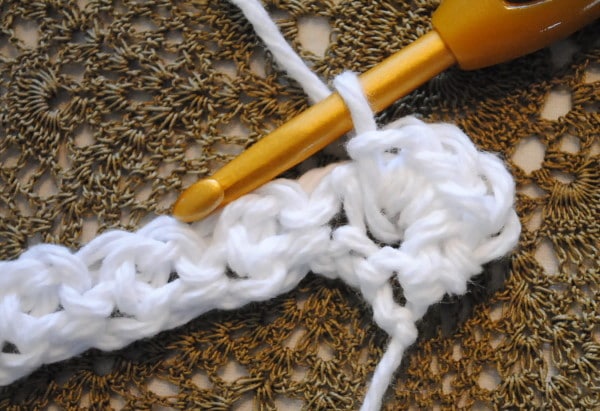
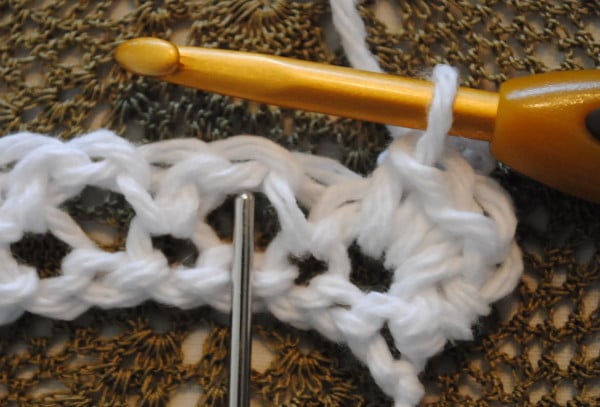
4. Into the next 4 spaces crochet 3hdc and 1sl st, giving you 5 more petals
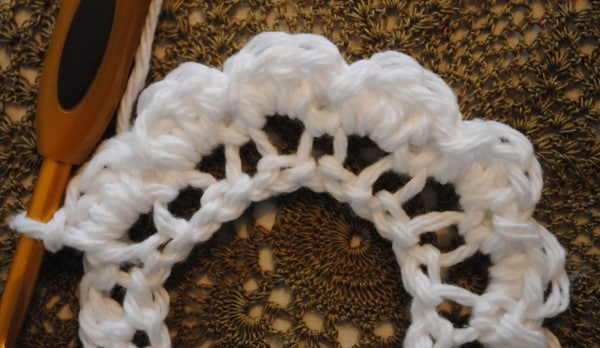
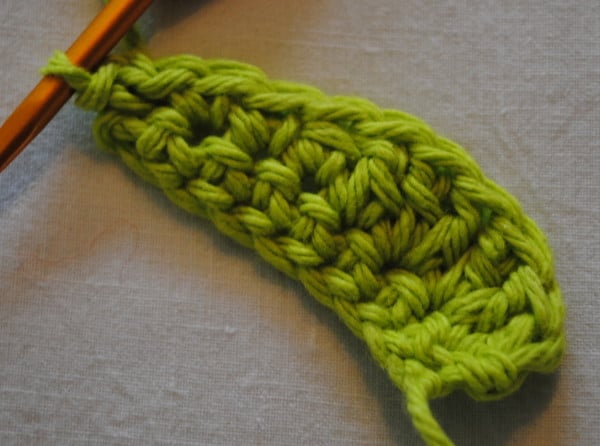
5. Into each of the remaining spaces crochet 3dc and 1sl, giving you 5 more petals. Fasten off leaving short tail (approx. 4-6”)
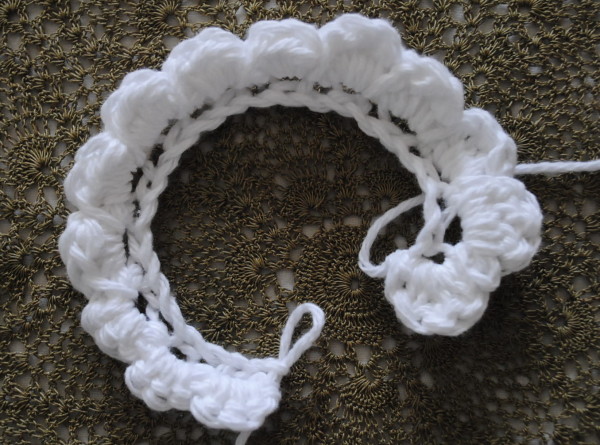
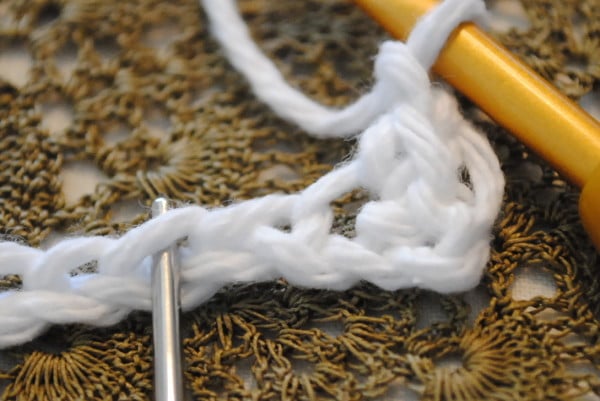
6. Insert long tail into embroidery needle and begin to wind up petals to create the rosette. Stitch together at the bottom as you go along. I recommend stitching after your first three petals are rounded and then for every additional petal placement so that you can control exactly what your flower will look like. After bottom is secure, weave the needle through the base of the flower to give petal placement more security.
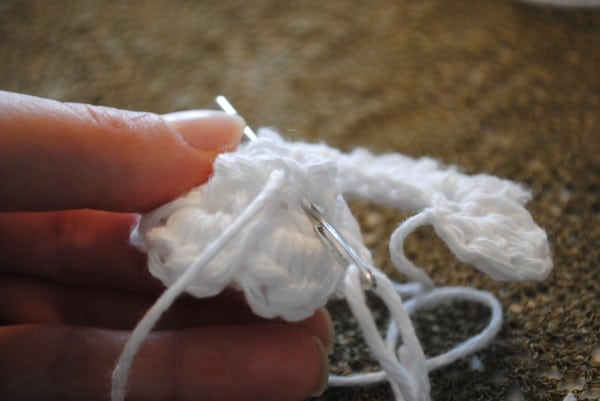
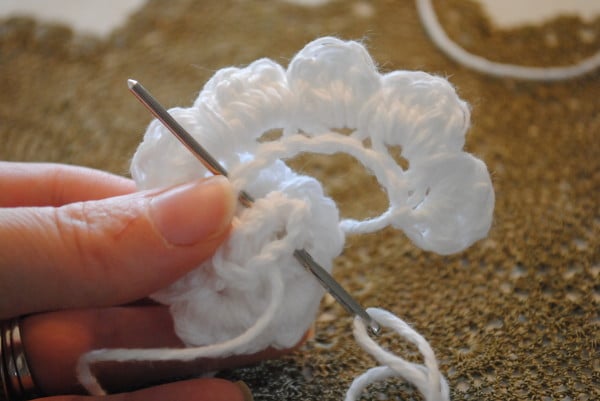
7. Secure with knot when done and leave tails to secure to finished piece. I use both tails to secure and tie them together and then use the long tail to tack the rosette into place. Weave in ends and cut short when done.

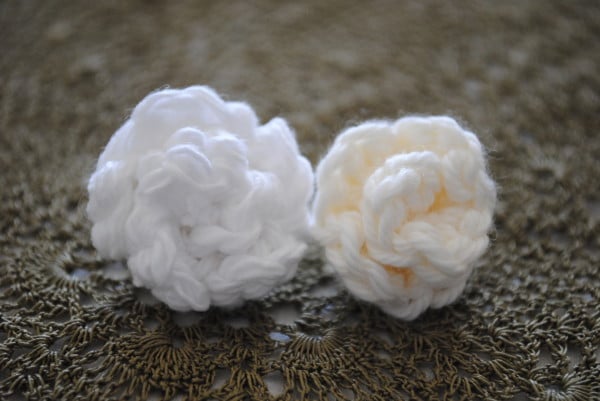
There is no right or wrong way to secure the flowers, you can wind them either way and make them as tight as you want… you will just achieve a different look. The flowers below are both made from the large rose pattern.

Medium Roses
5.0mm hook (H)
medium weight cotton (70.9g)
- Leave long tail (12-18”) and chain 21
- Skip first space and sc into second space from hook, * ch1 (skipping a space) and sc into next space. Repeat from* till end. This will give you 10 holes or spaces
- Turn, into the first three spaces crochet 3sc and 1sl st, giving you 3 petals
- Into each of the remaining spaces crochet 3hdc and 1sl st, giving you 7 more petals. Fasten off leaving short tail (approx. 4-6”)
- Insert long tail into embroidery needle and begin to wind up petals to create the rosette. Stitch together at the bottom as you go along. I recommend stitching after your first three petals are rounded and then for every additional petal placement so that you can control exactly what your flower will look like.
- Secure with knot when done and leave tails to secure to finished piece. I use both tails to secure and tie them together and then use the long tail to tack the rosette into place. Weave in ends and cut short when done.
 Small Roses and Sweetheart Roses
Small Rosettes
4.0mm hook (G) (may use a 4.25mm as well)
medium weight cotton (70.9g)
- Leave long tail (12-18”) and chain 17
- Skip first space and sc into second space from hook, * ch1 (skipping a space) and sc into next space. Repeat from* till end. This will give you 8 holes or spaces
- Turn, into the first three spaces crochet 3sc and 1sl st giving you 3 petals
- Into the next 4 spaces crochet 3hdc and 1sl st giving you 5 more petals. Fasten off leaving short tail (approx. 4-6”)
- Insert long tail into embroidery needle and begin to wind up petals to create the rosette. Stitch together at the bottom as you go along. I recommend stitching after your first three petals are rounded and then for every additional petal placement so that you can control exactly what your flower will look like.
- Secure with knot when done and leave tails to secure to finished piece. I use both tails to secure and tie them together and then use the long tail to tack the rosette into place. Weave in ends and cut short when done.
Sweetheart Rosettes
4.0mm (G) hook
These rosettes are made with a thinner, 50g, cotton
- Leave long tail (12-18”) and chain 15
- Skip first space and sc into second space from hook, * ch1 (skipping a space) and sc into next space. Repeat from* till end. This will give you 7 holes or spaces
- Turn, into each space crochet 3sc and 1sl st, giving you 8 petals. Fasten off leaving short tail (approx. 4-6”)
- Insert long tail into embroidery needle and begin to wind up petals to create the rosette. Stitch together at the bottom as you go along. I recommend stitching after your first three petals are rounded and then for every additional petal placement so that you can control exactly what your flower will look like.
- Secure with knot when done and leave tails to secure to finished piece. I use both tails to secure and tie them together and then use the long tail to tack the rosette into place. Weave in ends and cut short when done.
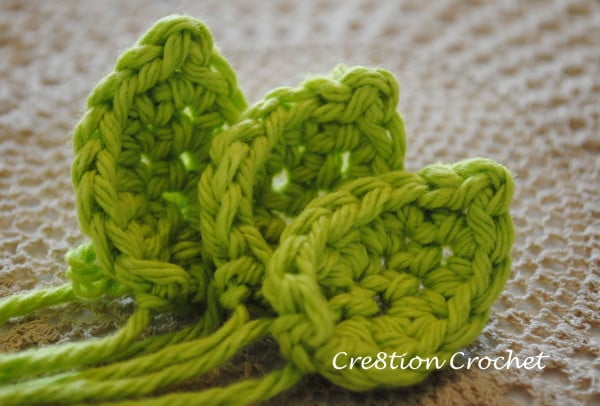
Leaves
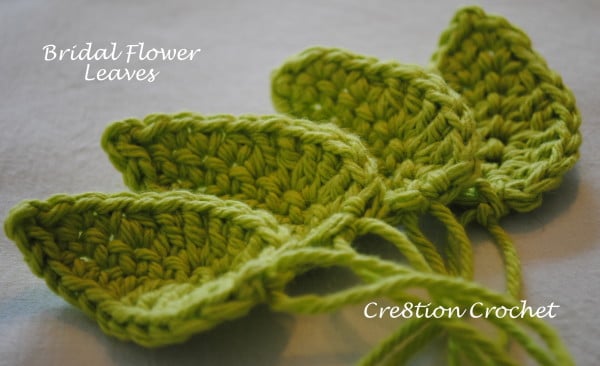
Medium Leaf
4.0mm hook (G) (may use a 4.25mm as well)
medium weight cotton (70.9g)
1. Chain 9
2. Turn and sc across <8>
3. Turn and crochet as follows, 1dc in first st, 2dc in next st, 2dc in next st, 1dc in next st, 1hdc in next st, 1sc in next st, 1sc in next st, 1sl t in last st <10>
4. At top, ch2 and sl st into same sp
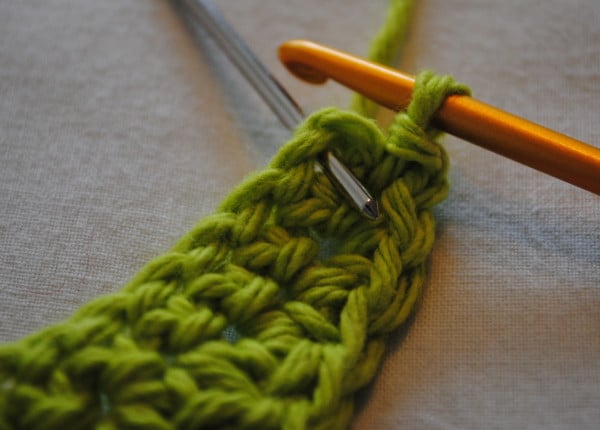
5. Crochet opposite side as follows, 1sl st in first st, 1sc in next st, 1sc in next st, 1hdc in next st, 1dc in next st, 2dc in next st, 2dc in next st, 1dc in last st <10>
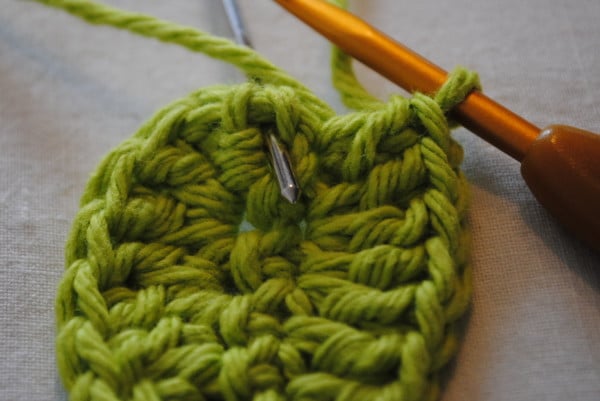
6. Sl st into base of leaf and fasten off, tie knot with other tail and leave long for fastening to finished piece

Small Leaf
4.0mm hook (G) (may use a 4.25mm as well)
medium weight cotton (70.9g)
- Chain 6
- Turn and sc across <5>
- Turn and crochet as follows 1hdc in 1st st, 2hdc in next st, 1sc in next st, 1sc in next st, 1sl st in last st <6>
- At top, ch2 and sl st into same sp
- Crochet opposite side as follows, 1sl st in 1st st, 1sc in next st, 1sc in next st, 2hdc in next st, 1hdc in last st <6>
- Sl st into base of leaf and fasten off, tie knot with other tail and leave long for fastening to finished piece
Assemble Flowers and Leaves
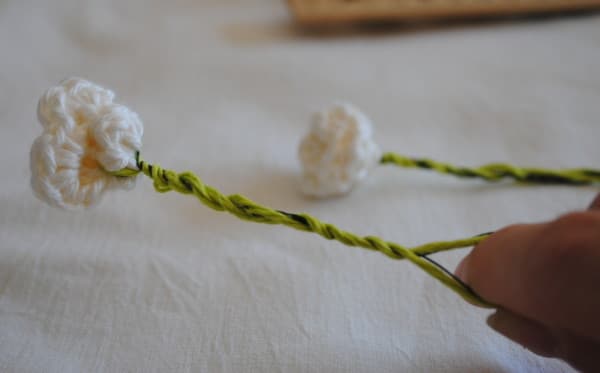
1. Cut wire and yarn approx. 18” per flower
2. weave yarn and wire through underneath of flower (I used two different brands of wire, one was stiff and could be pushed through the bottom of the flower, the other was thinner and had to be weaved through with an embroidery needle
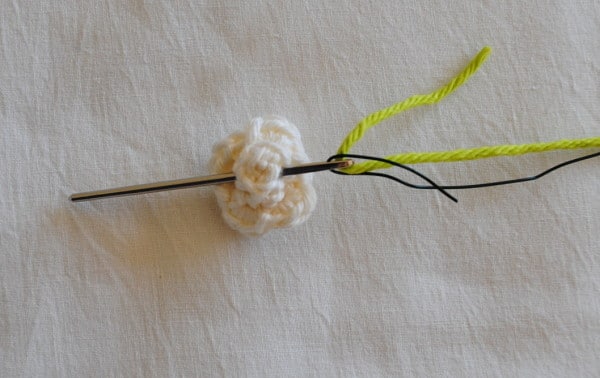
3. pull through till flower is in center and bend wire and yarn in half
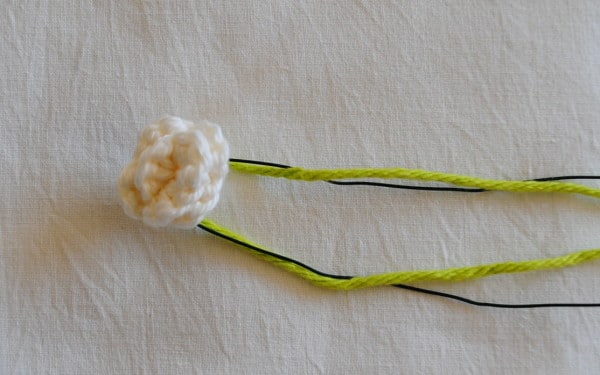
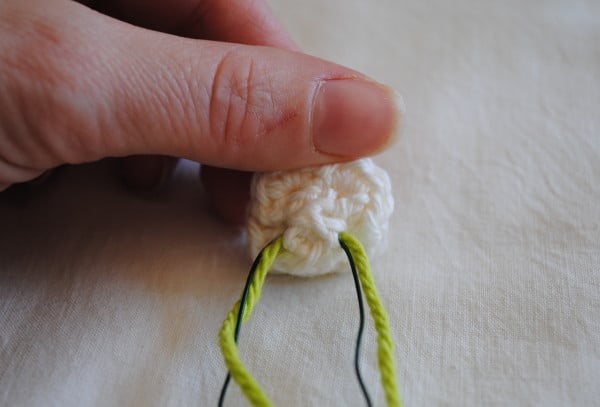
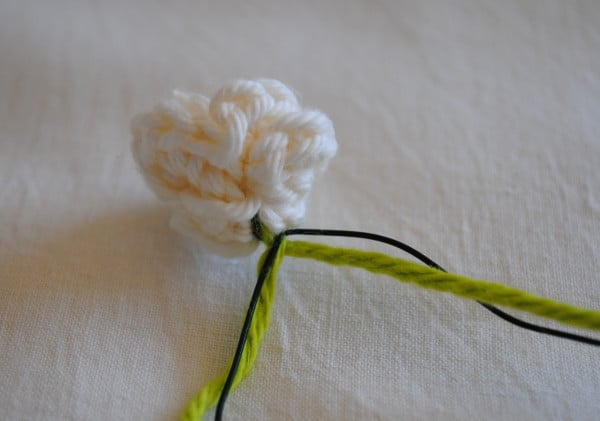
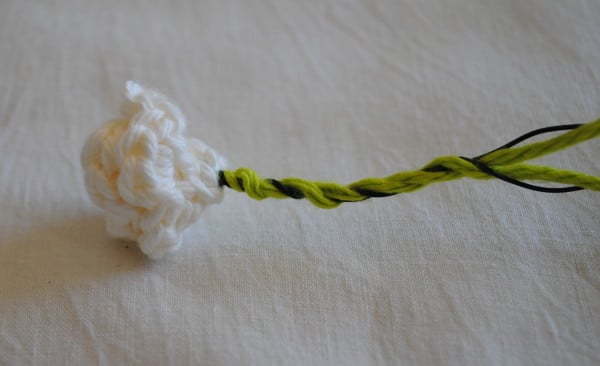
4. keeping one strand of yarn and one piece of wire together on either side, give a good twist as close as possible to flower and continue to twist all the way down, keeping one strand and one piece of wire on one half and the other strand of yarn and wire on the other half
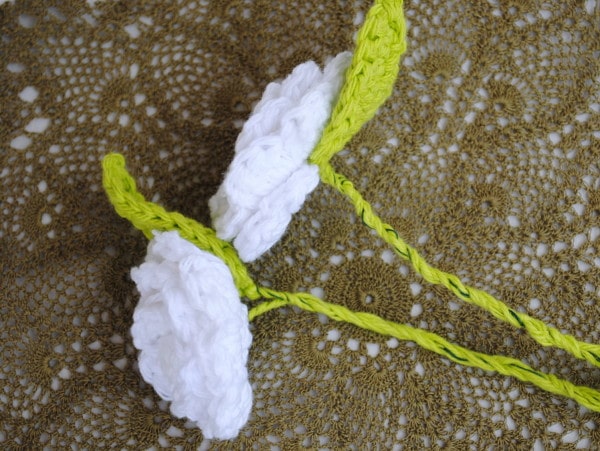
5. for leaves, you will already have two long strands so you will only need to pass the wire through the base of the leave and
complete the same way as the flower

6. Repeat with another flower or leave and then twist the two finished pieces together in the same fashion
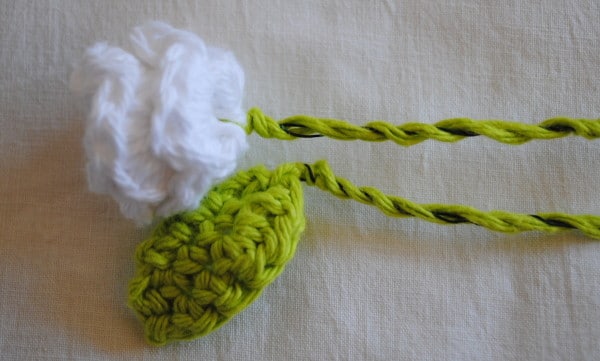

7. You can arrange these components in any fashion you desire. Some that I did were one flower and one leaf, two small flowers, one larger flower and one small flower, and two leaves. Do not worry about these steps being too neat, it will all be covered over
when done

Some of the flowers and leaves can be left as singles, there is no right or wrong here, just different results. I did about two thirds of the pieces doubles and about one third singles, I even did a couple triples.
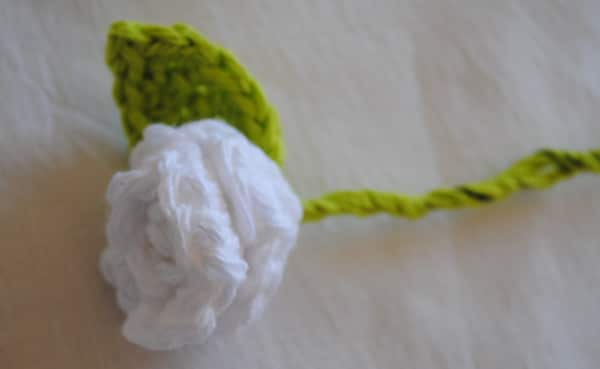
Once all of these pieces are completed you are ready to assemble your boutique
Assemble Bouquet
1. Simply bunch up the finished pieces and arrange them how you would like them to lay, try to keep them as natural as possible looking, just like real flowers would lie

2. Wrap them together, securing them with a long strand of green cotton. Do not worry about the neatness here. It will all be covered in the next step, just make sure it is secure
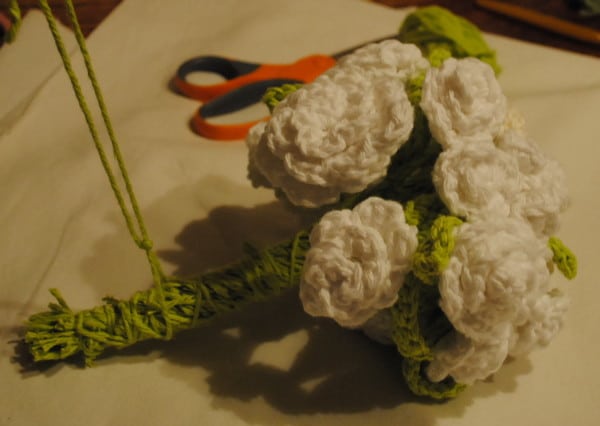
3. Cut the ends of stems evenly and neatly to the desired finished length
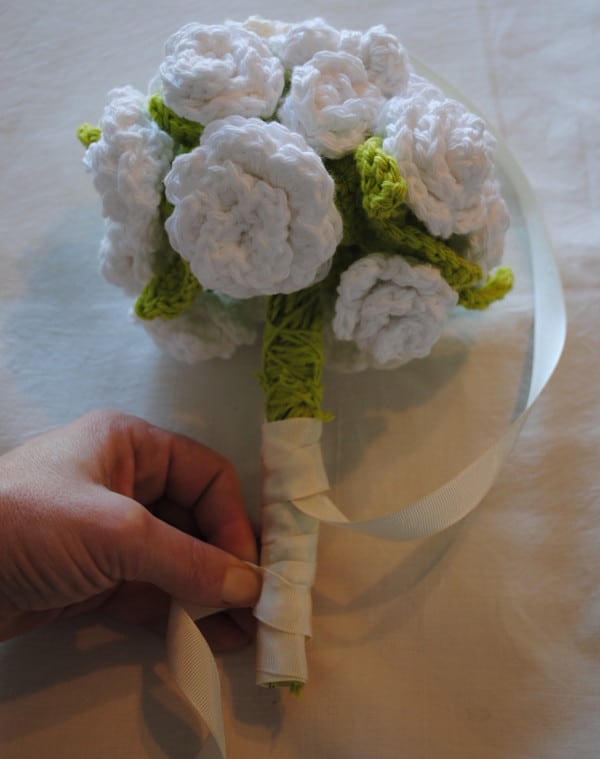
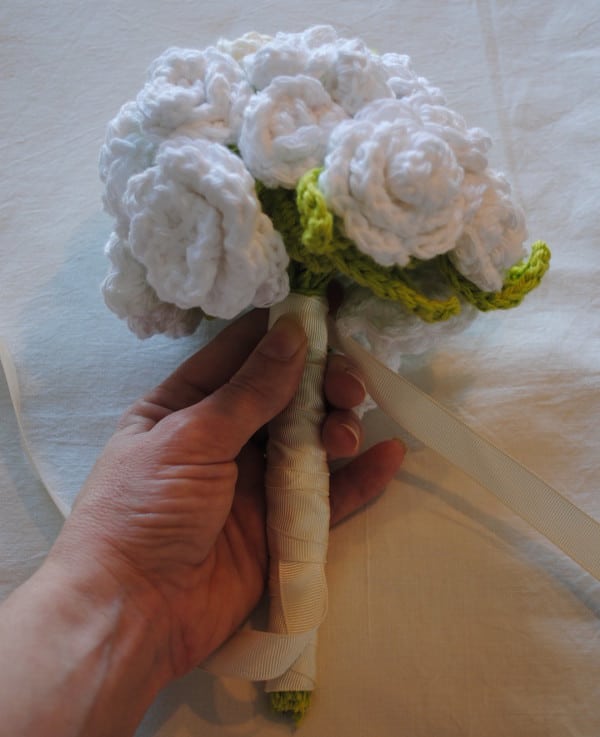
4. Use your choice of ribbon (½ -1” works best) to wrap the entire “stem” portion of your flower bundle. Start by wrapping around the middle and tying the ribbon in one knot, leaving one end approximately 12” long, being wrapping the other half from the middle down wrapping over the other end one time to secure in place. Once you get to the bottom begin to wrap back up, this part will show so be sure to be neat, cover over the long end in the other direction one time, and wrap to top. When you get to the top begin your wrap back down to the middle, when you reach the other end stop and tie into a knot. Tie knot into a neat bow and you are finished.

Assemble Boutonniere
1. Assemble boutonniere components the same way as flower components. I used one sweetheart rosette and one small rosette with one small leaf.
2. Cut to desired length and wrap finished stem in ribbon. Tie knot at top, directly below flower, wind your way down the stem and slightly past the bottom edge. Wrap back up neatly. Tie a bow in the back of the boutonniere to finish. Use a long boutonniere pin to attach to lapel
I hope you enjoyed making this bridal boutique with me. Stay tuned for more bridal flower patterns and tutorials.
You may also enjoy these Large Roses that are being designed for a clients custom bridal bouquet

Or this handmade vintage inspired garter

Or check out all my other FREE Crochet Patterns

Have fun and always…. Happy Hookin’


