Little Pixie Tee
free kids crochet tee pattern
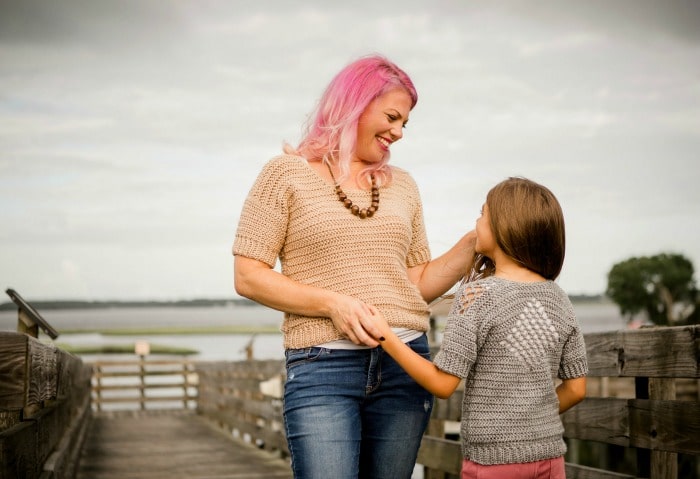
The Little Pixie kids crochet tee is the companion, children’s version, of the Pixie Dust Tee; a wonderfully versatile top that can be paired with jeans, shorts or skirts for different looks for all seasons.
The diamond-back provides a gorgeous design that’s lacy giving you a garment that’s airy and comfortable. Its ribbed sleeves and hem hugs your arms and torso comfortably. The little girl in your life will get great use from this versatile design.

- This post contains affiliate links. You can click on any yarn or material highlighted to purchase
- By using the Little Pixie kids crochet tee pattern, you agree to the Pattern Terms of Use set forth by Cre8tion Crochet

YARN
Red Heart Fashion Soft – 2 (2, 2, 2, 2, 2, 2, 2) skeins
440 (460, 490, 510, 650, 670, 690, 710) of 3 Light Weight Yarn- 100% Acrylic
Sample uses Grey Heather
MATERIALS
I/5.5mm hook- I used my Blackberry Candy Shop by Furls Crochet to make the Little Pixie kids crochet tee
DIFFICULTY
Easy
SIZE(S)
2 (4, 6, 8, 10, 12, 14, 16) Children’s
see the schematic for finished measurements of the Little Pixie kids crochet tee

GAUGE
Done in herringbone st
17sts = 5″
11 rows = 4″
Please note
Gauge is extremely important with any fitted garment, but especially with the row height of this particular stitch. I use fairly light tension when I crochet, you may need to go up a hook size or adjust your stitching so that your row height matches mine. Because of the unique nature of this stitch, you may need to pay particular attention to how tightly you are crocheting, be sure not to make the first part of the stitch too tight. See notes for more.
STITCH GUIDE
ch(s) – chain(s), sc – single crochet, st(s) – stitch(es), sl st – slip stitch, RS – right side,
SPECIAL STITCHES
Herringbone HDC (referred to as herringbone in pattern)
YO, insert hook in st, YO and draw through the st and the first loop on the hook (two loops remain on hook), YO and draw through two remaining loops on hook. Be sure not to pull the first part of the stitch too tightly.
Herringbone two together
YO, insert hook in first st, YO and draw through the st and the first loop on the hook (two loops remain on hook) insert hook in next st, yarn over and draw through the st and the first st on the hook (two loops remain on hook), YO and draw through remaining two loops on hook.

NOTES
- The Little Pixi s design is constructed bottom up in two panels, shoulders are seamed and sleeves are added before side seaming.
- Ch 2 (and ch 1) are not considered the first stitch, the first herringbone (or sc) will be placed in the same st as the Ch 2 (or ch 1).
- Sides are marked as would be worn.
- Be sure to check gauge. The pattern includes measurements required where necessary and the schematic shows the measurements of the finished garment. Be sure your dimensions match.
The adult version of this pattern can be found HERE
use promo code formommy to get 25% off
PATTERN
FRONT PANEL
Row 1: Fhdc 35 (41, 43, 45, 49, 51, 53, 55)
Rows 2-25 (27, 27, 29, 29, 31, 31, 33): Ch 2 turn, herringbone to end <35 (41, 43, 45, 49, 51, 53, 55)>
Do not fasten off- Check your measurements, your finished section should measure approx. 9.5 (10.25, 10.25, 11, 11, 11.75, 11.75, 12.5)” tall
If your height is short, add rows as necessary in multiples of two. **You will need to add any extra rows to the back portion (before the diamond section) as well.
Shoulder rows start a new count, final row count for all sizes will be 31 (33, 35, 37, 39, 41, 43, 45)
Right shoulder
Row 1: Ch 2, turn, 15 (17, 18, 19, 21, 22, 22, 23) herringbone
Row 2: Ch 2, turn, herringbone first, herringbone2tog, herringbone to end (decrease by one) <14 (16, 17, 18, 20, 21, 21, 22)>
Row 3: Ch 2, turn, herringbone to end
Repeat last two rows 1 (0, 1, 2, 1, 2, 2, 3) times more for a total of 13 (16, 16, 16, 19, 19, 19, 19) sts
Next 1 (3, 3, 1, 5, 3, 5, 3) rows: Ch 2, turn herringbone to end <13 (16, 16, 16, 19, 19, 19, 19) sts>
Fasten off.
Left shoulder
Row 1: Skip 5 (7, 7, 7, 7, 7, 9, 9) sts, join yarn in next st, ch 2 and herringbone in same st, herringbone to end <25 (28, 31, 34, 37, 39, 42, 46)>
Row 2: Ch 2, turn, herringbone until 3sts remain, herringbone2tog, herringbone in last st,
Row 3: Ch 2, turn, herringbone to end
Repeat last two rows 1 (0, 1, 2, 1, 2, 2, 3) times more for a total of 13 (16, 16, 16, 19, 19, 19, 19) sts
Next 1 (1, 3, 1, 5, 3, 5, 3) rows: Ch 2, turn herringbone to end <13 (16, 16, 16, 19, 19, 19, 19) sts>
Fasten off and place a stitch marker in the last st
BACK PANEL
Row 1: Fhdc 35 (41, 43, 45, 49, 51, 53, 55)
Rows 2- 13 (15, 15, 17, 17, 19, 19, 21): Ch 2 turn, herringbone to end <35 (41, 43, 45, 49, 51, 53, 55)>
**If you added any rows to the front section, be sure to add the same number of rows to this section as well.
Diamond-section starts a new row count which will correspond with an actual row count of 29 (31, 33, 35, 37, 39, 41, 43)
Increase section of Diamond
Row 1: Ch2, turn herringbone next 17 (20, 21, 22, 24, 25, 26, 27) sts, ch 3, skip 1, herringbone to end
Row 2: Ch2, turn, herringbone next 15 (18, 19, 20, 22, 23, 24, 25) sts, ch 3, skip 2, sc in next ch sp, ch 3, skip 2, herringbone to end
Row 3: Ch2, herringbone next 13 (16, 17, 18, 20, 21, 22, 23) sts, ch 3, skip 2, sc next ch sp, ch 3, sc next ch sp, ch 3, skip 2, herringbone to end
Row 4: Ch2, herringbone next 11 (14, 15, 16, 18, 19, 20, 21) sts, ch 3, skip 2, sc next ch sp, *ch 3, sc next ch sp, repeat from * one time, ch 3, skip 2, herringbone to end
Row 5: Ch2, herringbone next 9 (12, 13, 14, 16, 17, 18, 19) sts, ch 3, skip 2, sc next ch sp, *ch 3, sc next ch sp, repeat from * two times, ch 3, skip 2, herringbone to end
Row 6: Ch2, herringbone next 7 (10, 11, 12, 14, 15, 16, 17) sts, ch 3, skip 2, sc next ch sp, *ch 3, sc next ch sp, repeat from * three times, ch 3, skip 2, herringbone to end
Row 7: Ch2, herringbone next 5 (8, 9, 10, 12, 13, 14, 15) sts, ch 3, skip 2, sc next ch sp, *ch 3, sc next ch sp, repeat from * four times, ch 3, skip 2, herringbone to end
END FOR SIZE 2 and 4 SKIP TO ROW 11
Row 8: Ch2, herringbone next x (x, 7, 8, 10, 11, 12, 13) sts, ch 3, skip 2, sc next ch sp, *ch 3, sc next ch sp, repeat from * five times, ch 3, skip 2, herringbone to end
END FOR SIZE 6 and 8 SKIP TO ROW 13
Row 9: Ch2, herringbone next x (x, x, x, 8, 9, 10, 11) sts, ch 3, skip 2, sc next ch sp, *ch 3, sc next ch sp, repeat from * six times, ch 3, skip 2, herringbone to end
END FOR SIZE 10 and 12 SKIP TO ROW 12
Row 10: Ch2, herringbone next x (x, x, x, x, x, 8, 9) sts, ch 3, skip 2, sc next ch sp, *ch 3, sc next ch sp, repeat from * seven times, ch 3, skip 2, herringbone to end
Decrease section of Diamond
SIZES 14 and 16 START HERE
Row 11: Ch 2, turn, herringbone to last st, 2 herringbone in next ch-3 sp, *ch 3, sc next ch sp, repeat from * 7 times, ch 3, 2 herringbone in next ch-3 sp, herringbone to end
SIZES 10 and 12 START HERE
Row 12: Ch 2, turn, herringbone to last st, 2 herringbone in next ch-3 sp, *ch 3, sc next ch sp, repeat from * 6 times, ch 3, 2 herringbone in next ch-3 sp, herringbone to end
SIZES 6 and 8 START HERE
Row 13: Ch 2, turn, herringbone to last st, 2 herringbone in next ch-3 sp, *ch 3, sc next ch sp, repeat from * 5 times, ch 3, 2 herringbone in next ch-3 sp, herringbone to end
SIZES 2 and 4 START HERE
Row 14: Ch 2, turn, herringbone to last st, 2 herringbone in next ch-3 sp, *ch 3, sc next ch sp, repeat from * 4 times, ch 3, 2 herringbone in next ch-3 sp, herringbone to end
Row 15: Ch 2, turn, herringbone to last st, 2 herringbone in next ch-3 sp, *ch 3, sc next ch sp, repeat from * 3 times, ch 3, 2 herringbone in next ch-3 sp, herringbone to end
Row 16: Ch 2, turn, herringbone to last st, 2 herringbone in next ch-3 sp, *ch 3, sc next ch sp, repeat from * 2 times, ch 3, 2 herringbone in next ch-3 sp, herringbone to end
Row 17: Ch 2, turn, herringbone to last st, 2 herringbone in next ch-3 sp, *ch 3, sc next ch sp, repeat from * one time, ch 3, 2 herringbone in next ch-3 sp, herringbone to end
Row 18: Ch 2, turn, herringbone to last st, 2 herringbone in next ch-3 sp, ch 3, sc next ch sp, ch 3, 2 herringbone in next ch-3 sp, herringbone to end
Row 19: Ch 2, turn, herringbone to last st, 2 herringbone in next ch-3 sp, ch 1, 2 herringbone in next ch-3 sp, herringbone to end
Row 20: Ch 2, turn, herringbone to last st, 1 herringbone in next ch-1 sp, herringbone to end <xx>
Next 2 rows: Ch2, turn, herringbone to end 35 (41, 43, 45, 49, 51, 53, 55)
do not fasten off
Shoulder rows start a new count, final row count for all sizes will be 31 (33, 35, 37, 39, 41, 43, 45)
Left shoulder
Row 1: Ch 2, turn, herringbone next 14 (17, 17, 17, 20, 20, 20, 20)
Row 2: Ch 2 turn, herringbone first, herringbone2tog one time, herringbone to end <13 (16, 16, 16, 19, 19, 19, 19) sts>
Do not fasten off
Join Left Shoulder to Front Panel
Row 1: Ch 1, turn, sc in first st, *ch 3, skip 2, sc in next st, repeat from * to end
Row 2: Ch 1, turn, take left the left (just completed shoulder) on the back panel and match it to the left shoulder of front panel (this is the marked shoulder) with RS facing out on both panels. Insert hook into the marked st and attach with a sl st, ch 1 and sc in the same st, *ch 1 and sc in the next ch-3 loop of the back panel, ch 3, skip 2 sts on the front panel (though it will be in the back position when working) and sc in next st, repeat from * to end, ch 1 and sc in the corner of the last st of the back panel.
Fasten off
Right shoulder
Lay your work so that the Back Panel is facing towards you with the finished shoulder to your right; Skip 7 (7, 9, 11, 9, 11, 13, 15) sts over from the left corner.
Row 1: Attach yarn with sl st in the next st; Ch 2 and herringbone in the same st, herringbone to end <14 (17, 17, 17, 20, 20, 20, 20)>
Row 2: Ch 2, turn, herringbone to 3sts from end, herringbone 2tog, herringbone in last st <13 (16, 16, 16, 19, 19, 19, 19) sts>
Do not fasten off
Join Right Shoulder to Front Panel
You will be repeating the same thing you did on the previous shoulder; however, it will be from the opposite direction.
Row 1: Ch 1, turn, sc in first st, *ch 3, skip 2 sts, sc in next st, repeat from * to end, line up your shoulders, insert hook into the last st on the corner of the front panel and join with a sl st
Row 2: Ch 1 and turn, sc in the same st, *ch 1 and sc in the next ch-3 loop on the back panel, ch 3, skip 2 sts on the front panel and sc in the next st, repeat from * to end, ch 1 and sc in the last st of the back panel. fasten off
You have now completed both front and back panels and joined them. Next, we will be edging the sides, crocheting and adding the sleeves, and final seaming.
EDGING and BOTTOM RIBBING
To edge body, turn the work so that right side is facing; sc evenly along both long edges. Exact st count is not mandatory, you just want to make sure that the fabric is neither stretched or pulled. What works well for me is doing 3sc along every two rows (or 1sc at the end of one row and 2sc at the end of the next row). Over the shoulders seam, place 1sc for every ch st.
Row 1: Begin in any corner and work along entire long edge, when you reach the end extend past it with 8 chains. You are now going to add the ribbing along the short edge.
Row 2: Turn, place one sc in the second ch from the hook, sc in next 5 chs, sc3tog over the next ch and the first and second unworked sts along the bottom edge of the top <7>
Row 3: Ch 1, turn, sc in the blo of the next 6 sts, sc in both loops of the last sc <7>
Row 4: Ch 1, turn, sc in the blo of the next 6 sts, sc3tog over the next st and the first and second unworked sts along the bottom edge of the top <7>
Repeat Rows 3 and 4 until all unworked sts along the bottom edge of the top are worked (you may only be able to do a sc2tog on the last repeat, depending on what size you make). Sc evenly along the other long side of the top and extend past the long edge with 8 chs, repeat rows 2-4 until all unworked sts along the bottom edge of the top are worked. You should meet at the st where you began the edging, join with a sl st.
Fasten off
SLEEVES
Lay your seamed panels down flat, so that you can measure the long sides. Measure the center 9.5 (10.5, 11, 12, 13, 14, 15, 16)” with the 4.75 (5.25, 5.5, 6, 6.5, 7, 7.5, 8)” mark in the very center of the shoulder seaming. Place a stitch marker at the first and last st of those 9.5 (10.5, 11, 12, 13, 14, 15, 16)”.
Row 1: With the wrong side facing; attach yarn with sl st in the first marked st, ch 2 and herringbone in the same st, herringbone in each st to end <your stitch count will vary>
Row 2: Ch 2, turn, herringbone in the first st, herringbone 2tog, herringbone until end <decrease by one st>
Rows 3-5: Repeat Row 2 <each row will decrease by one st, your stitch count will vary>
Rows 6-8: Ch 2, turn, herringbone in each st to end <your stitch count will vary>
END FOR SIZE 2, 4, 6 and 8- skip to sleeve ribbing
Rows 9-10: Ch 2, turn, herringbone in each st to end <your stitch count will vary>
END FOR SIZE 10, 12, 14 and 16- skip to sleeve ribbing
Repeat for the second side. Count the sts on both sides to ensure that they match, adjust as needed.
SLEEVE RIBBING
Row 1: Ch 8, turn, place one sc in the second ch from the hook, sc in next 5 chs, sc3tog over the next ch and the first and second unworked sts along the last row of the sleeve <7>
Row 2: Ch 1, turn, sc in the blo of the next 6 sts, sc in both loops of the last sc <7>
Row 3: Ch 1, turn, sc in the blo of the next 6 sts, sc3tog over the next st and the first and second unworked sts along the last row of the sleeve <7>
Repeat Rows 2 and 3 until all unworked sts along the last row of the sleeve are worked (you may only be able to do a sc2tog on the last repeat, depending on what size you make).
Fasten off.
FINAL ASSEMBLY
With wrong sides facing and right sides in, fold the panels in half at the shoulder seaming. Mattress seam the bottom edge of the sleeves, continue along the side of the top to the bottom edge. Repeat for second side.
Fasten off.
NECK EDGING
Leave top inside out.
Row 1: Starting on the back panel, join yarn with sl st in any st; Ch 1, sc in the same st, sc evenly around neckline, sl st in top of first sc, skipping over the beginning ch-1 to join <st count will vary>
Row 2: Ch 1, turn, sc in same st, sc even around neckline, sl st in top of first sc, skipping over the beginning ch-1 to join <st count will vary>
Fasten off, weave in all ends, turn top right side out, block if necessary.
 |
 Lorene Eppolite is the designer behind Cre8tion Crochet. She has been designing since October 2012. She loves to create fun and easy crochet accessories and garments. Lorene strives to make her designs to be achievable for any skill level. Just because it is easy, doesn’t mean it can’t be beautiful. Lorene was named one of the Top Ten Designers by The Yarn Box in 2012 and by AllFreeCrochet in 2013-2017. Most recently Lorene has become the Creative Director for Furls Crochet. Follow Lorene on Facebook, Pinterest or Instagram. You can also subscribe to the Cre8tion Crochet Weekly Newsletter for weekly free patterns, discounts on paid patterns, reviews and giveaways and business tips.


