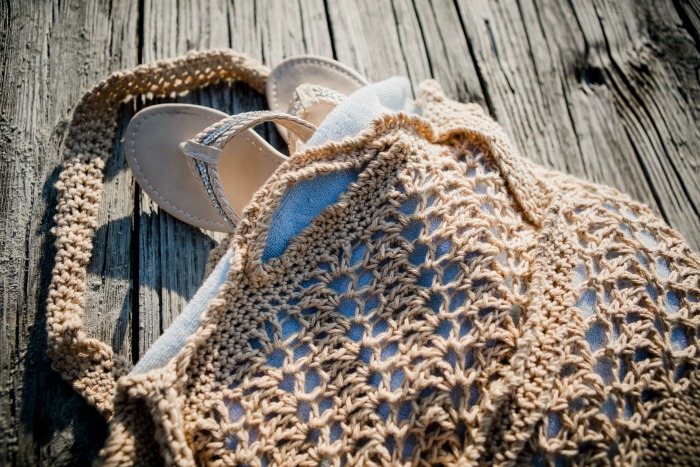
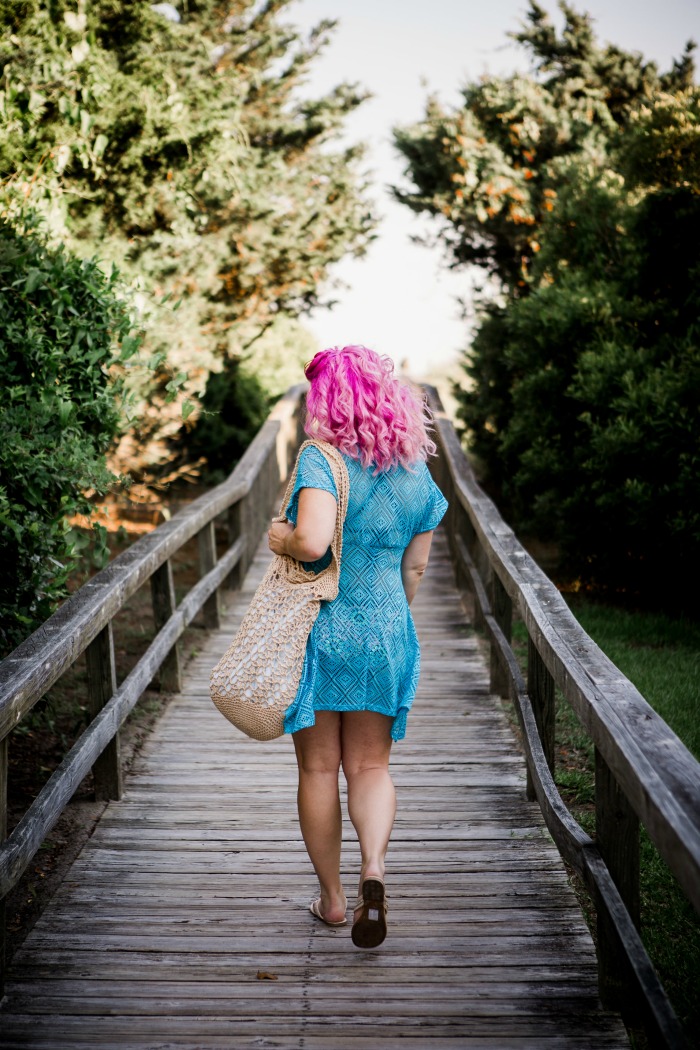
The Beachcomber bag is the perfect beach accessory. It works up quickly and makes a fashionable impact, all while carrying everything you could need at the beach.
This bag pattern can be easily altered to be larger or smaller; instructions included in notes.

This post contains affiliate links
By using this pattern, you agree to the Pattern Terms of Use set forth by Cre8tion Crochet
YARN
Worsted Weight, 100% cotton, 180 yards/100grams per skein- 2 skeins or 360 yards comparable worsted weight yarn.
*My sample uses Ivory I Love This Yarn
MATERIALS
K/6.5mm hook- I use the Mango Candy Shop from Furls Crochet
(4) stitch markers
DIFFICULTY
Easy
GAUGE
Not important with this pattern
STITCH GUIDE
ch(s) – chain(s), sc – single crochet, dc – double crochet, st(s) – stitch(es), RS – right side.
SPECIAL STITCHES
fsc- foundation single crochet – Tutorial
Ch2. Insert hook in first ch *yarn over and pull up loop (2 loops on hook), yarn over and pull through 1 loop, creating a chain, (this is an important step but easy to forget). Yarn over again and pull through two remaining loops on hook. This completes the first fsc. To stitch the next fsc insert the hook into the chain made in the first fsc and repeat from *
*To extend a row with fsc, you will work the fsc the same way as above- the first extended fsc will be stitched into the base of the last regular sc instead of the sl st that would normally be created in the previous step (see photos in pattern)
Twisted sc
*Yarn over, twist hook 360 degrees (completely around), creating a twist in the yarn, insert hook into st, yarn over and pull through, three loops on hook, yarn over and pull through all three loops, repeat from *
NOTES
- To decrease the overall size of this design, do less increase rows at the beginning. Be sure to end on an odd number round to be set up for the lace pattern (must end in multiples of 8)
- To increase the overall size of this design, add more increase rounds (using the same method as previous increase rounds), ending in multiples of 8
- Ch-1 is not considered a st
- The entire pattern is made in joined rounds with no turning.
- To join; for sc rounds, sl st into the first sc, skipping over the ch 1, for lace rounds, sl st into the 3rd ch of the beg ch-5
- St counts are at the end of each row in <brackets>
PATTERN
Row 1: Fsc 10
Round 2: Working around the fsc row just made; ch 1, 2sc next st, sc in next 8 sts, 2sc next 2 sts, sc next 8 sts, 2sc next st <24>
Round 3: Ch 1, 2sc next st, sc next 10 sts, 2sc next 2 sts, sc next 10 sts, 2sc next st <28>
Round 4: Ch 1, 2sc next st, sc next 10 sts, 2sc next 4 sts, sc next 10 sts, 2sc next 3 sts <36>
Round 5: Ch 1, 2sc next st, sc next 10 sts, 2sc next st, sc next 6 sts, 2sc next, sc next 10 sts, 2sc next st, sc next 6 sts <40>
Round 6: Ch 1, 2sc next st, sc next 12 sts, 2sc next st, sc next 6 sts, 2sc next st, sc next 12 sts, 2sc next st, sc next 6 sts <44>
Round 7: Ch 1, 2sc next st, sc next 12 sts, 2sc next st, sc next 8 sts, 2sc next st, sc next 12 sts, 2sc next st, sc next 8 sts <48>
Round 8: Ch 1, sc next 15 sts, 2sc next st, sc next 7 sts, 2sc next st, sc next 15 sts, 2sc next st, sc next 7 sts, 2sc next st <52>
Round 9: Ch 1, sc next 15 sts, 2sc next st, sc next 7 sts, 2sc next st, sc next 17 sts, 2sc next st, sc next 7, 2sc next st, sc next 2 <56>
Round 10: Ch 1, sc next 15 sts, 2sc next st, sc next 7 sts, 2sc next st, sc next 19 sts, 2sc next st, sc next 7 sts, 2sc next st, sc next 4 sts <60>
Round 11: Ch 1, sc next 15 sts, 2sc next st, sc next 7 sts, 2sc next st, sc next 21 sts, 2sc next st, sc next 7 sts, 2sc next st, sc next 6 sts <64>
Round 12: Ch 1, sc next 15 sts, 2sc next st, sc next 7 sts, 2sc next st, sc next 23 sts, 2sc next st, sc next 7 sts, 2sc next st, sc next 8 sts <68>
You may notice that the oval will begin to take a cup shape
Round 13: Ch 1, sc next 15 sts, 2sc next st, sc next 7 sts, 2sc next st, sc next 25 sts, 2sc next st, sc next 7 sts, 2sc next st, sc next 10 sts <72>
Round 14: Ch 1, sc next 15 sts, 2sc next st, sc next 7 sts, 2sc next st, sc next 27 sts, 2sc next st, sc next 7 sts, 2sc next st, sc next 12 sts <76>
At this point you may find it easier to fold your work in half
Round 15: Ch 1, sc next 15 sts, 2sc next st, sc next 7 sts, 2sc next st, sc next 29 sts, 2sc next st, sc next 7 sts, 2sc next st, sc next 14 sts <80>
Round 16: Ch 1, sc next 15 sts, 2sc next st, sc next 7 sts, 2sc next st,, sc next 31 sts, 2sc next st, sc next 7 sts, 2sc next st, sc next 16 sts <84>
Round 17: Ch 1, sc next 15 sts, 2sc next st, sc next 7 sts, 2sc next st sc next 33 sts, 2sc next st, sc next 7 sts, 2sc next st, sc next 18 sts <88>
Round 18: Ch 1, sc next 15 sts, 2sc next st, sc next 7 sts, 2sc next st, sc next 35 sts, 2sc next st, sc next 7 sts, 2sc next st, sc next 20 sts <92>
Round 19: Ch 1, sc next 15 sts, 2sc next st, sc next 7 sts, 2sc next st, sc next 37 sts, 2sc next st, sc next 7 sts, 2sc next st, sc next 22 st <96>
LACE BODY
Round 20: [Ch 5 (counts as first dc and ch-2), dc, ch 2, dc, ch 2, dc] in the same st, skip 3 sts, sc in the next st, skip 3 sts, *[dc, ch 2, dc, ch 2, dc, ch 2, dc] in the same st, skip 3 sts, sc in the next st, skip 3 sts, repeat from * around, sl st in 3rd ch of beg ch 3 to join <12 clusters>
Round 21: Sl st into first ch-2 sp, [Ch 5 (counts as first dc and ch-2), dc, ch 2, dc, ch 2, dc] in the same sp, skip next ch-2 sp, sc in next ch-2 sp, *skip next sc, *[dc, ch 2, dc, ch 2, dc, ch 2, dc] in next ch-2 sp, skip next ch-2 sp, sc in next ch-2 sp, repeat from * around
Repeat Round 21; until desired height (minus approx. 2” for edging) is reached. My ivory sample goes to 36 rounds, though I found that this was a bit taller than I would like, as it does stretch when being used. I’d recommend 28-30 rounds total.
EDGING/HANDLES and STRAPS
Next Round: Ch 1, place one sc in each st and ch-2 sp around <96>
Next 2 Rounds: Ch 1, sc in each st around <96>
You will end in a different place, depending on how many rounds of the lace section you completed.
Lay your bag flat (with the beginning fsc flat in the center), find the center of the last sc row, and count out 8sts on either direction from that center (not including that st). Mark these two sts. You will have 15sts in between the marked sts, this will become your handles. Repeat for back.
Next Round: Ch 1, sc around until you reach the first marked st, *extend fsc for 15 sts, skipping the 15 sts between the stitch markers. Sc in the next marked st, repeat from * at the next marked st. <96> Mark the 8th fsc st.
Next Round: Ch 1, sc around (you will be working along the top of the handles) <96> Move the stitch marker up to this row, same position
Lay your bag flat and count out 12sts on either direction from that center (not including that st). Mark these two sts. You will have 25 sts in between the marked sts, this will become your straps. Repeat for back.
Next Round: Ch 1, sc around until you reach the first marked st, *extend fsc for 45 sts, skipping the 25 sts between the stitch markers. Sc in the next marked st, repeat from * at the next marked st. <136>
Next Round: Ch 1, sc around (you will be working along the top of the straps) <136>
Next Round: Ch 1, twisted sc around the entire top. Fasten off.
Attach the yarn in the inside edge of the straps, working along the inside edge of the straps and the outer edge of the top and handles; ch 1, twisted sc around. Fasten off
Attach the yarn in the inside edge of the handles; ch 1, twisted sc around. Fasten off.
Weave in all your ends and enjoy your new bag!!!!
 |
Subscribe to the Cre8tion Crochet Weekly Newsletter for weekly free patterns, discounts on paid patterns, reviews and giveaways and business tips. You’ll be sent a promo code for one free pattern from my Ravelry shop when you sign up.
Lorene Eppolite is the designer behind Cre8tion Crochet. She has been designing since October 2012. She loves to create fun and easy crochet accessories and garments. Lorene strives to make her designs to be achievable for any skill level. Just because it is easy, doesn’t mean it can’t be beautiful.


