This post may contain affiliate links
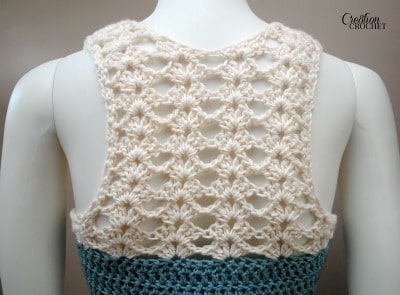
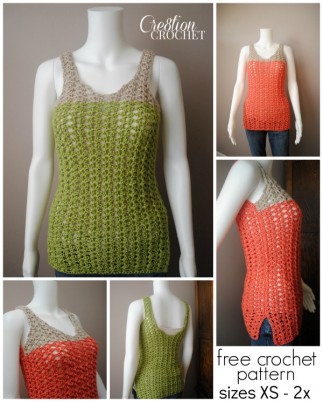
Adorable, lacy topped, tank. Perfect for the summer! Wear over a camisole or tank, or even your bathing suit.
The Seaside Tank is incredibly easy to make. It is constructed with two panels, front and back, which are then seemed together. This top is designed with 2” of ease so it is fitted but not tight. I recommend using natural fibers, specifically bamboo, cotton, silk or a blend of either listed, so that it is nice and cool to wear. You can also use acrylic, though it will be slightly on the warmer side.
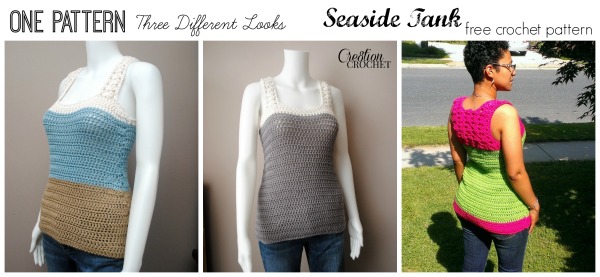
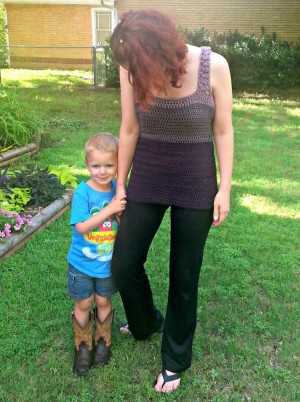
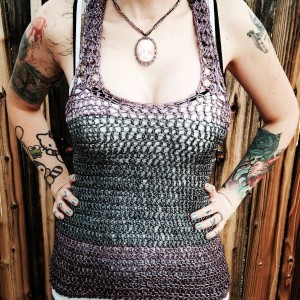
Other tester photos
Click here –> to Add this pattern to your Ravelry Favorites
![]()
This pattern is available for free in XS size only. This pattern is incredibly easy to grade/size and I invite anyone to do so, OR you can purchase the paid version which is already sized to S, M, L, 1x and 2x.
While I understand it can be frustrating if you yourself are not an XS, please realize that I could have chosen to
1) make all of the sizes a paid pattern and not given any part of it away for free or…
2) made the pattern in size XS only to begin with.
Grading patterns in multiple sizes takes time and testing for accuracy as well as payment to testers and contract crocheters. However, you will have the opportunity to get the full size version for free…
On approximately 06/20/14- I will be giving a FREE copy away for one weekend only, be sure to subscribe to the blog so that you don’t miss it! Or you can purchase the pattern below

Materials
Having trouble finding materials? Click HERE
Approx 540 yards of light weight worsted weight yarn, or dk yarn
(I used Touch of Silk by Hobby Lobby)
Gauge was also met with
– Knit Picks Comfy Worsted
– Knit Picks Shine Sport
– Caron’s Simply Soft
– Red Heart Super Saver
– Yarn Bee Soft Secret
– I Love This Cotton
– Lion Brand Cotton Ease
– Lion Brand Vanna’s Choice Baby
– Paton’s Metallic
6.0mm (J) hook or hook needed to obtain gauge
yarn needle
Notes
• Ch3 is considered first dc. Next dc will be placed in the second st. Alternately you can do a chainless starting double crochet instead of a Ch3 for all rows up until 32. Tutorial HERE
• Last st will be placed in the Ch3 (or chainless dc) from previous row
• You can make this tank in three colors or two. If you choose only two please ignore the first color change (change to CB, Row 20). Change color at second color change only (change to CC, Row 32)
Abbreviations and Special Stitches
CA– color A
CB– color B
CC– color C
FDC– Foundation Double Crochet- tutorial HERE
SH– Shell
3dc. Ch2. 3dc
Gauge
Measure in pattern or make a 7” x 7” swatch to test- do not include edges when measuring-
20sts and 11 rows = 6”
Alternately you can make a 5” x 5” swatch and measure gauge in 4” however it will not be quite as accurate- 13sts and 7 rows = 4″
Size
XS
To Fit
Bust 30
Waist 24
Hip 34
Notes on Fit:
• Garment is designed with 2” of ease
PATTERN
Front– make one
Row 1: With CA. (WS) FDC 51
Row 2-11: Ch3 and turn. 1dc in every st. <51>
Row 12: Ch3 and turn. dc2tog. 1dc in each of the next 45 sts. dc2tog. 1dc in the last st. <49>
Row 13-14: Ch3 and turn. 1dc in every st. <49>
Row 15: Ch3 and turn. dc2tog. 1dc in each of the next 43 >sts. dc2tog. 1dc in the last st. <47>
Row 16: Ch3 and turn. 1dc in every st. <47>
Row 17: Ch3 and turn. dc2tog. 1dc in each of the next 41 sts. dc2tog. 1dc in the last st. <45>
Row 18: Ch3 and turn. 1dc in every st. <45>
Row 19: Ch3 and turn. dc2tog 2x. 1dc in each of the next 35 sts. dc2tog 2x. 1dc in the last st. <41>
Rows 20: Ch3 and turn. 1dc in every st. <41>
Row 21: Change to CB. Ch3 and turn. dc2tog. 1dc in each of the next 35 sts. dc2tog. 1dc in the last st. <39>
Rows 22-26: Ch3 and turn. 1dc in every st. <39>
Row 27: Ch3 and turn. 2dc in the next st. 1dc in each of the next 35 sts. 2dc in the next st. 1dc in the last st. <41>
Row 28: Ch3 and turn. 2dc in each of the next 2sts. 1dc in each of the next 35 sts. 2dc in each of the next 2sts. 1dc in the last st. <45>
Rows 29-31: Ch3 and turn. 1dc in every st. <45 >
Rows 32: Change to CC. Ch3 and turn. 1dc in every st. <45>
Row 33: Ch3 and turn. dc2tog 2x. 1dc in each of the next 35 sts. dc2tog 2x. 1dc in the last st. <41>
Row 34. Ch3 and turn. dc2tog 2x. 1dc in each of the next 31 sts. dc2tog 2x. 1dc in the last st. <37>
Beginning of Shoulder Straps
Row 35: Turn. (WS) 1sl st into each of the next 6 sts. Ch3 and 1dc in the same st. Skip 2sts. SH in next st. Skip 2sts. 2dc in next st. <2dc. 1 SH. 2dc>
Row 36-43: Ch3 and turn. 1dc in the same st. SH in SH. 2dc in the top of the Ch3 from previous row. <2dc. 1 SH. 2dc>
Row 44: Ch3 and Turn. 1dc in the same st. 6dc in the Ch2 space. 2dc in the top of the Ch3 from previous row. <2dc. (1) 6dc SH. 2dc>
Attach yarn at outer edge of opposite side and repeat rows 35-44.
Back– make one
Row 1: With CA. (WS) FDC 51
Row 2-11: Ch3 and turn. 1dc in every st. <51>
Row 12: Ch3 and turn. dc2tog. 1dc in each of the next 45 sts. dc2tog. 1dc in the last st. <49>
Row 13-14: Ch3 and turn. 1dc in every st. <49>
Row 15: Ch3 and turn. dc2tog. 1dc in each of the next 43 sts. dc2tog. 1dc in the last st. <47>
Row 16: Ch3 and turn. 1dc in every st. <47>
Row 17: Ch3 and turn. dc2tog. 1dc in each of the next 41 sts. dc2tog. 1dc in the last st. <45>
Row 18: Ch3 and turn. 1dc in every st. <45>
Row 19: Ch3 and turn. dc2tog 2x. 1dc in each of the next 35 sts. dc2tog 2x. 1dc in the last st. <41 >
Rows 20: Ch3 and turn. 1dc in every st. <41>
Row 21: Change to CB. Ch3 and turn. dc2tog. 1dc in each of the next 35 sts. dc2tog. 1dc in the last st. <39>
Rows 22-26: Ch3 and turn. 1dc in every st. <39>
Row 27: Ch3 and turn. 2dc in the next st. 1dc in each of the next 35 sts. 2dc in the next st. 1dc in the last st. <41>
Row 28: Ch3 and turn. 1dc in every st. <41>
Row 29: Ch3 and turn. 2dc in the next st. 1dc in each of the next 37 sts. 2dc in the next st. 1dc in the last st. <43>
Row 30: Ch3 and turn. 2dc in the next st. 1dc in every st until end. <44>
Row 31: Ch3 and turn. 1dc in every st. <44>
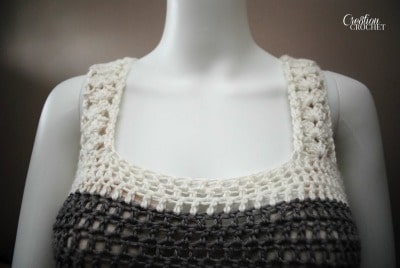
Beginning of Lace Back
Row 32: Change to CC. Ch3 and turn. 1dc in the same st. Skip 3sts. SH in next st. *Skip 4 sts. SH in next st. Repeat until last 4sts. Skip 3sts and 2dc in the last st. <2dc. 8 SHs. 2dc>
Row 33: Turn and sl st in each of the next 6sts, to next Ch2/ center of SH. Ch3 and 1dc in the Ch2. SH in each of the next 6 (7, 8, 9, 10, 11) SHs. 2dc in the last Ch2/ center of SH. <2dc. 6 SHs. 2dc>
Row 34: Turn and sl st in each of the next 6sts, to next Ch2/ center of SH. Ch3 and 1dc in the Ch2. SH in each of the next 4 (5, 6, 7, 8, 9) SHs. 2dc in the last Ch2/ center of SH. <2dc. 4 SHs. 2dc>
Rows 35-40 Ch3 and turn. 1dc in the same st. SH in every SH. 2dc in the top of the Ch3 from previous row. <2dc. 4 SHs. 2dc>
Beginning of Shoulder Straps
Row41-42: beginning of shoulder straps- Ch3 and turn. 1dc in the same st. SH in next SH. 2dc in the Ch2/ center of next SH. <2dc. 1 SH. 2dc>
Row 43: Ch3 and turn. 1dc in the same st. 6dc in next SH. 2dc in the top of the Ch3 from previous row. <2dc. (1) 6dc SH. 2dc>
Attach yarn at outer edge of opposite side and repeat rows 41-43.
ASSEMBLY
You can use any method you wish to attach front and back. I prefer the mattress stitch for a neater/flatter seam. Moogly has a great tutorial for this (link below). You can also use a whip stitch or slip stitch. Tutorial HERE
1: Weave in all ends. Place wrong sides together and stitch should straps together first.
2: With piece still inside out (wrong sides showing) stitch up sides. Use matching yarn/thread to seam for each color change. Starting at the bottom, stitch to the very bottom of row 33 so that only one row of the shell portion is stitched.
3: BEFORE weaving in final tails, turn right side out and make sure everything lines up properly. If all is good, weave in your tails.
I hope you enjoyed this free pattern for the Seaside Tank. Pattern is also available in sizes S, M, L, 1x and 2x as a paid pattern, you can purchase by clicking below. On approximately 06/20/14- I will be giving a FREE copy away for one weekend only… be sure to subscribe to the blog so that you don’t miss it!
Don’t Miss a Post. Subscribe to Cre8tion Crochet by Email
This pattern (Seaside Tank – XS ONLY) is also available as a PDF for the cost of $2. This fee is to offset revenue lost when the pattern is printed and a visit to this site is not required. Click HERE to go to Ravelry.
You may also like
Saffron Sweet Shawl FREE Pattern
Crochet It! Love It! Wear It! ebook by Drew Embrosky