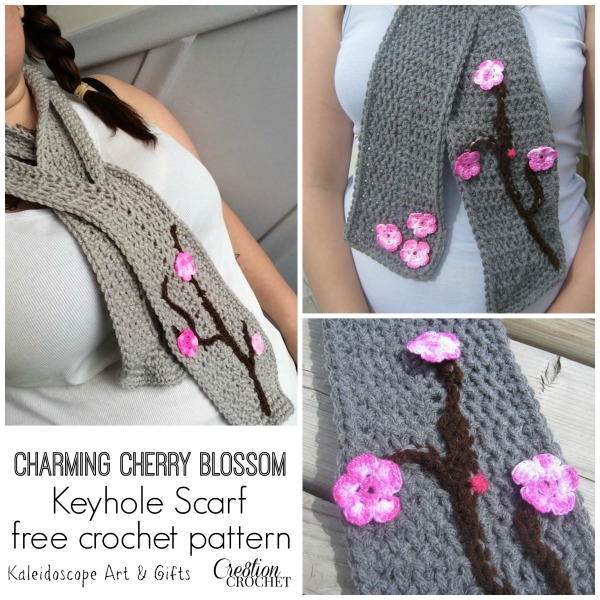
Pretty Scarf with a Cherry on Top
This Charming Cherry Blossom Keyhole Scarf by Kaleidoscope Art&Gifts. Lisa’s newest addition to her Charming Cherry Blossom Collection of patterns, is a quick work up and creates a ‘charming’ accessory for Fall/Winter. Make one for yourself or for a gift.
Find other items from this collection HERE
Find the Charming Cherry Blossom Babydoll Tank in the Issue #4 of Happily Hooked Magazine HERE
Skill Level
Experienced Beginner-Advanced Beginner
Materials
- Hook- L (scarf), H (branches), B (blossoms)
- Worsted Weight Yarn in main color (scarf), worsted for branches(black or brown), small amount of worsted for buds, #10 crochet or craft thread in light color
- (white, cream light pink etc)
- Tapestry needle for weaving in ends
- Stitch markers
Staining/painting supplies
For painting/staining flowers. Tutorial HERE
- Permanent markers in colors of choice for blossoms
(I use Sharpies in light pink and red) - Rubbing alcohol
- Medicine Dropper/Plastic Syringe/Q-tip
Gauge
(scarf w/L hook): 7sc x 7 rows= 2”x2” test swatch
Finished Measurement
Approx measurements of 4” wide x 40” long
Abbreviations and stitches required
– mc- magic circle (tutorial HERE)
– ch- chain
– sc- single crochet
– dc- double crochet
– flosc- front loop only single crochet
– blosc- back loop only single crochet
– sl st- insert slip stitch
– st(s)- stitch(es)
PATTERN- print friendly pdfs listed below
Scarf
L hook, main color worsted
Row 1: ch120, sc in 2nd st from hook, sc across till one stitch is left, 3 scs in last st (121sts)
Row 2: ch1, turn piece 180 degrees (you’re now working in the back sts of the beginning chain), 3 scs in 1st st, sc in next 30 sts, ch15, skip next 15 sts, sc in next st and across till one st is left, 3 scs in last st (125sts, not including ch1)
Row 3: ch1, turn 180 degrees (working in R1 sts), 3 scs in 1st st, *flosc in next st, blosc in next st*, repeat flosc/blosc alternating across till one st is left, 3 scs in last st, turn 90 degrees, 2 scs into ch1 SPACE from R2 (127sts, not including ch1)
Row 4: turn 90 degrees, 3 scs in 1st st, *flosc in next st, blosc in next st*, repeat flosc/blosc alternating across (including into ch STS when you get to that point) till one st is left, 3 scs in last st, turn 90 degrees, 2 scs into ch1 SPACE from R3 (131sts)
**Note: your blosc’s and flosc’s are alternating from row to row to create the texture <see pic>. When you begin a new row, the flosc sts will be placed into the blosc sts from previous row and vice versa.
Row 5: turn 90 degrees, 3 scs in 1st st, *blosc in next st, flosc in next st*, repeat blosc/flosc alternating across till one st is left, 3 scs in last st, turn 90 degrees, 2 scs into next TWO sts (133sts)
Row 6: turn 90 degrees, 3 scs in 1st st, *blosc in next st, flosc in next st*, repeat blosc/flosc alternating across till one st is left, 3 scs in last st, turn 90 degrees, 2 scs into next TWO sts (137sts)
Row 7: turn 90 degrees, 3 scs in 1st st, *flosc in next st, blosc in next st*, repeat flosc/blosc alternating across till one st is left, 3 scs in last st, turn 90 degrees, 2 scs into next st, sc in next two sts, 2 scs in next st (139sts)
Row 8: turn 90 degrees, 3 scs in 1st st, *flosc in next st, blosc in next st*, repeat flosc/blosc alternating across till one st is left, 3 scs in last st, turn 90 degrees, 2 scs into next st, sc in next two sts, 2 scs in next st (143sts)
Row 9: turn 90 degrees, 3 scs in 1st st, *blosc in next st, flosc in next st*, repeat blosc/flosc alternating across till one st is left, 3 scs in last st, turn 90 degrees, 2 scs into next st, sc in next four sts, 2 scs in next st (145sts)
Row 10: turn 90 degrees, 3 scs in 1st st, *blosc in next st, flosc in next st*, repeat blosc/flosc alternating across till one st is left, 3 scs in last st, turn 90 degrees, 2 scs into next st, sc in next four sts, 2 scs in next st (147sts), sl st in next st
Row 11: ch1, sc all the way around piece (one sc in each st around), join w/sl st in first st, fasten off and weave in ends.
Branches
H hook
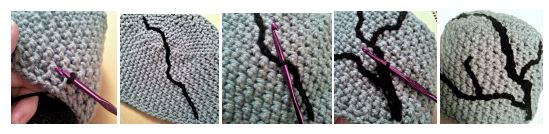
Surface crochet tutorial HERE
- Keep stitches loose, so they don’t pull/distort the piece)
- Insert hook (right side TO inside) and pull up a loop.
- Crochet branches using sl sts to create a line at desired angle, also known as surface crochet. Add a second ‘line’ in
parts where you want the branch to appear ‘thicker’. - When your branches reach the desired length, fasten off and weave in ends.
- Repeat process for additional branches coming off the main one.
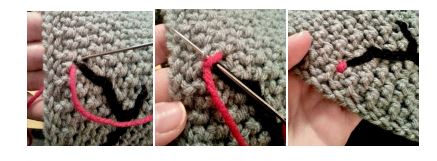
Flower ‘buds’
tapestry needle and red worsted
- Using tapestry needle threaded with red worsted yarn, stitch on flower buds <see pic>, wherever you like.
Blossoms
B hook, light colored #10 cotton thread
Round 1: Make a mc, sc 10 inside mc, join w/sl st in 1st st (10)
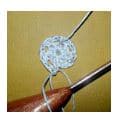
Round 2: *ch2, skip next st, sc in next st*, repeat 4 more times (5 ch2 spaces), do NOT join.
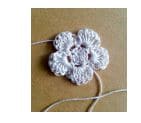
Round 3: *sl st in next ch2 space, ch1, 6 dcs in same ch2 space, ch1, sl st in same ch2 space (one petal made)*, repeat from
* to * 4 more times (5 petals made), fasten off leaving long tail for sewing
(NOTE: scs or hdcs may be used in place of dcs for ‘just opening’ petals)
**follow tutorial for staining/painting blossoms, then sew on to desired item after they dry –> HERE
Wrap scarf around neck, feed long end through the keyhole ‘slit’ and pull to fasten around neck. Enjoy!
Print Friendly PDF of pattern —>
With pictures
Charming Cherry Blossom Keyhole Scarf FREE pattern
Without pictures
Charming Cherry Blossom Keyhole Scarf NO PICTURES
This pattern is the intellectual property of Lisa Jelle/Kaleidoscope Art&Gifts. Rewriting, reselling, distributing, or copying this pattern as your own, and/or without my consent is prohibited.
If you wish to sell finished items produced from this pattern, feel free to do so. However, I askthat you please credit me as the pattern designer and link back to me as follows:
Pattern by Lisa Jelle/Kaleidoscope Art&Gifts
www.facebook.com/kaleidoscopeartngifts
www.etsy.com/shop/kaleidoscopeartgifts
www.ravelry.com/stores/lisa-jelle-kaleidoscope-artgifts-designs
**Special thanks to the following for use of her pic in pattern cover photo: Kimberly B. (main photo) and Evelyn from Candid Quilts & Crafts (all photos except main pic)
![]()


