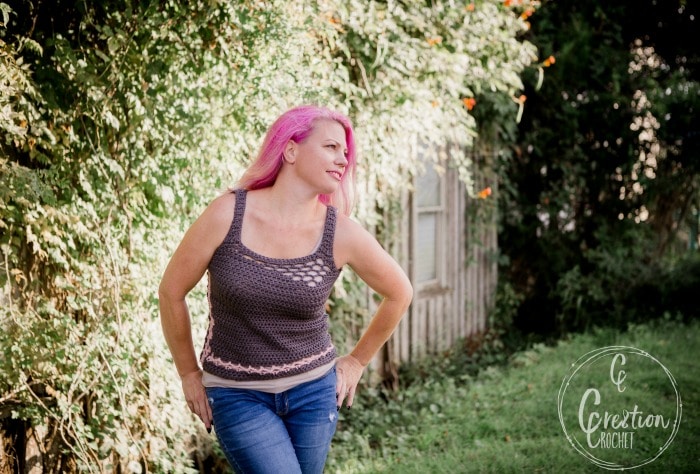
Everly Tank
This fun tank top features a unique way of seaming leaving open lacework along the sides and bottom. The Everly Tank is created with a front and back panel, made bottom up, with a small section added to the bottom with the lace seaming. The sides are then edged and seamed the same way. Final edging is added to the neckline and straps. This pattern looks great in one color or two, which will give your laced seaming a more defined look.
This pattern contains affiliate links. You can click on any yarn or material highlighted to purchase
By using this pattern you agree to the Pattern Terms of Use set forth by Cre8tion Crochet
SUPPLIES NEEDED
YARN
Knit Picks Comfy Worsted 75% Pima Cotton, 25% Acrylic, 110 yards/50 grams
Sample use Hawk 4 (5, 6, 7, 7, 8, 9, 10) skeins and Flamingo 1 skein
OR 400 (490, 580, 670, 760, 860, 970, 1090) yards of comparable weight yarn (#3)
Second sample (one color) uses Hobby Lobby’s I Love This Cotton in Taupe
MATERIALS
J/6.0mm hook- I used my Green Apple Candy Shop by Furls Crochet
Yarn needle
DIFFICULTY
Easy to Intermediate
TO FIT
Small (Medium, Large, 1x, 2x, 3x, 4x and 5x)
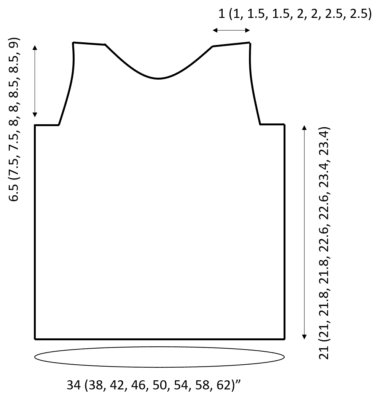
FINISHED SIZE
See schematic for finished measurements- post blocking
GAUGE
not blocked- In pattern
hdc using fhdc to begin
10sts and 10 rows = 4”
STITCH GUIDE
ch(s) – chain(s), sc – single crochet, hdc – half double crochet, st(s) – stitch(es), RS – right side,
SPECIAL STITCHES
Fhdc – foundation half double crochet
Chain 2 (does NOT count as first fhdc). Yarn over and insert hook in 2nd chain from hook. *Yarn over and pull up loop (3 loops on hook), yarn over and pull through 1 loop creating a chain, (this is an important step but easy to forget). Yarn over again and pull through all three loops on hook. This completes the first fhdc. To stitch the next fhdc, yarn over and insert the hook into the chain made in the 2nd fhdc and repeat from *.
Hdc2tog- half double crochet two together– (Cre8tion Crochet variation 2)
Yarn over (YO), insert hook into first stitch (st), pull up a loop (3 loops on hook), insert hook into next st, pull up a loop (4 loops on hook), YO, pull through first 2 loops, YO and pull through remaining 3 loops on hook
NOTES
- Pattern is written in size small with changes for medium, large, 1x, 2x, 3x, 4x and 5x, in parenthesis.
- Ch 2 is not considered the first hdc, the first actual hdc will be placed in the first st, and the last hdc of each row will be placed in the top of the last hdc, omitting the ch-2 completely.
- Sides are labeled as they will be when worn.
- Any additional notes in the pattern will be bolded and italicized.
- This item will benefit greatly from blocking.
PART ONE
PATTERN
BACK PANEL
Row 1 (RS): FHDC 40 (46, 52, 55, 61, 64, 70, 76)
Rows 2-31: Ch 2, turn, hdc in each st to end <40 (46, 52, 55, 61, 64, 70, 76)>
Row 32: Ch 1, turn, slip st into next 4 (4, 5, 5, 6, 6, 7, 7) sts (this leaves 3 (3, 4, 4, 5, 5, 6, 6) sts unworked), ch 2, hdc in the first st, hdc in the next 33 (39, 43La, 46, 50, 53, 57, 63) sts, leaving the remaining 3 (3, 4, 4, 5, 5, 6, 6) sts unworked <34 (40, 44, 47, 51, 54, 58, 64)> These indentations will be referred to as the underarm
Next 5 (5, 7, 7, 9, 9, 11, 11) Rows: Ch 2, turn, hdc in each st to end, do not fasten <34 (40, 44, 47, 51, 54, 58, 64)>
Strap rows start a new count, final row count for all sizes will be 45 (45, 47, 47, 49, 49, 51, 51)>
LEFT STRAP- Mark your Left Strap for easy identification of the left side during the seaming process
Row 1: Ch 2, turn, hdc first st, hdc2tog, hdc next 3 (3, 4, 4, 5, 5, 6, 6) sts, hdc2tog, hdc next st <7 (7, 8, 8, 9, 9, 10, 10)>
Row 2: Ch 2, turn, hdc in each st to end <7 (7, 8, 8, 9, 9, 10, 10)>
Row 3: Ch 2, turn, hdc first st, hdc2tog, hdc next 1 (1, 2, 2, 3, 3, 4, 4) sts, hdc2tog, hdc next st <5 (5, 6, 6, 7, 7, 8, 8)>
Row 4: Ch 2, turn, hdc in each st to end <5 (5, 6, 6, 7, 7, 8, 8)>
Row 5: Ch 2, turn, hdc2tog (over first and 2nd sts), hdc next 1 (1, 2, 2, 3, 3, 4, 4) sts, hdc2tog <3 (3, 4, 4, 5, 5, 6, 6)>
Rows 6-8: Ch 2, turn, hdc in each st to end, fasten off, leaving a long tail for seaming <3 (3, 4, 4, 5, 5, 6, 6)>
RIGHT STRAP
Lay tank so that finished strap is to the right (beginning tail will be at the bottom left). Join yarn by slip st in the 9th (9th, 10th, 10th, 11th, 11th, 12th, 12th) st from the left corner.
Row 1: Ch 2 and hdc in the first st, hdc2tog, hdc next 3 (3, 4, 4, 5, 5, 6, 6) sts, hdc2tog, hdc next st <7 (7, 8, 8, 9, 9, 10, 10)>
Rows 2- 8: Repeat as for left strap

PART TWO
FRONT PANEL
Row 1 (RS): FHDC 40 (46, 52, 55, 61, 64, 70, 76)
Rows 2-27 (27, 29, 29, 31, 31, 33, 33): Ch 2, turn hdc in each st to end <40 (46, 52, 55, 61, 64, 70, 76)>
Lace Row 1: Ch 2, turn, hdc next 12 (14, 16, 18, 22, 24, 26, 28) sts, ch 3, skip 2, hdc remaining 26 (30, 34, 35, 37, 38, 42, 46) sts
Lace Row 2: Ch 2, turn, hdc next 21 (25, 29, 30, 32, 33, 37, 41) sts, ch 3, skip 2, hdc next st, ch 3, skip 2, hdc in next ch-3, ch 3, skip 1, hdc remaining 11 (13, 15, 17, 21, 23, 25, 27) sts
Lace Row 3: Ch 2, turn, hdc next 9 (11, 13, 15, 19, 21, 23, 25) sts, ch 3, skip 2, hdc next ch-3, [ch 3, skip 1, hdc next ch-3] 2x, ch 3, skip 1, hdc remaining 20 (24, 28, 29, 31, 32, 36, 40)
Lace Row 4: Ch 2, turn, hdc next 15 (19, 23, 24, 26, 27, 31, 35) sts, ch 3, skip 2, hdc next st, ch 3, skip 2, hdc next ch-3, [ch 3, skip 1, hdc next ch-3] 3x, ch 3, skip 1, hdc remaining 8 (10, 12, 14, 18, 20, 22, 24)
Lace Row 5: Ch 1, turn, sl st next 4 (4, 5, 5, 6, 6, 7, 7) sts, ch 2 and hdc in first st, (this leaves 3 (3, 4, 4, 5, 5, 6, 6) sts unworked, hdc in next 4 (6, 7, 9, 12, 14, 15, 17), 2 hdc in the next ch-3 sp, [ch 3, skip 1, hdc next ch-3 sp] 5x, ch 3, skip 2, hdc in the next, ch 3, skip 2, hdc next 7 (11, 14, 15, 16, 17, 20, 24) sts, leave the remaining 3 (3, 4, 4, 5, 5, 6, 6) sts unworked. These indentations will be referred to as the underarm
Next Row: Ch 2, turn, hdc next 7 (11, 14, 15, 16, 17, 20, 24) sts, 2 hdc in the first ch-3 sp, 3 hdc in the next six ch-3 sps, hdc in the remaining 7 (9, 10, 12, 15, 17, 18, 20) sts, do not fasten off
Strap rows start a new count, final row count for all sizes will be 45 (45, 47, 47, 49, 49, 51, 51)
RIGHT STRAP
Row 1: Ch 2, turn, hdc in the first st, hdc in the next 6 (6, 7, 7, 8, 8, 9, 9) sts, leave remaining sts unworked <7 (7, 8, 8, 9, 9, 10, 10)>
Row 2: Ch 2, turn, hdc in the first st, hdc2tog, hdc in the next 1 (1, 2, 2, 3, 3, 4, 4) sts, hdc2tog, hdc in last st <5 (5, 6, 6, 7, 7, 8, 8)>
Row 3: Ch 2, turn, hdc2tog (over first and 2nd sts), hdc next 1 (1, 2, 2, 3, 3, 4, 4) sts, hdc2tog <3 (3, 4, 4, 5, 5, 6, 6)>
Rows 4-12: Ch 2, turn hdc in each st to end <3 (3, 4, 4, 5, 5, 6, 6)>
LEFT STRAP
Mark your Left Strap for easy identification of the left side during the seaming process.
Lay tank so that finished strap is to the right (beginning tail will be at the bottom left). Join yarn by slip st in the 7th (7th, 8th, 8th, 9th, 9th, 10th, 10th) st from the left corner
Row 1: Ch 2, hdc in the first st, hdc in the next 6 (6, 7, 7, 8, 8, 9, 9) sts, leave remaining sts unworked <7 (7, 8, 8, 9, 9, 10, 10)>
Rows 2-12: Repeat as for right strap
Yay you have finished Par two of the Everly Tank CAL- If you don’t want to wait for the rest of the pattern, you can purchase it for 50% off during the month of August, using the promo code everafter on Ravelry.
PART THREE
BOTTOM SECTION and SEAMING
Repeat for front and back panels
Row 1 (RS): FHDC 40 (46, 52, 55, 61, 64, 70, 76)
Rows 2-3: Ch 2, turn hdc in each st to end <40 (46, 52, 55, 61, 64, 70, 76)>
Row 4: Ch 1, turn, sc in the first st, *ch 3, skip 2, sc in the next st, repeat from * to end
Row 5: Ch 1, turn, take the section you just completed and line it up with the bottom edge of the top section (make sure the beginning tail is on the same side (right) of both sections, insert your hook in the first st of the bottom section and attach with a sl st, ch 1 and sc in the same st, *ch 1 and sc in the next ch-3 loop of the bottom section, ch 3, skip 2 sts on the top section and sc in next st, repeat from * to end, ch 1 and sc in the corner of the last st of the bottom section.
EDGING and SEAMING
You will be edging the sides of the panels evenly with sc. Exact st count is not mandatory, you just want to make sure that the fabric is neither stretched or pulled and that the stitch count for all four sides match. What works well for me is doing 3sc along every two rows (or 1sc at the end of one row and 2sc at the end of the next row). Over the open seaming, place 1sc for every ch st and sc. You WILL however need to end in a multiple of 3 plus one.
EDGING THE LEFT SIDE
FRONT PANEL
Row 1: Begin with the Left Side of the Front Panel; With RS facing, attach yarn with slip st in the bottom corner, ch 1 and sc in the first st, sc evenly until you reach the sl stitches for the underarm <55 (55, 58, 58, 61, 61, 64, 64- or any multiple of 3 plus one>
Fasten off
BACK PANEL
Row 1: Begin with the Left Side of the Back Panel; With RS facing, attach yarn with slip st in the top corner, where you indented for the underarm, ch 1 and sc in the first st, sc evenly until you reach the bottom <55 (55, 58, 58, 61, 61, 64, 64- or any multiple of 3 plus one>
Row 2: Ch 1, turn, sc in first st, *ch 3, skip 2, sc in next st, repeat from * to end
Row 3: Ch 1, turn, take left side of the front panel and line it up with this panel (the RS of both panels should be facing out), insert your hook in the first st and attach with a sl st, ch 1 and sc in the first st, *ch 1 and sc in the next ch-3 loop of the back panel, ch 3, skip 2 sts on the front panel (though it will be in the back position when working) and sc in next st, repeat from * to end, ch 1 and sc in the corner of the last st of the back panel.
Fasten off
EDGING THE RIGHT SIDE
BACK PANEL
Row 1: Begin with the Right Side of the Back Panel; With RS facing, attach yarn with slip st in the bottom corner, ch 1 and sc in the first st, sc evenly until you reach the sl stitches for the underarm <55 (55, 58, 58, 61, 61, 64, 64- or any multiple of 3 plus one>
Fasten off
FRONT PANEL
Row 1: Begin with the Right Side of the Front Panel; With RS facing, attach yarn with slip st in the top corner, ch 1 and sc in the first st, sc evenly until you reach the bottom <55 (55, 58, 58, 61, 61, 64, 64- or any multiple of 3 plus one>
Row 2: Ch 1, turn, sc in first st, *ch 3, skip 2, sc in next st, repeat from * to end
Row 3: Ch 1, turn, take left side of the back panel and line it up with this panel (the RS of both panels should be facing out), insert your hook in the first st and attach with a sl st, ch 1 and sc in the first st, *ch 1 and sc in the next ch-3 loop of the front panel, ch 3, skip 2 sts on the back panel and sc in next st, repeat from * to end, ch 1 and sc in the corner of the last st of the front panel.
Fasten off
FINISHING
Turn the top wrong side out and mattress seam the shoulders. Weave in all ends. Turn the top right side out and sc evenly around the openings for the neck and arms.
Block your work.
REMINDER- Free access to this pattern will expire on August 31, 2018
You can also purchase the pattern at 50% off
Use promo code everafter on Ravelry


