CAL of the Month with Cre8tion Crochet
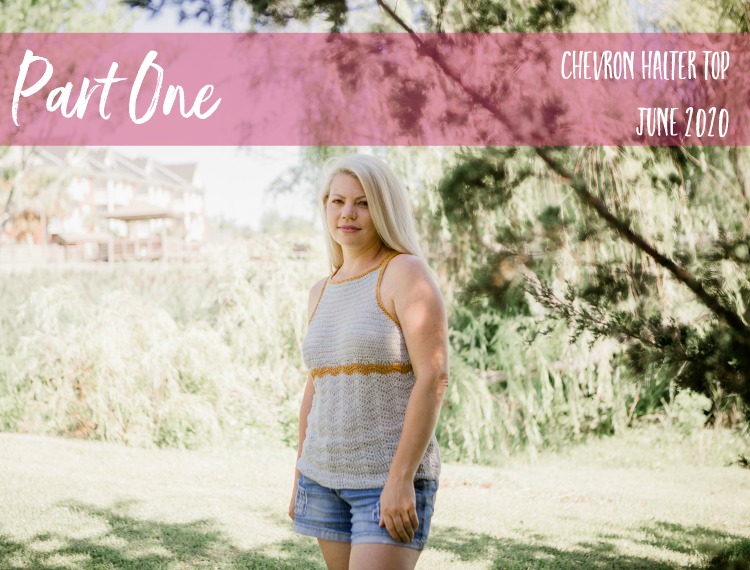
The CAL for June is my Chevron Halter Top. This delicate and lacy design can also be made in a bra-friendly tank or a sleeved version. Both alternate top stylings are available on the premium pattern in Ravelry. Use promo code junecal to get 50% off the purchase.
The free CAL will be for the halter top style only.
![]()
This pattern is also available as a printable pattern. Use promo code junecal to get 50% on Ravelry.
Materials
YARN
Yarn amounts are given for the style shown in picture. The option to add sleeves will require additional yarn.
Lindy Chain by Knit Picks – 70% Linen, 30% Pima Cotton – Fingering Weight
5 (5, 6, 6, 7, 8, 9, 10, 11) skeins of Main Color
OR
212 (238, 266, 298, 334, 374, 419, 469, 525) grams or
764 (857, 958, 1073, 1203, 1347, 1509, 1689, 1890) yards of comparable yarn
PLUS
1 (1, 2, 2, 2, 2, 2, 2, 2) skeins of Accent Color
OR
40 (45, 51, 57, 63, 71, 79, 89, 100) grams or
144 (162, 184, 206, 227, 256, 285, 321, 360) yards of comparable yarn
OTHER MATERIALS
G/4.0 and E/3.5 mm hooks- or hooks needed to obtain gauge – I always use Furls Crochet
Get 15% off your entire Furls order with promo code Cre8tionCrochet15
Pattern Details
DIFFICULTY
Easy plus to intermediate
FINISHED SIZE or SIZE(S)
follows CYC Standard Sizes- for more information click here
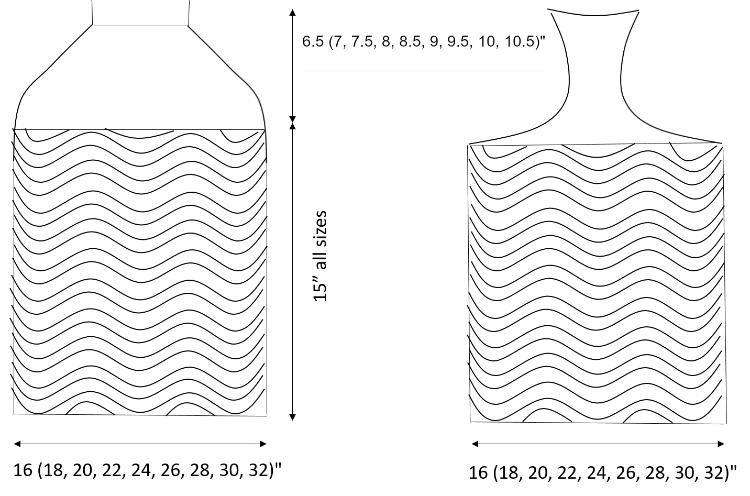
FINISHED MEASUREMENTS
See schematic below. Additional options for top finishes can be found in the Ravelry listing.
GAUGE
in chevron lace – with G/4.0mm hook
2 chevron repeats and 10 rows = 4″
in hdc – with smaller hook
19sts and 16 rows = 4″
GAUGE PATTERN
Follow directions for the main body portion of the pattern changing your FDC sts to 25. Continue in pattern until your gauge swatch measures approximately 6”.
SPECIAL STITCHES
Chevron decrease- This st will be worked as a dc2tog with one st skipped in between each ‘leg’ of the dc2tog. Yarn over (YO), insert hook in first st, pull up loop, 3 loops on hook, YO, pull through 2 loops (2 loops remain on hook), skip next st, YO, insert hook in next st, pull up loop, 4 loops on hook, YO, pull through 2 loops (3 loops remain on hook), YO, pull through last 3 loops.
Hdc2tog- Half double crochet two together
Yarn over (YO), insert hook in first st, pull up loop, 3 loops on hook, (do not yarn over again) insert hook in next st, pull up loop, 4 loops on hook, YO, pull through last 4 loops.
Hdc Chevron Decrease– This st will be worked as a hdc2tog with one st skipped in between each ‘leg’ of the hdc2tog. Yarn over (YO), insert hook in first st, pull up loop, 3 loops on hook, skip next st, (do not yarn over again) insert hook in next st, pull up loop, 4 loops on hook, YO, pull through last 4 loops.
OPTIONAL SPECIAL STITCHES
CSDC- Chainless Starting Double Crochet – Tutorial
If working in rows, turn work. If working in rounds spin hook completely around, making a twist in the loop. Pull up a loop to the height of a normal dc. YO with the loop so that the hook is behind the loop. Insert the hook into the first st of row. Complete a normal dc (YO and draw through st (3 loops on hook). YO and draw through first two loops on hook. YO and draw through last two loops on hook).
STITCH GUIDE
ch(s) – chain(s), hdc – half double crochet, dc – double crochet, st(s) – stitch(es), RS – right side, WS – wrong side, sl st – slip stitch
NOTES
- Pattern is written in size small with changes for medium, large, 1x, 2x, 3x, 4x and 5x, in parenthesis. US terms. Basic stitch knowledge is assumed.
- Ch 3 is considered the first dc, second dc will be placed in the first st to create 2 dc in same st. The last st of the next row will be placed in the top of this ch-3; alternately you can use a CSDC- see OPTIONAL SPECIAL STITCHES.
- Ch 2 is not considered the first hdc.
- The Main Body section of the pattern is the same for all three finish options. Be sure to follow the correct finishing option for your design.
- Stitch counts appear in <brackets> in rows where a change takes place.
Main Body- make two
Beginning with larger hook- G/4.0mm
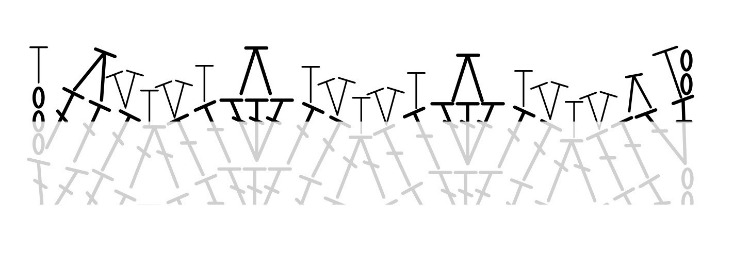
You will begin working each panel from the bottom to right below the bust. See Chart #1 below
Row 1 (RS): FDC 65 (73, 81, 89, 97, 105, 113, 121, 129), turn work.
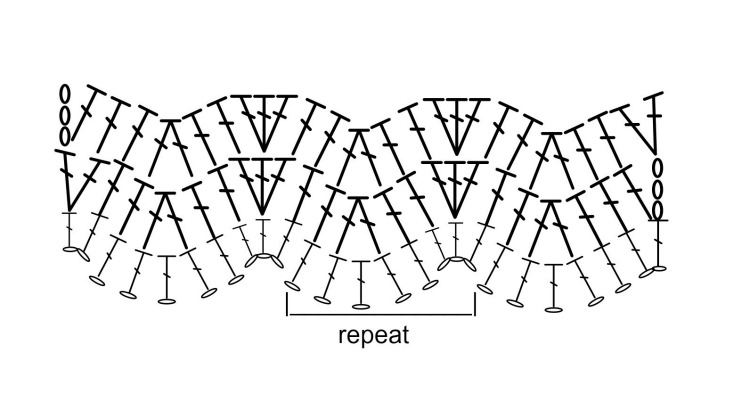
Row 2: Ch 3 or CSDC, dc in the first st (same st as the ch-3 or CSDC), dc next 2 sts, chevron decrease (see special sts), dc next 2 sts, *3-dc in next st, dc next 2 sts, chevron decrease, dc next 2 sts, repeat from * until one st remains, 2-dc in last st, turn work. <8 (9, 10, 11, 12, 13, 14, 15, 16)> chevron repeats
Repeat previous row 29 times for a total of 31 rows. Optional color change for the band of contrasting color was completed on rows 29 and 30. This section will lie right below the breast.
The next row will create a straight edge to work the rest of the pattern after. See Chart #2 below
Next Row: Ch 2, hdc in first st (same st as the ch-2), hdc2tog, [2 hdc next st, hdc next st] two times, *hdc chevron decrease (performed the same way as the chevron decrease in the body of the pattern but done in hdc- see special sts), hdc next st, [2 hdc next st, hdc next st] two times, repeat from * 5 (6, 7, 8, 9, 10, 11, 12, 13) times more, hdc chevron decrease, [hdc next st, 2 hdc next st] two times, hdc2tog, hdc last st, turn work. <65 (73, 81, 89, 97, 105, 113, 121, 129)>
![]()
Change to smaller hook – E/3.5mm (for the remainder of each option)
In the first row of this section, you will be working with the smaller hook but adding sts to keep the width even. Row count changes for all options. Final row counts for the hdc section will be listed after each option (this excludes the row that was created in the first section to create a flat row after the chevrons)
Row 1: Ch 2, hdc in first st, *hdc in next 7 sts, 2 hdc in next st, repeat from * to end, turn work. <73 (82, 91, 100, 109, 118, 127, 136, 145)>
Do not fasten.
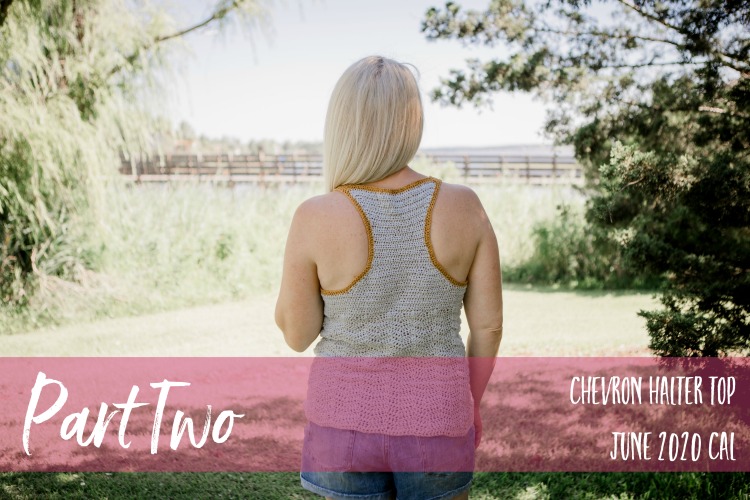
In Part Two we will add the top section to this tank. The pattern below gives instructions for the halter/racer back version. A bra-friendly tank top and a sleeved version are both available as part of the premium pattern for this design. Get 50% off the printable pattern with promo code junecal in my Ravelry shop.
FRONT BODICE
Next 10 (12, 14, 16, 18, 20, 22, 24, 26) Rows: Ch 2, hdc in first st, hdc in each st to end, turn work.
Next 9 (10, 11, 12, 13, 14, 15, 16, 17) Rows: Ch 2, hdc in first st, hdc2tog two times, hdc in each st until 5 sts remain, hdc2tog two times, hdc in the last st, turn work. <each row will decrease by 4 sts, total st count on final repeat is <37 (42, 47, 52, 57, 62, 67, 72, 77)>
Next 11 (10, 9, 8, 7, 6, 5, 4, 3) Rows: Ch 2, turn, hdc in first st, hdc in each st to end, turn work. Fasten off. Move on to back panel.
Final Row count for front bodice section is 31 (33, 35, 37, 39, 41, 43, 45, 47)
BACK
Place a stitch marker in the 17th (19th, 21st, 23rd, 25th, 27th, 29th, 31st, 33rd) st from either side of back panel.
Row 2: Join yarn by sl st in first marked st, ch 2, hdc in same st, hdc in each st to (including) next marked st, turn work. <37 (42, 47, 52, 57, 62, 67, 72, 77)>
Next 4 (5, 6, 7, 8, 9, 9, 10, 11) Rows: Ch 2, hdc in first st, hdc2tog two times, hdc in each st until 5 sts remain, hdc2tog two times, hdc in last st, turn work. Each row will decrease by 4 sts, total st count on final repeat is <21 (22, 23, 24, 25, 26, 31, 32, 33)>
Next 1 (1, 0, 0, 0, 0, 1, 1, 1) Rows: Ch 2, hdc in first st, hdc2tog one time, hdc in each st until 3 sts remain, hdc2tog one time, hdc in last st, turn work. Row will decrease by 2 sts, total st count on final repeat is <19 (20, 23, 24, 25, 26, 29, 30, 31)>
Next 26 (26, 28, 28, 28, 28, 28, 28, ,28) Rows: Ch 2, hdc in first st, hdc in each st to end, turn work.
Next 5 (6, 6, 7, 8, 9, 10, 11, 12) Rows: Ch 2, hdc in first st, 2 hdc in next 2 sts, hdc in each sts until 3 sts remain, 2 hdc in next 2 sts, hdc in last st, turn work. Each row will increase by 4 sts, total st count on final repeat is <37 (42, 47, 52, 57, 62, 67, 72, 77)> Fasten off. Move to side seaming.
Final Row count for back section is 36 (38, 40, 42, 44, 46, 48, 50, 52)
SIDE SEAMING
Turn work so that the right sides are facing each other and the wrong sides of the work are facing out on both sides. Seam your sides together using any st you prefer, I use the mattress seam.
STRAPS and FINAL EDGING
Working with smaller hook – E/3.5mm and Color B/Contrasting Color
Turn work so that the right side is facing out. Join yarn in either top corner of the front panel; fhdc 20 (20, 22, 22, 24, 24, 26, 26, 28) times, join yarn in the corresponding corner of the back panel. Fasten off.
Join yarn in the opposite top corner of the front panel; fhdc 20 (20, 22, 22, 24, 24, 26, 26, 28) times, join yarn in the corresponding corner of the back panel. This will create both straps; continue working along the top edge of the back panel, hdc evenly around entire neck opening two times. Fasten off.
Join yarn in either arm hole and hdc evenly around entire opening two times. Fasten off. Repeat for second arm hole. I did not edge the bottom hem as I liked the bit of wave left from the chevron.
This completes the June CAL for the Chevron Tank with Halter Top. The premium version of this design includes both a bra-friendly tank top option and a sleeved option. Get 50% off with promo code junecal. Weave in all your ends. Block as necessary and wear the heck out of your new top!!!
I hope you are enjoying the CAL of the Month. Please feel free to ask questions and share your progress in the Cre8tion Crochet Monthly CAL group on FB.
Share it on IG for a chance to win fun prizes!
#cre8tioncrochet #junecal
I’ll be sending out notifications via my newsletter (sign up below if you don’t already belong) with details on the CAL!
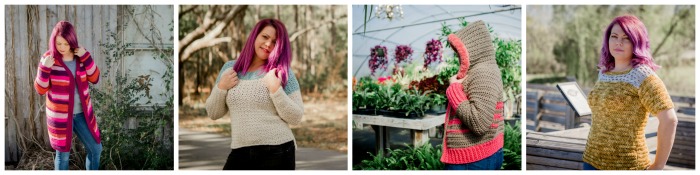
See some of the designs we’ve done in 2020…