Free Crochet Owl Hat Pattern
Oh Boy Oh Boy Owl
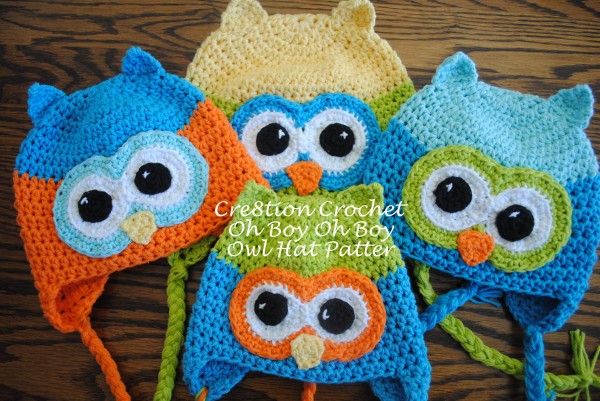
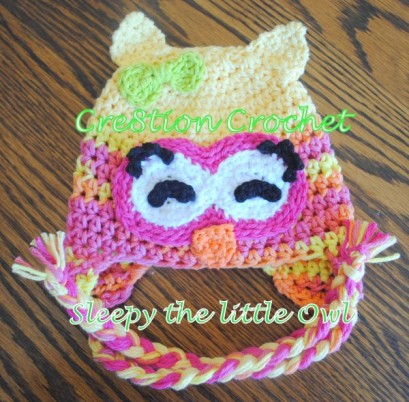
This is the follow up owl to my Winky Winky the Owl and Sleepy the Little Owl
Oh Boy, Oh Boy is a great Spring hat since he is made with 100% cotton. He will keep your little ones warm on those breezy but brisk Spring days, but he won’t get them all sweaty like an acrylic hat would. The hat pattern is written in four sizes, 3-6mo, 6-12mo, 12-24mo and 3-5 years, but can easily be modified to fit anyone. This sizing chart is a helpful tool to customize any hat pattern.
I recommend using my seamless method described here. Use the second method listed for this hat.
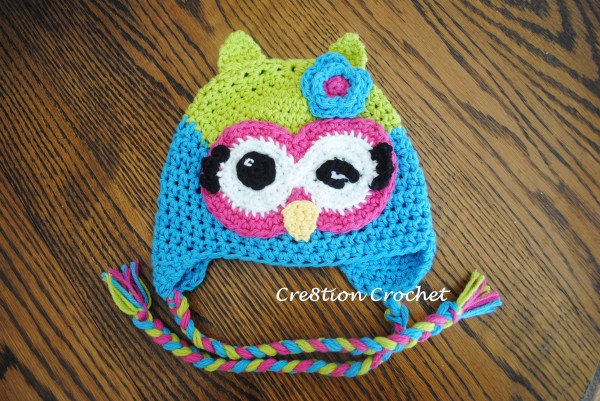
Oh Boy Oh Boy can easily become Oh Girl Oh Girl too… just add eyelashes and a flower (pattern at bottom)
Abbreviations and Stitches used:
st– stitch
sp– space
mc/r– magic circle/ring
ch– chain
sl st– slip stitch
insert hook, yarn over, pull through, (two loops on hook), pull loop closest to hook through other loop
sc– single crochet
insert hook, yarn over, pull through (two loops on hook), yarn over, pull through both loops
hdc– half double crochet
yarn over, insert hook, yarn over, pull through (three loops on hook), yarn over, pull through all three loops
Increase– two of any designated stitch in one space
Materials:
100% cotton yarn, I used Peaches N’Cream
5.5mm hook for hat
4.0mm hook for appliques
3-6mo Hat Pattern
- Mc/r with 10hdc, join round with sl st
- hdc around, increase in every sp, join round with sl st <20>
- hdc around, increase in every other sp, join round with sl st <30>
- hdc around, increase in every 3rd sp, join round with sl st <40>
- hdc around, join round with sl st 40>
- hdc around, join round with sl st <40>
- hdc around, join round with sl st <40>
- using new color hdc around, join round with sl st <40>
- hdc around, join round with sl st <40>
- hdc around, join round with sl st <40>
- hdc around, join round with sl st <40>
- hdc around, join round with sl st <40>
- hdc around, join round with sl st <40>
- hdc around, join round with sl st <40>
- This step is stitching the 1st ear flap
sl st into first sp, 1sc in next two sp, 1hdc in next 7sp, 1sc in next two sp, 1sl st in next sp, turn - sl st into first sp, 1sc in next two sp, 1hdc in next 6sp, 1sc in next two sp, 1sl st in next sp, turn
- sl st into first sp, 1sc in next two sp, 1hdc in next 5sp, 1sc in next two sp, 1sl st in next sp, turn
- sl st into first sp, 1sc in next two sp, 1hdc in next 4sp, 1sc in next two sp, 1sl st in next sp, fasten off and weave in end
- Count 21sp from end of ear flap and insert hook into 22nd sp, repeat above steps for 2nd ear flap
Braided Ties
- cut 24 pieces of yarn to approx. 30” each (you can do all one color or 3 different colors)
- divide in half and weave one half through the center of one ear flap (in the second row from bottom so that it is more secure)
- hold hat (I find that it is best to hold it between my knees) and pull ends even
- separate into three sections of 4 strands each and braid to end (if using three colors do 4 strands of each color per section)
- Tie in knot at end and then take a few strands and tie them separately to secure
- Repeat on other side with the other 12 strands and cut the ends evenly
6-12mo Hat Pattern
- Mc/r with 10hdc, join round with sl st
- hdc around, increase in every sp, join round with sl st <20>
- hdc around, increase in every other sp, join round with sl st <30>
- hdc around, increase in every 3rd sp, join round with sl st <40>
- hdc around, increase in every 8th sp, join round with sl st <45>
- hdc around, join round with sl st <45>
- hdc around, join round with sl st- change color on sl st <45>
- using new color hdc around, join round with sl st <45>
- hdc around, join round with sl st <45>
- hdc around, join round with sl st <45>
- hdc around, join round with sl st <45>
- hdc around, join round with sl st <45>
- hdc around, join round with sl st <45>
- hdc around, join round with sl st <45>
- This step is stitching the 1st ear flap
- 1sc in next two sp, 1hdc in next 8sp, 1sc in next two sp, 1sl in next sp, turn
- sl st into first sp, 1sc in next two sp, 1hdc in next 7sp, 1sc in next two sp, 1sl st in next sp, turn
- sl st into first sp, 1sc in next two sp, 1hdc in next 6sp, 1sc in next two sp, 1sl st in next sp, turn
- sl st into first sp, 1sc in next two sp, 1hdc in next 5sp, 1sc in next two sp, 1sl st in next sp, turn
- sl st into first sp, 1sc in next two sp, 1hdc in next 4sp, 1sc in next two sp, 1sl st in next sp, fasten off and weave in end
- Count 21sp from end of ear flap and insert hook into 22nd sp, repeat above steps for 2nd ear flap
Braided Ties
- cut 24 pieces of yarn to approx. 30” each (you can do all one color or 3 different colors)
- divide in half and weave one half through the center of one ear flap (in the second row from bottom so that it is more secure)
- hold hat (I find that it is best to hold it between my knees) and pull ends even
- separate into three sections of 4 strands each and braid to end (if using three colors do 4 strands of each color per section)
- Tie in knot at end and then take a few strands and tie them separately to secure
- Repeat on other side with the other 12 strands and cut the ends evenly
12-24mo Hat Pattern
- Mc/r with 10hdc, join round with sl st
- hdc around, increase in every sp, join round with sl st <20>
- hdc around, increase in every other sp, join round with sl st <30>
- hdc around, increase in every 3rd sp, join round with sl st <40>
- hdc around, increase in every 4th sp, join round with sl st <50>
- hdc around, join round with sl st <50>
- hdc around, join round with sl st <50>
- hdc around, join round with sl st- change color on sl st <50>
- using new color hdc around, join round with sl st <50>
- hdc around, join round with sl st <50>
- hdc around, join round with sl st <50>
- hdc around, join round with sl st <50>
- hdc around, join round with sl st <50>
- hdc around, join round with sl st <50>
- hdc around, join round with sl st <50>
- This step is stitching the 1st ear flap
- 1sc in next two sp, 1hdc in next 8sp, 1sc in next two sp, 1sl in next sp, turn
- sl st into first sp, 1sc in next two sp, 1hdc in next 7sp, 1sc in next two sp, 1sl st in next sp, turn
- sl st into first sp, 1sc in next two sp, 1hdc in next 6sp, 1sc in next two sp, 1sl st in next sp, turn
- sl st into first sp, 1sc in next two sp, 1hdc in next 5sp, 1sc in next two sp, 1sl st in next sp, turn
- sl st into first sp, 1sc in next two sp, 1hdc in next 4sp, 1sc in next two sp, 1sl st in next sp, fasten off and weave in end
- Count 21sp from end of ear flap and insert hook into 22nd sp, repeat above steps for 2nd ear flap
Braided Ties
- cut 24 pieces of yarn to approx. 30” each (you can do all one color or 3 different colors)
- divide in half and weave one half through the center of one ear flap (in the second row from bottom so that it is more secure)
- hold hat (I find that it is best to hold it between my knees) and pull ends even
- separate into three sections of 4 strands each and braid to end (if using three colors do 4 strands of each color per section)
- Tie in knot at end and then take a few strands and tie them separately to secure
- Repeat on other side with the other 12 strands and cut the ends evenly
3-5 yo Hat Pattern
- Mc/r with 10hdc, join round with sl st
- hdc around, increase in every sp, join round with sl st <20>
- hdc around, increase in every other sp, join round with sl st <30>
- hdc around, increase in every 3rd sp, join round with sl st <40>
- hdc around, increase in every 4th sp, join round with sl st <50>
- hdc around increasing in every 10th sp, join round with sl st <55>
- hdc around, join round with sl st <55>
- hdc around, join round with sl st <55>
- hdc around, join round with sl st- change color on sl st <55>
- using new color hdc around, join round with sl st <55>
- hdc around, join round with sl st <55>
- hdc around, join round with sl st <55>
- hdc around, join round with sl st <55>
- hdc around, join round with sl st <55>
- hdc around, join round with sl st <55>
- hdc around, join round with sl st <55>
- hdc around, join round with sl st <55>
- hdc around, join round with sl st <55>
- This step is stitching the 1st ear flap
1sc in next two sp, 1hdc in next 8sp, 1sc in next two sp, 1sl in next sp, turn - sl st into first sp, 1sc in next two sp, 1hdc in next 7sp, 1sc in next two sp, 1sl st in next sp, turn
- sl st into first sp, 1sc in next two sp, 1hdc in next 6sp, 1sc in next two sp, 1sl st in next sp, turn
- sl st into first sp, 1sc in next two sp, 1hdc in next 5sp, 1sc in next two sp, 1sl st in next sp, turn
- sl st into first sp, 1sc in next two sp, 1hdc in next 4sp, 1sc in next two sp, 1sl st in next sp, fasten off and weave in end
- Count 24sp from end of ear flap and insert hook into 25nd sp, repeat above steps for 2nd ear flap
Braided Ties
- cut 24 pieces of yarn to approx. 30” each (you can do all one color or 3 different colors)
- divide in half and weave one half through the center of one ear flap (in the second row from bottom so that it is more secure)
- hold hat (I find that it is best to hold it between my knees) and pull ends even
- separate into three sections of 4 strands each and braid to end (if using three colors do 4 strands of each color per section)
- Tie in knot at end and then take a few strands and tie them separately to secure
- Repeat on other side with the other 12 strands and cut the ends evenly
All the appliques are made using a 4.0mm hook and 100% cotton yarn
3-6 mo Eyes
- starting with white- mc/r 8sc, join round with sl st
- sc around, increase in every sp <16>, join round with sl st
- sc around, increase in every other sp <24> join round with sl st, fasten off leaving a 12” long tail
- repeat above steps for second eye, but leave a 18” long tail
- weave in center (mc/r) tails and using 18” long tail, stitch both eyes together in the center for 4sp, fasten off and leave both tails
- using a different color loosely sc around both eyes in back loops only (skip spaces in center (indent) of the eyes, join round with a sl st. Fasten off leaving 18″ long tail


6-12mo, 12-24mo and 3-5yo Eyes
- starting with white- mc/r with10sc, join round with sl st
- sc around, increase in every sp <20>, join round with sl st
- sc around, increase in every other sp <30> join round with sl st, fasten off leaving a 12” long tail
- repeat above steps for second eye, but leave a 18” long tail
- weave in center (mc/r) tails and using 18” long tail, stitch both eyes together in the center for 4sp, fasten off and leave both tails
- using a different color loosely sc around both eyes in back loops only, join round with sl st
- loosely sc around for a second time, but this time skip the spaces between eyes (indents), fasten off and leave 18” long tail


Pupil
- With black, ch 2
- 5sc into 1st ch sp, join round with sl st
- sc around, increase in every sp <10>
- fasten off leaving approx. 9-10” long tail
- stitch on white to highlight eye (optional)
- stitch pupil on to left eye, secure tails in back, knot and cut short
- Stitch completed eye section on to hat, stitch white part on first then use colored tail to secure colored ring
Beak
Use yellow or orange yarn
- ch 2
- 3sc into 1st ch sp
- Turn piece over entirely and sc across 1sc in 1st sp, 2sc in 2nd sp, 1sc in 3rd sp <4>
- Turn and sc across <4>
- Turn and sc across <4>, fasten off leaving 9-10” tail
- Stitch on to hat
Ears
Use same color as top portion of hat
- Leaving a 6” long tail, ch 2
- 3sc into first ch-sp
- Turn piece completely over and sc across, 1sc in 1st sp, 2sc in 2nd sp, 1sc in 3rd sp <4>
- Turn and sc across, 1sc in 1st sp, 2sc in 2nd sp, 2sc in 3rd sp, 1sc in 4th sp <6>
- Turn and sc across <6>
- Turn and sc across <6>
- Fasten off and leave 9-10” tail
- Weave 1st tail through the tip of ear (where original ch was crocheted) a few times and stitch down the back of ear with embroidery needle. Stitch all the way to bottom of ear and pull through to inside of hat and secure when you stitch the ear into place
Repeat for 2nd ear
Stitch both ears slightly forward of center
To make Oh boy Oh Boy a girl instead just add eyelashes and a flower or bow
Eyelashes
- Stitch right eye first (when facing you). Insert hook, from front to back, at the center right of the right eye (halfway down point). Pick up black and sl st into place. Ch4 and sc into same sp. Sl st into next sp, ch4 and sc into same space. Fasten off and secure tails to the back of the eye, knot and cut short
For left eye insert hook three spaces above left center (halfway point) of left eye and repeat the above steps
Flower
single layer
- Using color of your choice, ch 2
- 5sc into 1st ch sp, join round with sl st
- Sc around, increase in every sp, join round with sl st (change color on sl st) <10>
- Tie end of new color to end of old color to secure and crochet around as follows. Into first sp *3hdc and 1sl st. sl st into next space. Repeat from * around for 5 petals. Fasten off leaving 9-10” tail and secure to hat
Flower
double layer
- Using color of your choice, ch 2
- 5sc into 1st ch sp, join round with sl st
- Sc around, increase in every sp, join round with sl st (change color on sl st) <10>
- Tie end of new color to end of old color to secure and crochet around as follows. Crochet into front loops only, first sp *3hdc and 1sl st. sl st into next space. Repeat from * around for 5 petals.
- After last sl st crochet around back loops as follows. *4hdc and 1sl st. sl st into next sp, repeat all the way around. Fasten off leaving 9-10” tail and secure to hat
Bow
- ch5
- 3tc in 1st ch
- ch4 and sl st into 1st ch
- Repeat steps 1-3
- Knot in back and wrap yarn around center of bow a few times, knot in back and cut leaving a 10″ long tail
You may also like these baby boy patterns
I hope you enjoyed making this free crochet owl hat pattern with me… have fun and as always…
happy hookin’
This pattern is also available as a PDF for the cost of $2. This fee is to offset revenue lost when the pattern is printed and a visit to this site is not required. Click HERE to go to Ravelry.


