Laney V Back Crochet Sweater Pattern
Free crochet sweater pattern featuring Chic Sheep by Marly Bird
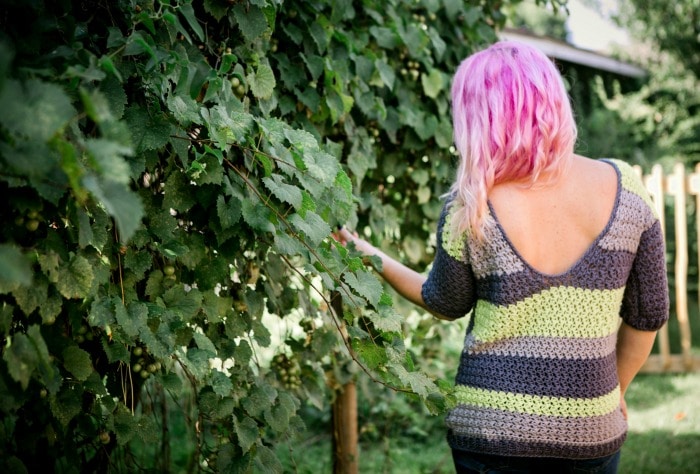
The Laney V Back Crochet Sweater features great texture mixed with sleek finishes. The three-quarter sleeves and the open back makes it a great piece for many seasons. This sweater can also be made with a closed back and full-length sleeves. You can customize your colors any way you like. This top is constructed in two panels that are seamed together with the sleeves added to the sides before final seaming. The Laney V Back Crochet Sweater is sure to be a staple in your wardrobe.
This pattern is part of the Chic Sheep by Marly Bird Blog tour on Red Heart Yarns. Check out all the other patterns by some amazing designers here.
This post contains affiliate links. You can click on any yarn or material highlighted to purchase
By using this pattern, you agree to the Pattern Terms of Use set forth by Cre8tion Crochet
YARN
Marly Bird’s Chic Sheep by Red Heart Yarns– 3.5 oz/100grams, 186 yards each- #4 100% Merino Wool
3 (3, 4, 4, 5, 5, 6, 7) skeins Platinum
2 (3, 3, 4, 4, 5, 6, 6) skeins Sterling
2 (3, 3, 4, 4, 5, 6, 6) skeins Green Tea
MATERIALS
J/6.0mm- I used my Green Apple Candy Shop from Furls Crochet
Yarn needle
(4) Stitch Markers plus more for lining up edging
DIFFICULTY
Intermediate
SIZES
follows CYC Standard Sizes- for more information click here
Small through 5x
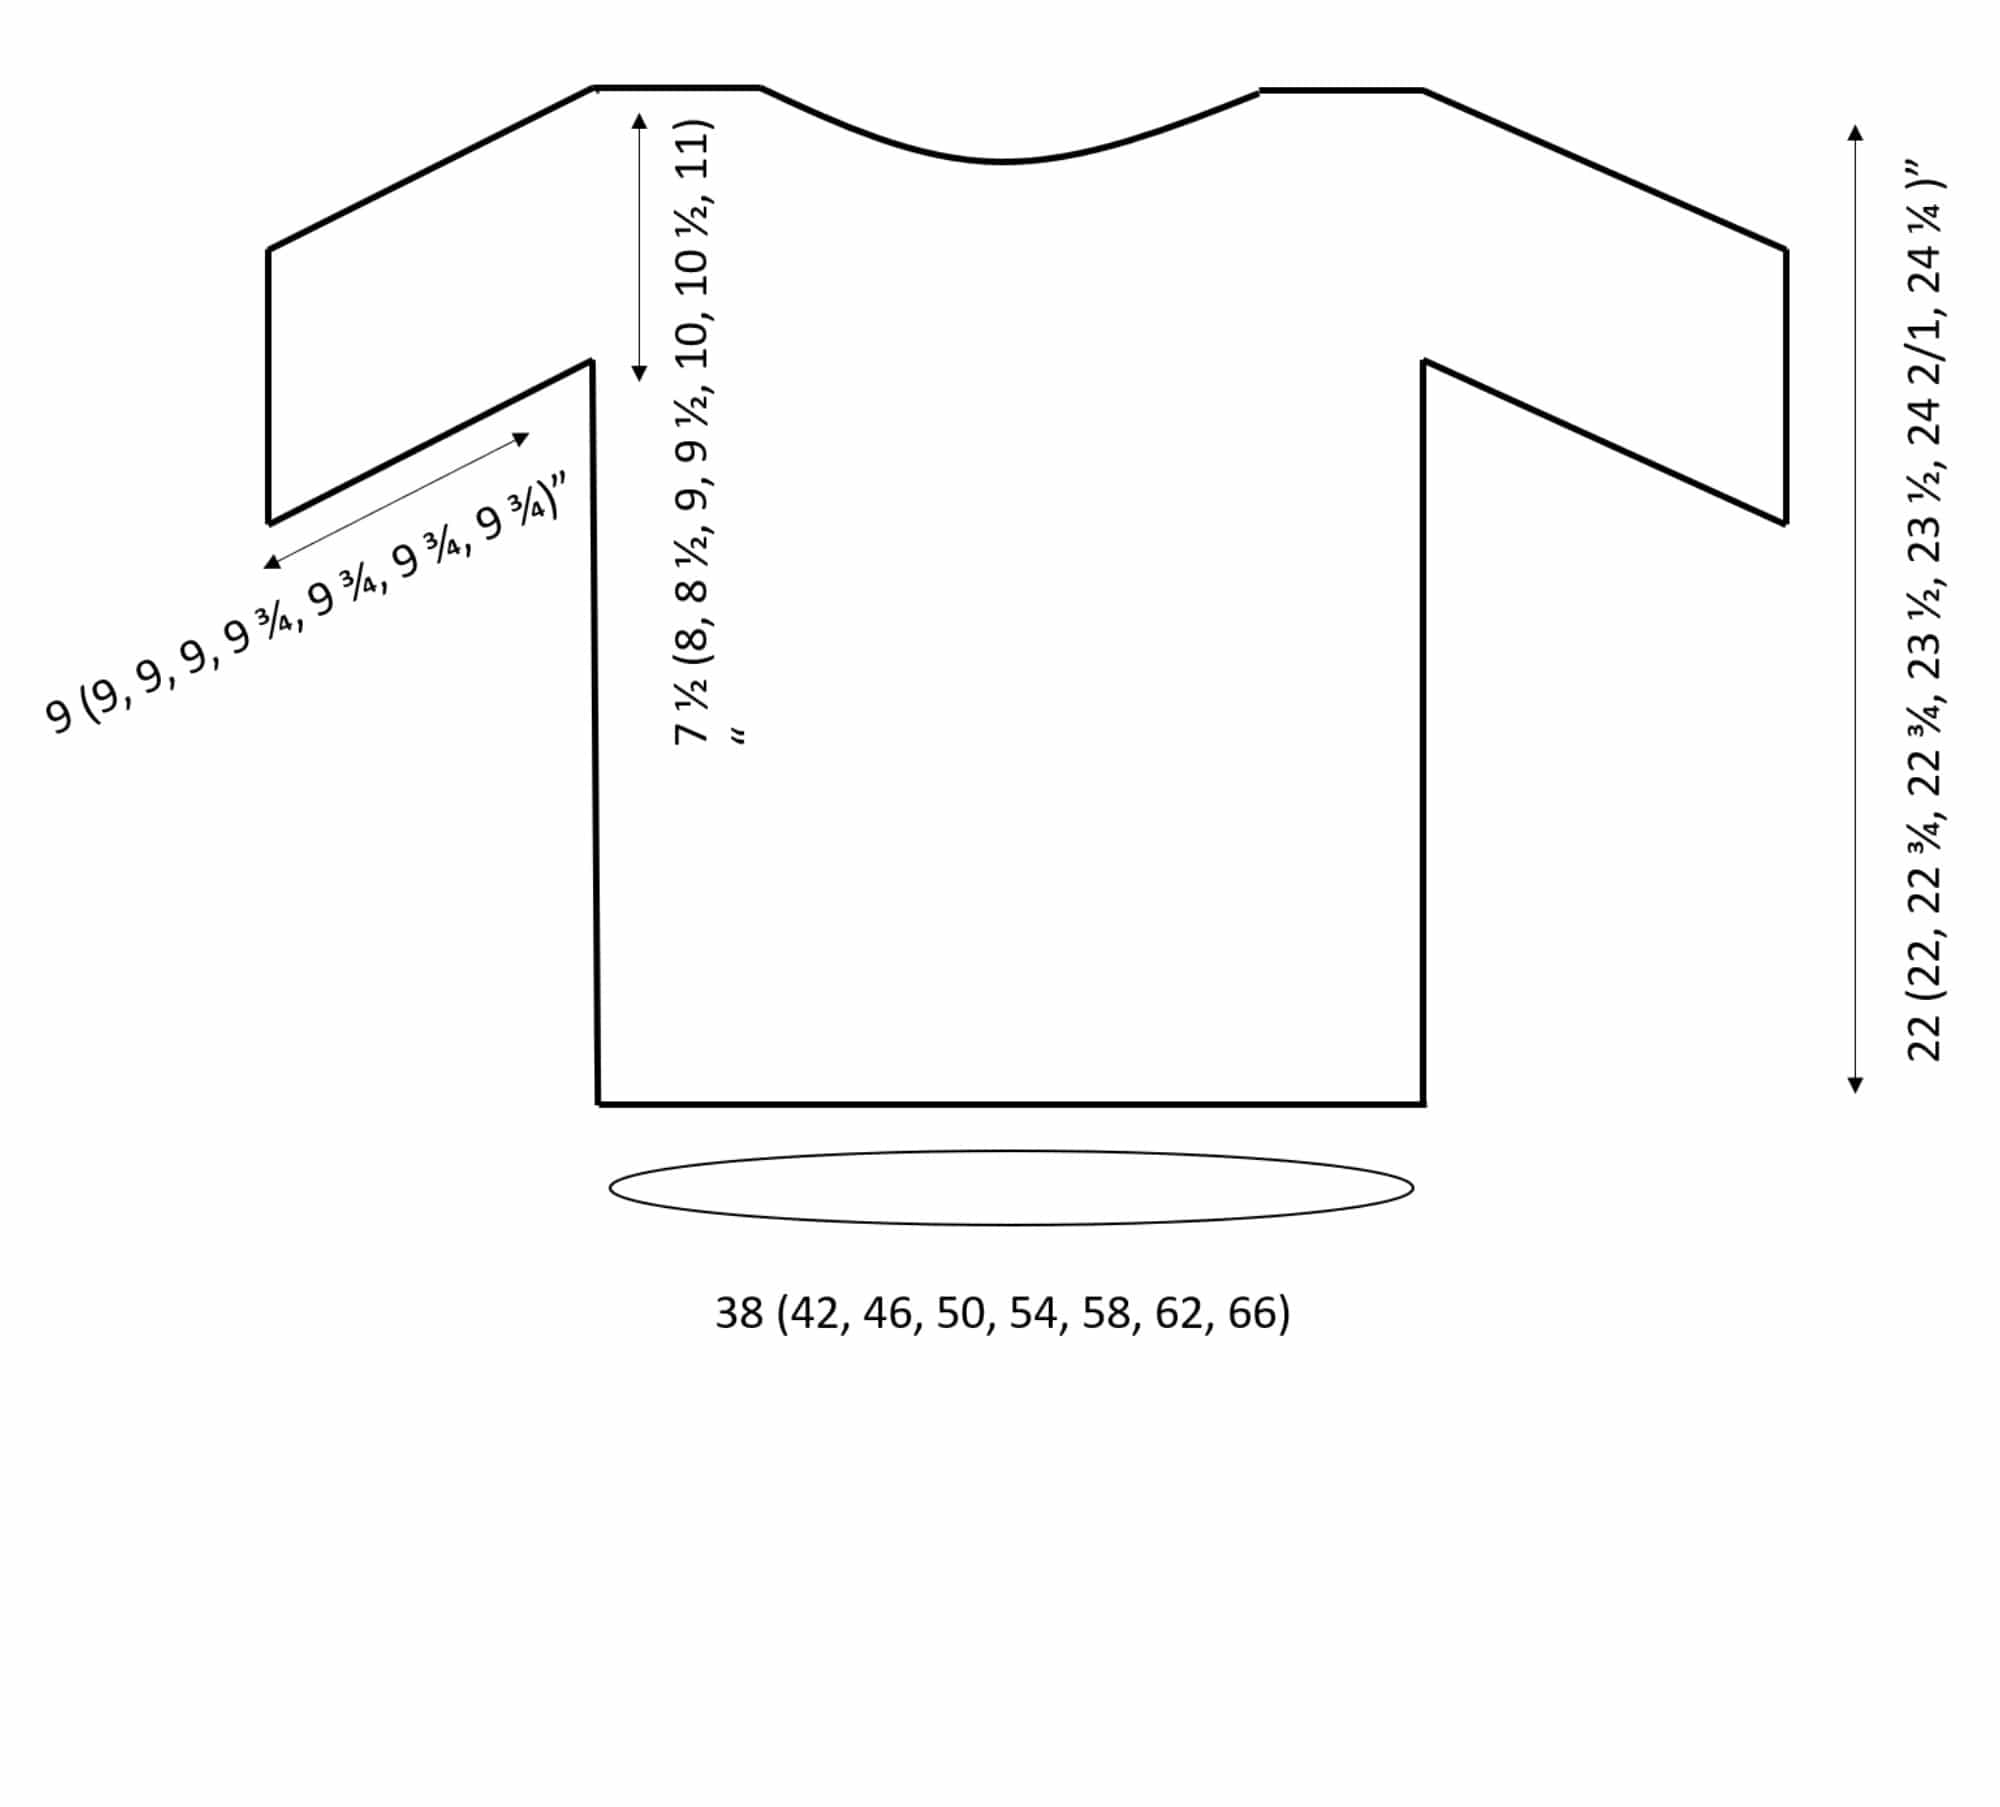
FINISHED MEASUREMENTS
see schematic for finished measurements
GAUGE
pre blocking
6 clusters (or 12 sts) and 12 rows = 4”
post blocking
7 clusters (or 14 sts) and 13 rows = 5”
NOTES
- Ch 1 is not considered the first st
- St counts are in <brackets> at the end of rows where the st count changes from previous row
- Color changes used in my sample are notated in the pattern, however you can use any color scheme you like- color blocks are done in row multiples of two
- Each section of [sc and dc] in the same st is referred to as a cluster for the purposes of stitch count
- Sides are labeled as will be when laid flat- the beginning tail will be on the bottom right when you are looking at the right (correct) side
- There are no stitch counts given for edging as it is not necessary to have a specific number of stitches; however, it is important that the fabric be neither overly stretched or bunched up, and that your st counts match from side to side.
- For edging the Pattern Rows; The technique that works best for me is to place 2sc in each row ending in dc and 1sc in each row beginning with a ch-1, this will equate to 3 sc every two rows
- For edging the Ribbing Rows; The technique that works best for me is to place 1 sc in each row, this will equate to 2 sc every two rows
- During seaming, I recommend using stitch markers to ensure that everything lines up before stitching
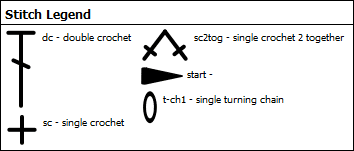
STITCH GUIDE
ch(s) – chain(s), sc – single crochet, hdc – half double crochet, dc – double crochet, st(s) – stitch(es), RS – right side
SPECIAL STITCHES
Dc2tog (alternative)- dc2tog
Yarn over (YO), insert hook into first st, YO and draw up a loop, (three loops on hook), YO, insert hook in next st, YO and draw up a loop (five loops on hook), YO, pull through first three loops on hook, YO and pull through remaining three loops.
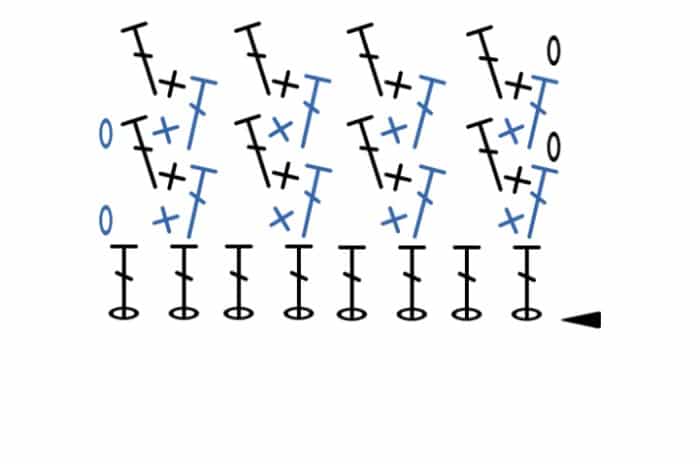
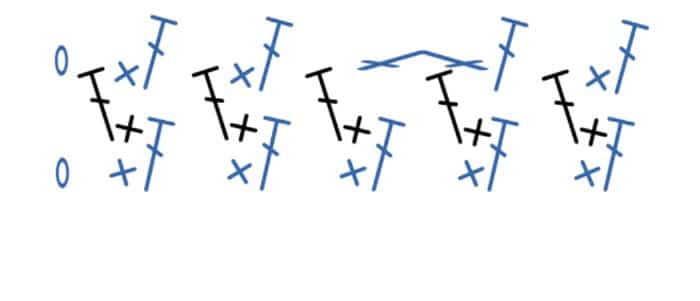
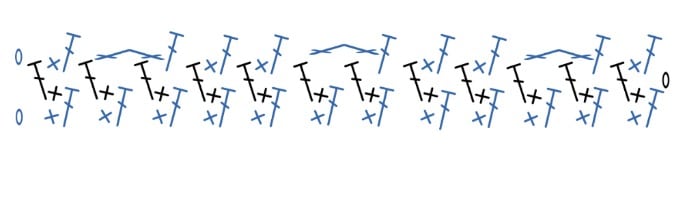
Pattern Row
Ch 1, turn, skip first st, [sc and dc] in the next st, *skip one st, [sc and dc] in the next st, repeat from * to end
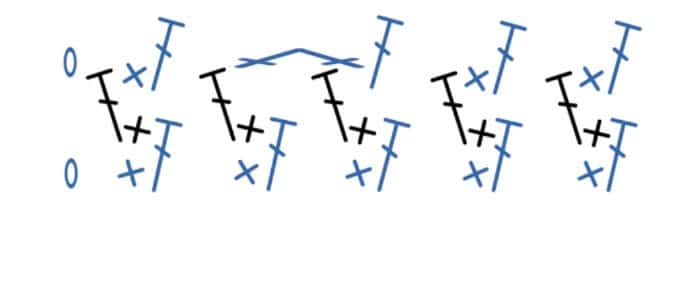
Decrease Row (left side)
Ch 1, turn, skip first st, [sc and dc] in the next st, skip one st, sc2tog over the next 2 sc (skipping the dc in between), dc in the same st as the last portion of the sc2tog, *skip one st, [sc and dc] in the next st, repeat from * to end <each decrease row will decrease by one cluster>
Decrease Row (right side)
Ch 1, turn, skip first st, [sc and dc] in next st, * skip one st, [sc and dc] in next st, repeat from * until 3 clusters remain, skip one st, sc2tog over the next 2 sc (skipping the dc in between), dc in the same st as the last portion of the sc2tog, skip one st, [sc and dc] in the last st <each decrease row will decrease by one cluster>
Sleeve Decrease Row
Ch 1, turn, skip first st, [sc and dc] in next st, * skip one st, [sc and dc] in next st **; repeat from * to ** until you reach the middle two clusters (this is not marked- it doesn’t have to be exact, just as close to the middle as possible), skip one st, sc2tog over the next 2 sc (skipping the dc in between), dc in the same st as the last section of the sc2tog, repeat from * to ** until 3 clusters remain, skip one st, sc2tog over the next 2 sc (skipping the dc in between), dc in the same st as the last portion of the sc2tog, skip one st, [sc and dc] in the last st <each decrease row will decrease by three clusters>
VIDEO RESOURCES
Chainless Starting Double Crochet
How to Seam your Crochet Garments
Want a new, exclusive pattern, every month? Join A Year in Crochet 2019
PATTERN
see special stitches above
FRONT PANEL
Row 1 (RS): Beginning with Sterling; FHDC 54 (60, 66, 72, 78, 84, 90, 96)
Repeat Row Pattern as follows:
6 (6, 6, 6, 8, 8, 8, 8) Pattern Rows of Sterling <27 (30, 33, 36, 39, 42, 45, 48) clusters>
2 (2, 4, 4, 6, 6, 6, 6) Pattern Rows of Green Apple
8 Pattern Rows of Platinum
2 Pattern Rows of Sterling
8 Pattern Rows of Green Tea
6 Pattern Rows of Platinum
8 Pattern Rows of Sterling
6 Pattern Rows of Green Tea
2 Pattern Rows of Platinum
Do NOT fasten off
Shoulder rows start a new count, final row count for all sizes will be 51 (51, 53, 53, 55, 55, 57, 57)
RIGHT SHOUDER
Row 1: Ch 1, turn, skip first st, [sc and dc] in the next st, *skip one st, [sc and dc] in the same st, repeat from * 7 (8, 9, 10, 11, 12, 13, 14) times more leaving the remaining sts unworked <9 (10, 11, 12, 13, 14, 15, 16) clusters>
1 Pattern Row of Sterling <9 (10, 11, 12, 13, 14, 15, 16) clusters>
Fasten off
LEFT SHOULDER
Mark your Left Strap for easy identification of the left side during the seaming and assembly process. Lay tunic so that finished shoulder is to the right (beginning tail will be at the bottom left). Join yarn by slip st in the 17th (19th, 21st, 23rd, 25th, 27th, 29th, 31st) st from the left corner, this will be the 9th (10th, 11th, 12th, 13th, 14th, 15th, 16th) cluster.
Row 1: Ch 1, [sc and dc] in the first (same) st, *skip one st, [sc and dc] in the same st, repeat from * 7 (8, 9, 10, 11, 12, 13, 14) times more leaving the remaining sts unworked <9 (10, 11, 12, 13, 14, 15, 16) clusters>
1 Pattern Row of Sterling <9 (10, 11, 12, 13, 14, 15, 16) clusters>
Fasten off
Fasten off and weave in all of the short ends of the front panel, leaving the long tails for edging later. You may want to leave the beginning tail for identifying the right side of the tunic.

BACK PANEL
** If you prefer to exclude the open back, repeat the Front Panel instead
Row 1 (RS): Beginning with Sterling; FHDC 54 (60, 66, 72, 78, 84, 90, 96)
Repeat Row Pattern as follows:
6 (6, 6, 6, 8, 8, 8, 8) Pattern Rows of Sterling <27 (30, 33, 36, 39, 42, 45, 48) clusters>
2 (2, 4, 4, 6, 6, 6, 6) Pattern Rows of Green Apple
8 Pattern Rows of Platinum
2 Pattern Rows of Sterling
8 Pattern Rows of Green Tea
2 Pattern Rows of Platinum
Do NOT fasten off
Back V rows start a new count, final row count for all sizes will be 51 (51, 53, 53, 55, 55, 57, 57)
LEFT SIDE of BACK V
Mark your Left Strap for easy identification of the left side during the seaming and assembly process.
Row 1: Still working in Platinum; ch 1, turn, skip the first st, [sc and dc] in the next st, *skip one st, [sc and dc] in the same st, repeat from * 11 (12, 13, 14, 15, 16, 17, 18) times more leaving the remaining sts unworked <13 (14, 15, 16, 17, 18, 19, 20) clusters>
1 Decrease Row (left side) Platinum <12 (13, 14, 15, 16, 17, 18, 19) clusters>
1 Pattern Row of Platinum
1 Decrease Row (left side) of Platinum <11 (12, 13, 14, 15, 16, 17, 18) clusters>
1 Pattern Row of Sterling
1 Decrease Row (left side) of Sterling <10 (11, 12, 13, 14, 15, 16, 17) clusters>
1 Pattern Row of Sterling
1 Decrease Row (left side) of Sterling <9 (10, 11, 12, 13, 14, 15, 16) clusters>
4 Pattern Rows of Sterling
6 Pattern Rows of Green Tea
4 Pattern Rows of Platinum
Fasten off
RIGHT SIDE of BACK V
Lay tunic so that finished shoulder is to the right (beginning tail will be at the bottom left). Join yarn by slip st in the 25th (27th, 29th, 31st, 33rd, 35th, 37th, 39th) st from the left corner, this will be the 13th (14th, 15th, 16th, 17th, 18th, 19th, 20th)
Row 1: Working in Platinum; ch 1, [sc and dc] in the first (same) st, *skip one st, [sc and dc] in the same st, repeat from * 11 (12, 13, 14, 15, 16, 17, 18) times more <13 (14, 15, 16, 17, 18, 19, 20) clusters>
1 Decrease Row (right side) Platinum <12 (13, 14, 15, 16, 17, 18, 19) clusters>
1 Pattern Row of Platinum
1 Decrease Row (right side) of Platinum <11 (12, 13, 14, 15, 16, 17, 18) clusters>
1 Pattern Row of Sterling
1 Decrease Row (right side) of Sterling <10 (11, 12, 13, 14, 15, 16, 17) clusters>
1 Pattern Row of Sterling
1 Decrease Row (right side) of Sterling <9 (10, 11, 12, 13, 14, 15, 16) clusters>
4 Pattern Rows of Sterling
6 Pattern Rows of Green Tea
4 Pattern Rows of Platinum
Fasten off
ASSEMBLING the TOP of BOTH PANELS
Line up the top of the front and back panels with the wrong sides of each panel facing out; using Platinum, mattress seam the top edge along the sides of the neck (leaving the neck opening). Double seam in the opposite direction.
EDGING the sides of BOTH PANELS
Beginning with Platinum and working into the right side; join yarn by slip st in the right-hand corner, ch 1 and sc in the first st, sc evenly (see notes), along both side edges of the connected front and back panels.
ADDING SLEEVES
Lay your seamed panels down flat, so that you can measure the long sides. Measure the center 15 (16, 17, 18, 19, 20, 21, 22)” with the 7.5 (8, 8.5, 9, 9.5, 10, 10.5, 11)” mark in the very center of the shoulder seaming. Place a stitch marker at the first and last st of those 15 (16, 17, 18, 19, 0, 21, 22)”
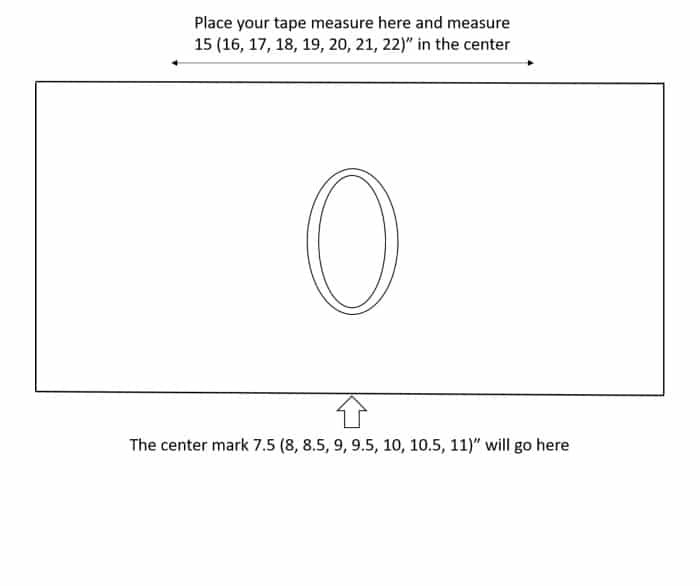 The marked stitches should match on either side of the panels, as well as the same row/color placement on both the front and back panel.
Row 1: Beginning with Platinum and working into the wrong side; join yarn by slip st in the first marked st, complete a Pattern Row until you reach the next marked st, if your sts do not line up perfectly with your stitch markers, do a Decrease Row (right side) to make up the difference <st count will vary>
Rows 2-4: Ch 1, turn, skip first st, sc2tog over the next 2 sc (skipping the dc in between), dc in the same st as the last portion of the sc2tog, *skip one st, [sc and dc] in the next st; repeat from * to the shoulder seam (or center of sleeve), sc2tog over the first sc and the next sc, (skipping the dc in between), dc in the same st as the sc2tog, repeat from * until 3 clusters remain, skip one st, sc2tog over the next 2 sc (skipping the dc in between), dc in the same st as the last portion of the sc2tog, skip one st, [sc and dc] in the next st <each row will decrease by 3 clusters>
12 (12, 12, 12, 14, 14, 14, 14, 14) Pattern Rows of Platinum (sample uses ½ sleeves, if you’d like longer sleeves, continue adding Pattern Rows until the desired length is reached)
Fasten off. Repeat for second sleeve
FINAL EDGING BODY and SLEEVE and ADDING RIBBING
With RS facing, join yarn by slip st in any st along the long side of the assembled front and back panel.
Ch 1 and sc in the same st, *sc evenly along the long panel and along the unfinished edge of the sleeve, when you reach the end of the first sleeve complete the section below for ribbing.
Row 1: Ch 6, turn, sc in the 2nd st from hook, sc in the next 3 chs, sc2tog in the 5th ch and the first unworked st of the sleeve/or bottom edge, sl st in the next unworked st of the sleeve/ or bottom edge
Row 2: Ch 1, turn, sc in the blo of the next 4 sts, sc in both loops of the last sc
Row 3: Ch 1, turn, sc in the blo of the first sc and each of the next 3 sc, sc2tog in the blo of the last st and the the first unworked st of the sleeve/ or bottom edge, sl st in the next unworked st of the sleeve/ or bottom edge
Repeat rows 2 and 3 until all unworked sts of the sleeve/ or bottom edges are worked
Continue to sc evenly along the unfinished edge of the sleeve, sc along the long edge of the sweater, when you reach the end of the sweater, repeat the section above for ribbing. Repeat from * one time more until the entire sweater is edged and ribbing is added to each sleeve and the bottom of the front and back panels. Sl st into the first sc (skipping over the ch-1) to join.
Fasten off and weave in all ends.
BLOCKING
Before moving on to final assembly and edging, wet block your work. Be extremely careful not to overstretch your fabric during this process.
FINAL SEAMING
With the wrong side facing out; line up the sleeves and edges of the sweater, use stitch markers to ensure everything is lined up before seaming. Mattress seam the sides and sleeves, leaving the bottom and the sleeve openings.
FINAL EDGING
Turn work right side out. See notes for edging
Beginning with Platinum and working into the right side; join yarn by slip st along the neckline, ch 1 and sc in the first st, sc evenly around the neck opening, sl st in the first sc, skipping over the ch-1, to join. Fasten off
Continuing with Platinum and working into the right side; join yarn by slip st along the bottom, ch 1 and sc in the first st, sc evenly around the bottom hem, sl st in the first sc, skipping over the ch-1, to join. Fasten off
Continuing with Platinum and working into the right side; join yarn by slip st along the sleeve opening, ch 1 and sc in the first st, sc evenly around the sleeve opening, sl st in the first sc, skipping over the ch-1 to join. Fasten off. Repeat for second sleeve
Weave in all ends. You have completed your Laney V Back Sweater. I hope you have enjoyed this pattern!
If you like this design you’ll probably love the Texture Top
 |
Subscribe to the Cre8tion Crochet Weekly Newsletter for weekly free patterns, discounts on paid patterns, reviews and giveaways and business tips. You’ll be sent a promo code for one free pattern from my Ravelry shop when you sign up- valid for new subscribers only.
 Lorene Eppolite is the designer behind Cre8tion Crochet- Where Beautiful is Easy. She has been designing since October 2012. She loves to create fun and easy crochet accessories and garments. Lorene strives to make her designs to be achievable for any skill level. Just because it is easy, doesn’t mean it can’t be beautiful. Lorene was named one of the Top Ten Designers by The Yarn Box in 2012 and by AllFreeCrochet in 2013-2018. Most recently Lorene has become the Creative Director for Furls Crochet.
Follow Lorene on Facebook, Pinterest or Instagram.


