This is a crochet pattern review of the Boho Bag designed by Ashley Stallsworth for A Crafty Concept. Review done by Maggie of Crochet Happens for Cre8tion Crochet.
This post contains affiliate links for Etsy and Amazon. If you make a purchase by clicking on them, I make a small commission at no extra cost to you. Thanks for your support!
Find the crochet pattern review below or click here to purchase the pattern from A Crafty Concept on Etsy!
In a hurry? Pin this for later when you have more time!
Hi! This is Maggie from Crochet Happens.
Be sure to come join me over on Facebook and Instagram and say Hi.
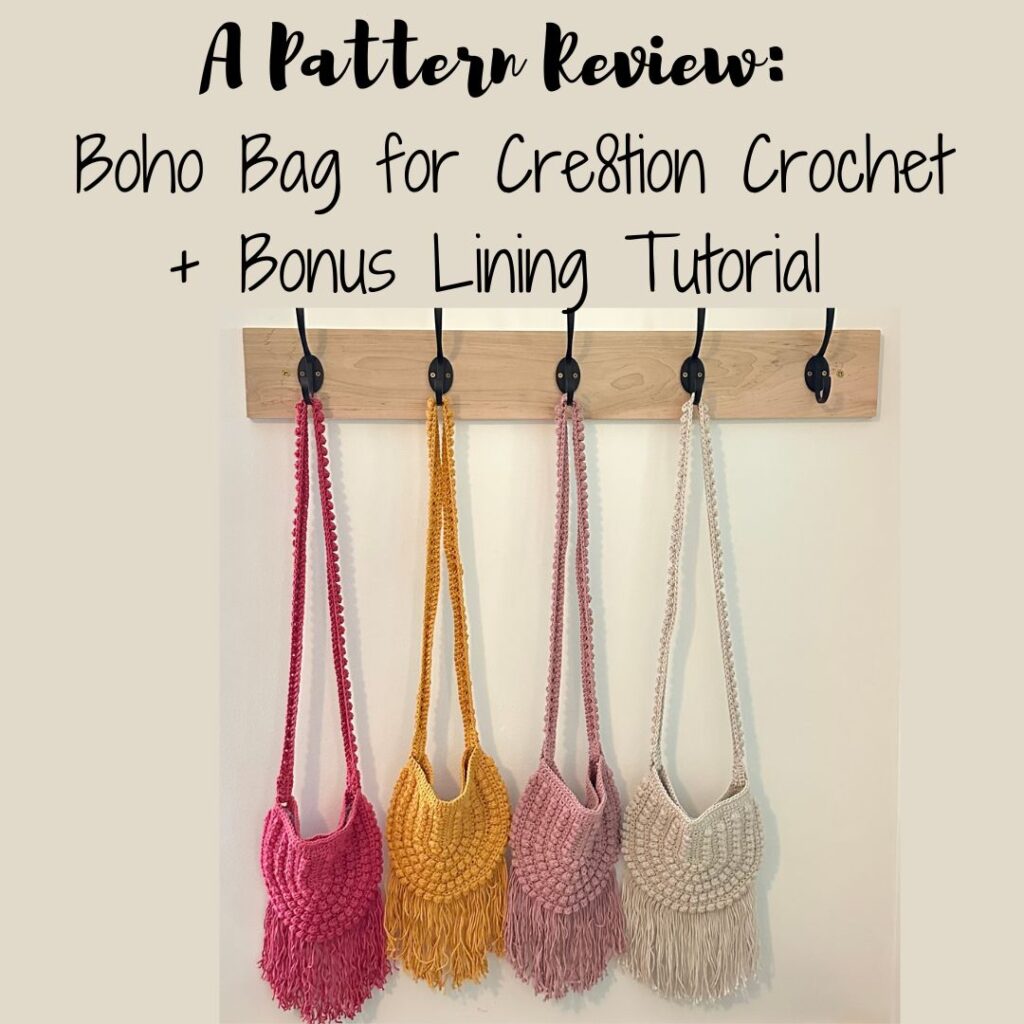
After making several of the Bitty Boho Bags for my spring market, I just knew I had to add the adult version to my upcoming summer markets. It is the perfect pair for the Bitty Boho Bag to make a fun and stylish Mommy and Me set. The adult version has all the same great qualities that I love in the toddler size, the fun bobble texture and fringe, only larger and with a fun bobble strap.
What Materials Do You Need to Crochet a Boho Bag:
- 204-255 Yards (or 4-5 oz) of Worsted Weight Yarn – I used Hobby Lobby’s I love This Cotton (a little less than 2 skeins)
- H8/5mm Crochet Hook
- Darning needle for weaving in ends.
- Scissors
- Boho Bag, Paid Crochet Pattern from ACraftyConcept via Etsy
- OPTIONAL Materials for lining: Small piece of fabric (2 pieces at least 11″ x 8″ or one that will fold to that size), featherweight fusible interfacing, matching thread and needle for sewing, ink pen, and scissors for cutting fabric, optional magnetic clasp.

Material Notes:
This pattern was written using Hobby Lobby’s I Love This Yarn which is a worsted weight acrylic yarn but again I opted to go with cotton so it would be less likely to pill and would hold its shape better after extended use. I thought that those qualities were even more important to have in an adult bag. I also lined the bag to give it more strength and structure to withstand repeated use. I found that the finished bag seemed a little smaller than I was wanting so I increased it by one more round of bobbles.
How Long Does It Take to Crochet a Boho Bag?
I was able to crochet the bag in about three hours and then lining it took an additional hour.
Measurements:
Finished bag measures about 8″ long by 9″ wide with a 47″ long strap. Adding an extra round of bobbles made my bag 10″ wide and 9″ long.
Gauge:
5 sc and 5 rows of sc = 1″

Pattern Notes:
Overall, this pattern was just as fun to make as the toddler version and went pretty smoothly. The instructions are very detailed and included lots of pictures of every step as well as helpful video links for some parts that could be a bit tricky.
I did find that I had to adjust the length of the strap to make it long enough. I think it was because I chose to use cotton instead of acrylic and it doesn’t have quite as much stretch. To get a length that I liked, I measured the strap length on my current purse, which matched up with the length in the pattern that the acrylic strap was supposed to stretch to, and then crocheted until I got close to that length. For me that turned out to be 161 stitches.
A way to keep track of what row you are on might also be helpful for the first time you make this bag but if you are like me and want to make several, after a couple bags I had to pattern repeats down and was able to make them with minimal pattern referencing. I used a clicker row counter for keeping track of the rows but a piece of paper with tally marks would also work well. After making a couple bags, I also found it helpful to mark the side that the increases were on with a stitch marker.
Another thing I noticed after making a couple bags, is that the alternating pattern of the increases, was actually for a reason; it helps keep the bag rounded and makes it so the back and front pieces line up correctly when assembling your bag. The first two bags I made, I was sticking with “inc, sc __” instead of alternating between “inc, sc __” and “sc __, inc”, and my bags were all wonky and not lining up correctly but when I started alternating like the pattern said, the pieces lined up perfectly.
So, grab your choice of worsted weight yarn and the crochet pattern and crochet yourself your own Boho Bag. After you are finished come back here and see how to add a fun fabric lining.
Fabric Lining Tutorial
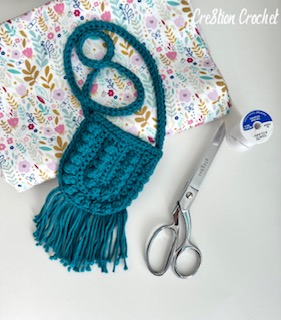
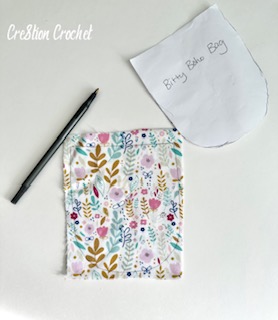
I lined my adult Boho Bag the same way I lined the Bitty Boho Bag, with just a couple additions. For lining your Boho Bag, you will need a small amount of fabric, about 11″ x 8″ when folded in half (or 2 pieces that size), some matching thread and needle for sewing, scissors for cutting, and an ink pen for tracing, optional featherweight fusible interfacing, and magnetic snap. I deiced to use the same fun floral fabric from my Bitty Boho Bag since I had plenty left over.
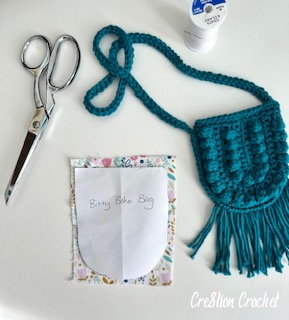
Because I knew I was going to be making lots of these bags, I went ahead and made myself a pattern by tracing the bag on a piece of paper and then cutting it out, but you can skip this step if you would like and just trace the bag directly onto your fabric. Make sure to fold the strap and fringe on top of the bag before tracing so they do not get in the way. You will need two pieces of fabric, so I like to have my fabric double layered when tracing and cutting to save a step.
TIP: if your fabric has an obvious directional pattern, be sure that the pattern is going the correct direction before tracing.
After tracing your bag/pattern onto your fabric, cut along the lines that you just made. At this point I decided to add some featherweight fusible interfacing to give the lining more durability. Once the interfacing was fused to the back of the fabric, I put the right sides together and sewed around the outside in a U shape. I chose to do this step with my sewing machine, but it can easily be done by hand as well.

After sewing the sides, fold the top of the bag down about 1″ towards the outside and iron. At this point I added my magnetic snap to the fabric, being careful that both sides of the snap lined up.
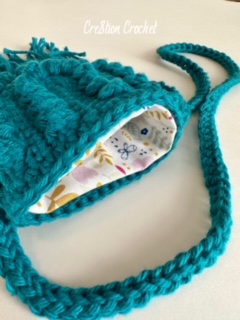
Next, insert your lining into your bag and adjust if needed so that it is just below the top band of the bag and where the slit is for the strap. Also be sure to make sure that your side seams line up with the sides of the bag. I found it helpful to pin the lining in place with straight pins so that it doesn’t shift while sewing.
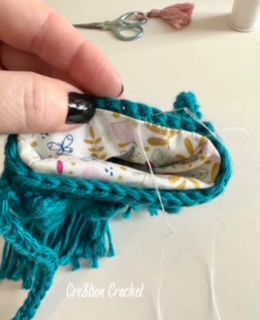
To attach the lining to the bag, I did a simple whip stitch by picking up a small section of yarn on the inside of the bag and then going through the top edge of the lining, repeating the process until the entire top edge of the lining is attached to the bag.
To finish off the lining, I tied the two ends of thread together and then using the needle, I hid the thread tails between the lining and the crocheted bag by running the needle between the layers.
Congratulations!! You now have a chic and stylish Bitty Boho Bag that is sure to make any little girl smile.

Be sure to join me over on Facebook and Instagram for more fun projects and inspiration.
Join one of our awesome Facebook groups to share your creations, and see what others are up to!
– Yarn Crafts & Coffee Community
– DIY Home On Rockwood Lane
– Alexandra Lane Lifestyle
Linked Up To…
Craftastic Monday Link Party – Sew Can Do
Weekday Wear Linkup – Away from the Blue
Linky Ladies Party #235 – The Purple Poncho
Style with a Smile Link Up – Style Splash
Confident Twosday – I do deClaire
Turning Heads Tuesday – Elegantly Dressed and Stylish
Loop Scoop #60 – Moogly Blog
Team Creative Crafts Link Party #141 – Artsy-Fartsy Mama
The Wednesday Link Party 500 – Oombawka Design Crochet
Creatively Crafty Link Party #377 – Try It – Like It – Create It
Wow on Wednesday – Is This Mutton?
Chic and Stylish Link Up – Mummabstylish
Thursday Fashion Files – Doused in Pink
Spread The Kindness Link Up On the Edge #649 – Shelbee on the Edge
Fancy Friday Link Up – Nancy’s Fashion Style
Neverending Style Link Up – The Grey Brunette
Craft Schooling Sunday – Creative Jewish Mom
Happiness is Homemade 475 – Decor Craft Design
Sundays on Silverado #141 – The House on Silverado
Handmade Monday #323 – Sum of their Stories
The Really Crafty Link Party #361 – Keeping it Real
Hello Monday – Pink Lady
Anything Goes Linky 374 – My Random Musings
679th Inspire Me Tuesday – A Stroll Thru Life
Fabulous Party 472 – Lou Lou Girls
The Happy Now Blog Link- Up #369 – JENerally Informed
Linky Party #316 – Karins Kottage
Crafty Creators Link Party #64 – Life as a LEO Wife
Wonderful Wednesday Blog Hop – My Life Abundant
Wednesday Link Party #345 – To Grandma’s House We Go
Create, Bake, Grow & Gather Party #569 – Shabby Art Boutique
Funtastic Friday Link Party 434 – Simply Beautiful by Angela
A Morning Cup of Joe – The Cottage Market
August Sunday Showcase – Chez Mireille


This is a super cute bag for any little girl. I am sure our granddaughter will love it. Will come back to check it out again.
Visited you via The Really Crafty Link Party #361!.
If interested, please hop over and come and share your posts with us at Senior Salon Pit Stop. See my entries: 20+21, and navigate to the bottom of my page for SSPS linkup, we hope to virtually meet you there.
Thanks! I am sure your granddaughter would love to have one.
Such a cute and on-trend bag! Thanks for sharing at #WowOnWednesday
Thanks Gail!
Hi Maggie, I love how you Adult Boho Bag turned out and the helpful bag lining tutorial you included in your pattern review. Thank you for linking up at our weekly Link Party! You are being featured at our Wednesday
Party #500 this week. Here’s the direct link to the post in case you’d like to share your feature:
https://oombawkadesigncrochet.com/crochet-cardigan-boho-bag-and-nordic-trails-scarf-link-party-501/
Hope to see you again next week! Rhondda
Thanks Rhondda! I am so glad you liked it.
LOvely Bag !!!
Thanks Sandra!