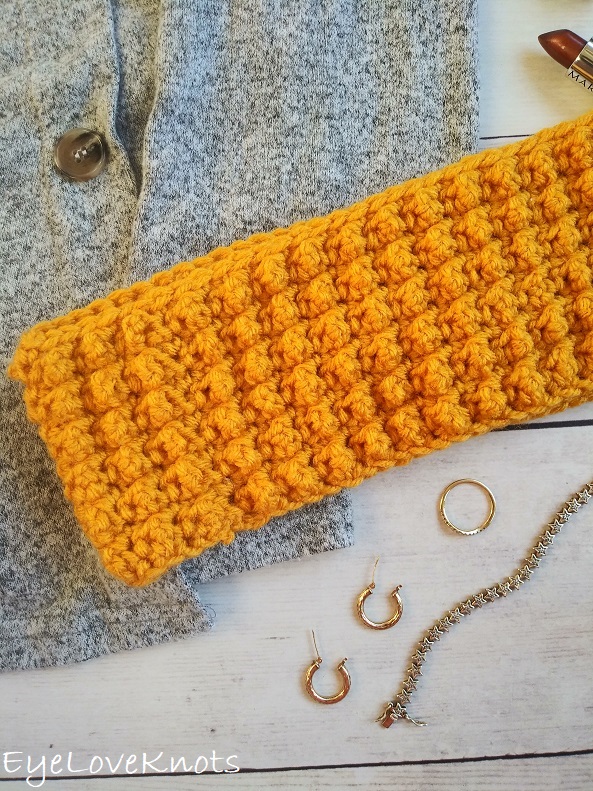
This is a free crochet pattern and video tutorial showing how to crochet the Lightweight Little Pebbles Earwarmer, which is an easy crochet ear warmer worked in a combination of single crochets and treble crochets to create a cozy, textured crochet pattern and your favorite Lightweight #3 yarn. Toddler, Child and Adult sizes included.
This post contains affiliate links for WeCrochet, Lion Brand Yarn, Amazon and Etsy. If you make a purchase by clicking on them, I make a small commission at no extra cost to you. Thanks for your support!
Find the free crochet pattern instructions below, or purchase a printer-friendly, ad-free PDF on Ravelry by clicking here.
Short on time? Pin it for later when you have more time.

This is the 2nd ear warmer design from the Mystery Earwarmer Crochet a Long, the Lightweight Little Pebbles Earwarmer, which is an easy crochet ear warmer worked in a combination of single crochets and treble crochets to create a cozy, textured crochet pattern and your favorite lightweight #3 yarn.
I just love the texture of this stitch pattern that I once discovered in a dress many moons ago. That dress used a crochet stitch called the Even Berry Stitch, but I found that in working the little berry stitches up, they did not hold their textured shape that well with some of them caving inward or flattening out, so I modified this stitch pattern by alternating single crochets and treble crochets to get the same exact look of the Even Berry crochet stitch, but with better stitch definition long term.
The worsted weight version of this pattern has been around since January of 2021 and updated here in September of 2024 to go hand in hand with this lightweight version.
You can work an ear warmer in different ways, but I wanted these to be beginner friendly patterns so I’ve chosen a rectangle design. What I love about this design is that after just 6 – 8 rows, you can measure the width and will know right off the bat if it will be the height you want for your ear warmer. Then, you work up the entire length and can just measure with a soft tape measure to make sure the length is correct to fit your head circumference. It takes the guess work out, and doesn’t require any additional work for checking gauge (I know many of us don’t like to do that anyway).

I am running a Washcloth Crochet a Long at the same time as this Earwarmer Crochet a Long, and the stitches are the same on both sides. If you are interested, make sure to check out my Sportweight Little Pebbles Washcloths.
Easy Textured Crochet Patterns:
Little Pebbles is a fun texture line that features a combination of single crochets and treble crochets to create an amazing texture that keeps it’s shape well and is not too bulky. These projects have a simple two row repeat making them great projects to pair with watching your favorite TV show or movie, and for projects like this ear warmer, you don’t have to even count rows if you don’t want you – you can use a soft tape measure to measure as you go, and stop at the length desired.
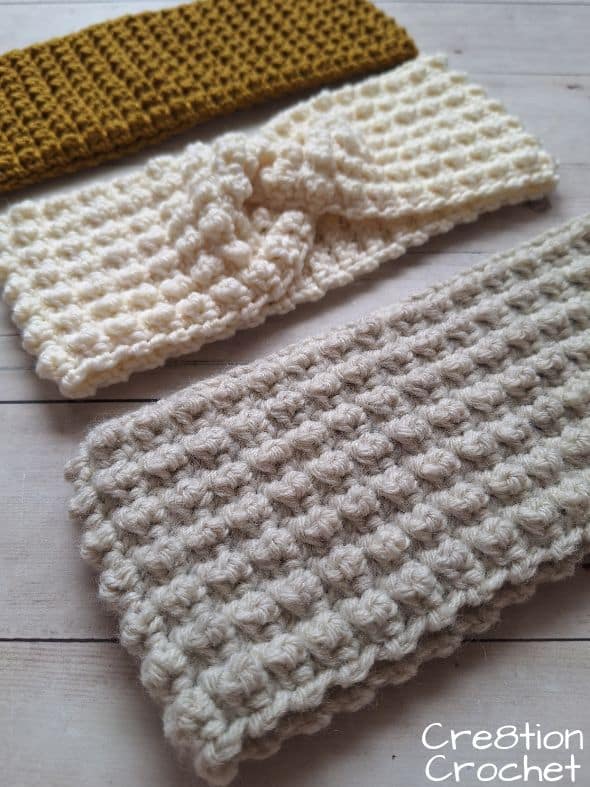
Twisted Little Pebbles Earwarmer (Middle)
Worsted Weight Little Pebbles Earwarmer 2 Ways (Bottom)

Find more Little Pebbles accessory and home decor crochet patterns on EyeLoveKnots, and Little Pebbles accessory and wearables crochet patterns here on Cre8tion Crochet.
You May Also Like These Lightweight Ear Warmers:

How do you crochet a textured crochet ear warmer in rows with lightweight yarn?
To begin a lightweight textured crochet ear warmer in rows following this modified berry stitch crochet pattern, you’ll start with a chain that is of an even number so you end up with an odd number of stitches.
Next, single crochet into the 2nd chain from the hook. The repeat begins now with treble crochet into the next stitch followed by a single crochet into the next stitch alternated all the way down the row.
For the next row, chain 1 and turn, and then work single crochets into each stitch across. The following row is a textured row again. You’ll begin with a single crochet into the first stitch, then the repeat begins here with treble crochet into the next stitch followed by a single crochet into the next stitch alternated all the way down the row.
You’ll continue alternating these two rows. Once you reach a length that is about 2″ to 2 1/2″ smaller than your head circumference, you’ll finish on a single crochet row. Join the two ends together to create a tube. My preferred method for joining this ear warmer is a whipstitch, though I want to try out the mattress stitch with my next one. There are various techniques – use whichever is your favorite and feels best with this ear warmer.
Weave in your ends when you’re finished and it’s ready to wear out!

How do you adjust the height of an ear warmer worked in rows? How do you make an ear warmer thinner or thicker?
One version of this ear warmer is worked widthwise, which is equal to the height of the finished ear warmer. After about 6 – 8 rows, you can measure the width to see how tall the finished ear warmer will be. When working this fun, textured pattern, you’ll want to make sure you have an even number of chains to get an odd number of stitches, so if you wanted to make it thinner or thicker, you can remove or add any number of chains in any multiple of 2. Take the total number of chains and subtract one – that will be how many stitches you’ll have for each row.
How do you adjust the length of an ear warmer worked in rows?
To adjust the length, simply add or subtract rows making sure to finish on a row of single crochet so the pattern will continue when seamed using your preferred method.

If you have other questions like: is it ear warmer or earwarmer — when should you wear an ear warmer — is an ear warmer and a headband the same thing — is it necessary to work up a gauge swatch before beginning a crocheted ear warmer — what is the best yarn to use to crochet an ear warmer — what size should a crocheted ear warmer be — then you’ll want to check out my post, Everything You Need to Know About How to Crochet an Ear Warmer.
Ad-Free Printer Friendly PDF:

Cre8tion Crochet newsletter subscribers get access to Exclusive Subscriber Content, like the free PDF of this pattern via the Free File Library – you’ll find the tab on the top menu. The library is password protected so sign up for my newsletter and you’ll receive a Welcome email containing this month’s password, or if you are already a blog subscriber, reference your latest newsletter for this month’s password. From the library, you’ll be able to access the PDFs via Google Drive – you do not need to have a Google Drive account to view and download the PDF.
For a limited time…

Through 10/04/24 at 11:59pm EST, you can grab a free copy of the PDF for the Lightweight Little Pebble Earwarmer on Ravelry using code FREECROCHET202424. I earn my income from the number of pageviews my blog sees, so please do not share the code, but instead share the link to this post so others can find it. Thank you!
After 10/04/24 or for non-subscribers, if you would like a PDF version of this post, you may get one through either my Etsy Shop, or Ravelry Shop for a small fee. This fee is to compensate for the views lost when you no longer need to return to the blog to for the information, as you will have your own copy. In a hurry? Pin this for later when you have more time.


Save this to Your Favorites on any of these awesome directories: AllFreeCrochet, FaveCrafts, Crochet Pattern Bonanza, Cheap Thrifty Living, DIYideaCenter, AllFreeHolidayCrafts, Free Crochet Tutorials, The Free Crochet Family
What Supplies Do I Need to Crochet a Lightweight Even Berry Stitch Ear Warmer?
- 105 (135, 145) Yards of Lightweight #3 Yarn – I used Lion Brand Superwash Merino in the Mustard Seed colorway
- G6/4.25mm Crochet Hook
- Tapestry Needle
- Soft Tape Measure – Gauge is Essential

Material Notes:
There are many yarns that would be perfect for ear warmers! The first question I would start with is will it be for warm weather or cold weather? A cotton blend yarn like Berroco Modern Cotton DK would be perfect for late Spring into early Fall, and a wool blend yarn would be perfect for errands on cool, but not cold, days, like most Winter days in Florida. For cold and windy days, I’ll be springing for a worsted weight version or chunky weight version.
Acrylic yarns work well for ear warmers when it’s just cool out and not too windy. To help protect against the wind, I would recommend an animal fiber. The more animal fiber within the yarn, the better it will protect against the wind and the warmer it will be. My favorite yarns for cozy ear warmers are wool blends. If you are allergic to wool, but looking for a different animal fiber, try alpaca.
Yarn Alternatives:
- Cotton Blends for Warm Weather: Lion Brand Coboo, Berroco Modern Cotton DK
- Cozy Wool Blends: Berroco Vintage DK, Araucania Huasco DK Kettle Dyed Yarn
- Cozy Non-Wool Alpaca Blends: Juniper Moon Herriot, Lion Brand Baby Alpaca, Lion Brand Feels Like Alpaca
- Acrylic Yarn: WeCrochet Brava Sport
Feel free to use your favorite lightweight yarn out of your stash!
I love my ergonomic clay hooks from SiennasBowtique and BronzeShepherdStudio! They both have so many fun designs – I have several from each shop because they’re so darn cute and nice to hold onto! We also have lots of beautiful, handcrafted crochet hooks in our Yarn Crafts and Coffee Yarn Shop as well!

Time Spent:
For the adult small size, I had my ear warmer ready in just over an hour and a half.
Measurements – Width by Length Before Seaming — to fit a head circumference of:
The width will be equal to the height of the band and the length is equal to about 2″ – 2 1/2″ smaller than the head circumference. This can vary depending on your yarn choice and the fit you like best (ie comfortable but loose fit or for it to fit like a hug).
Take a soft tape measure and measure your head circumference, or the distance around your head, just above your eyebrows.
You can easily adjust the height of an ear warmer if you prefer a thinner or thicker band, but I’ll provide average heights.
- Toddler: 3 1/2″ Wide by 17 1/8″ Long — 19″
- Child & Adult Small: 3 7/8″ Wide by 19 1/2″ Long — 21 1/2″
- Adult Large: 3 7/8″ Wide by 20 3/4″ Long — 22 1/2″

Gauge:
What I recommend is to use the Measurements section to measure gauge. Gauge itself is not terribly essential, but at least measuring your piece is.
I recommend working up about 6 – 8 rows, then measuring the width to see where you are – this will be the finished height of your ear warmer, but you can always adjust this if you would like a thinner or thicker band.
Heightwise, the most important thing is to measure the finished rectangle to ensure it is the correct size so it will fit well.
Abbreviations (US Terms):
- SC – Single Crochet (Photo Tutorial)
- TR – Treble Crochet
Pattern Notes:
Beginning chain does not count as a stitch.
To adjust the height of the band, work a chain that is of an even number so you end up with an odd number of stitches.
To adjust the length, simply add or subtract rows ending on a single crochet row so the stitch pattern will work out evenly when seamed.

Easy Lightweight Textured Ear Warmer Video Tutorial:
Written Pattern for the Easy Lightweight Textured Ear Warmer
Toddler Size Ear Warmer:
Chain 20, then SC into the 2nd chain from the hook, (TR into the next chain, SC into the next chain) across. (19 stitches)
Row 2: Chain 1, turn. SC into the 1st stitch, and each stitch across. (19 stitches)
Row 3: Chain 1, turn. SC into the first SC, then the repeat for the row begins here: (TR into the next chain, SC into the next chain) across. (19 stitches)
Rows 4 – 85: Repeat Row 2 + 3, ending on a Row 2.
Child & Adult Small Size Ear Warmer:
Chain 22, then SC into the 2nd chain from the hook, (TR into the next chain, SC into the next chain) across. (21 stitches)
Row 2: Chain 1, turn. SC into the 1st stitch, and each stitch across. (21 stitches)
Row 3: Chain 1, turn. SC into the first SC, then the repeat for the row begins here: (TR into the next chain, SC into the next chain) across. (21 stitches)
Rows 4 – 97: Repeat Row 2 + 3, ending on a Row 2.
Adult Large Size Ear Warmer:
Chain 22, then SC into the 2nd chain from the hook, (TR into the next chain, SC into the next chain) across. (21 stitches)
Row 2: Chain 1, turn. SC into the 1st stitch, and each stitch across. (21 stitches)
Row 3: Chain 1, turn. SC into the first SC, then the repeat for the row begins here: (TR into the next chain, SC into the next chain) across. (21 stitches)
Rows 4 – 103: Repeat Row 2 + 3, ending on a Row 2.

Fasten off with a long tail for sewing, and whipstitch the two ends together. I like to do this from the right side, or the textured side, of the fabric, but you could also do it from the wrong side facing. Weave in ends.

Feel free to use this information to make and sell your own items. When sharing, designer credit is appreciated, but not required. All Cre8tion Crochet Patterns, Photos and PDF’s are protected under copyright. They are not to be copied, distributed or sold – doing so is copyright infringement and stealing! DO NOT copy and paste my pattern anywhere, and DO NOT share the written pattern with others, share the link to the pattern instead so others can find it themselves.

Join one of our awesome Facebook groups to share your creations, and see what others are up to!
– Yarn Crafts & Coffee Community
– DIY Home On Rockwood Lane
– Alexandra Lane Lifestyle


Leave a Reply