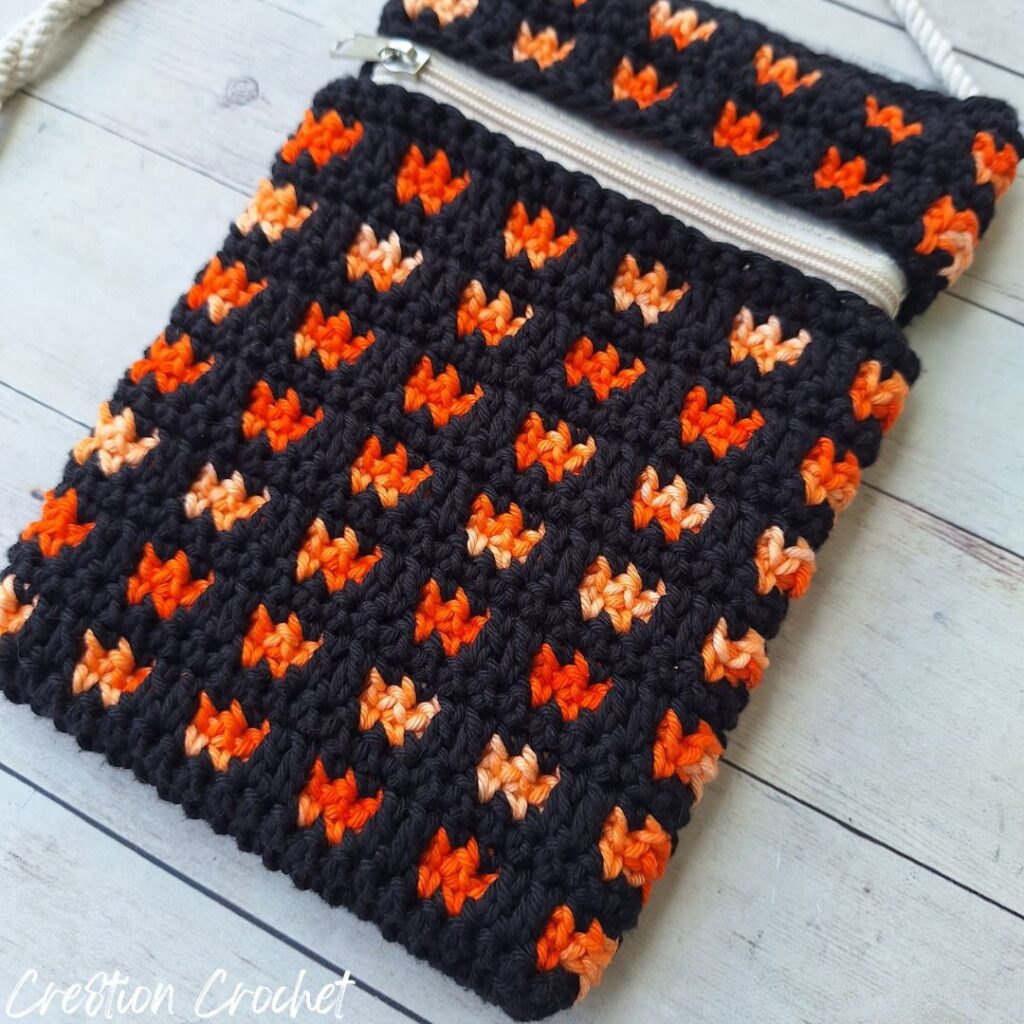
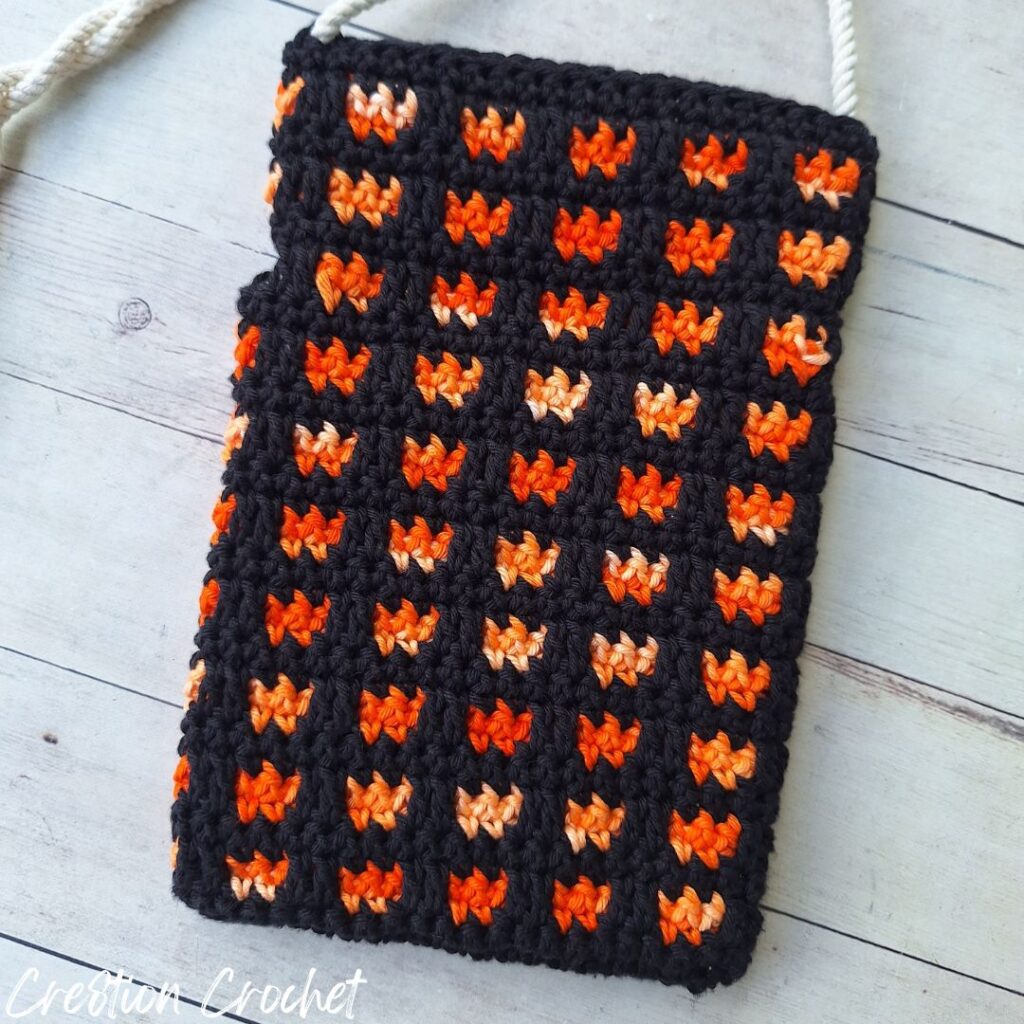
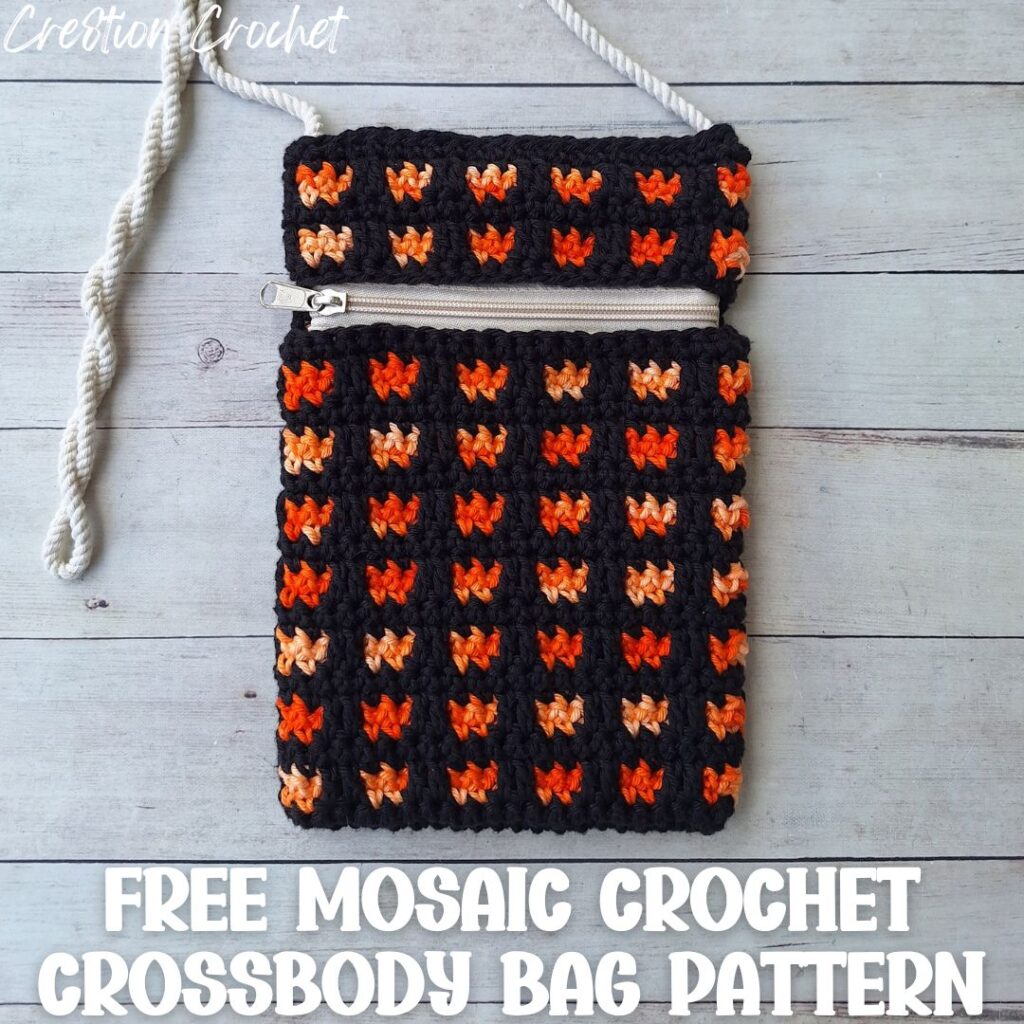
This is a free crochet pattern showing how to crochet the Through the Window Crossbody Bag, a fun crochet crossbody bag pattern that uses the mosaic crochet technique. Don’t let it scare you! It’s comprised of simple single crochet stitches, chains and easy double crochets.
The post contains affiliate links for Amazon, Etsy and WeCrochet. If you make a purchase by clicking on them, I make a small commission at no extra cost to you. Thanks for your support!
Find the free crochet pattern instructions below, or purchase a printer-friendly, ad-free PDF on Ravelry by clicking here.
Short on time? Pin this for later when you have more time.
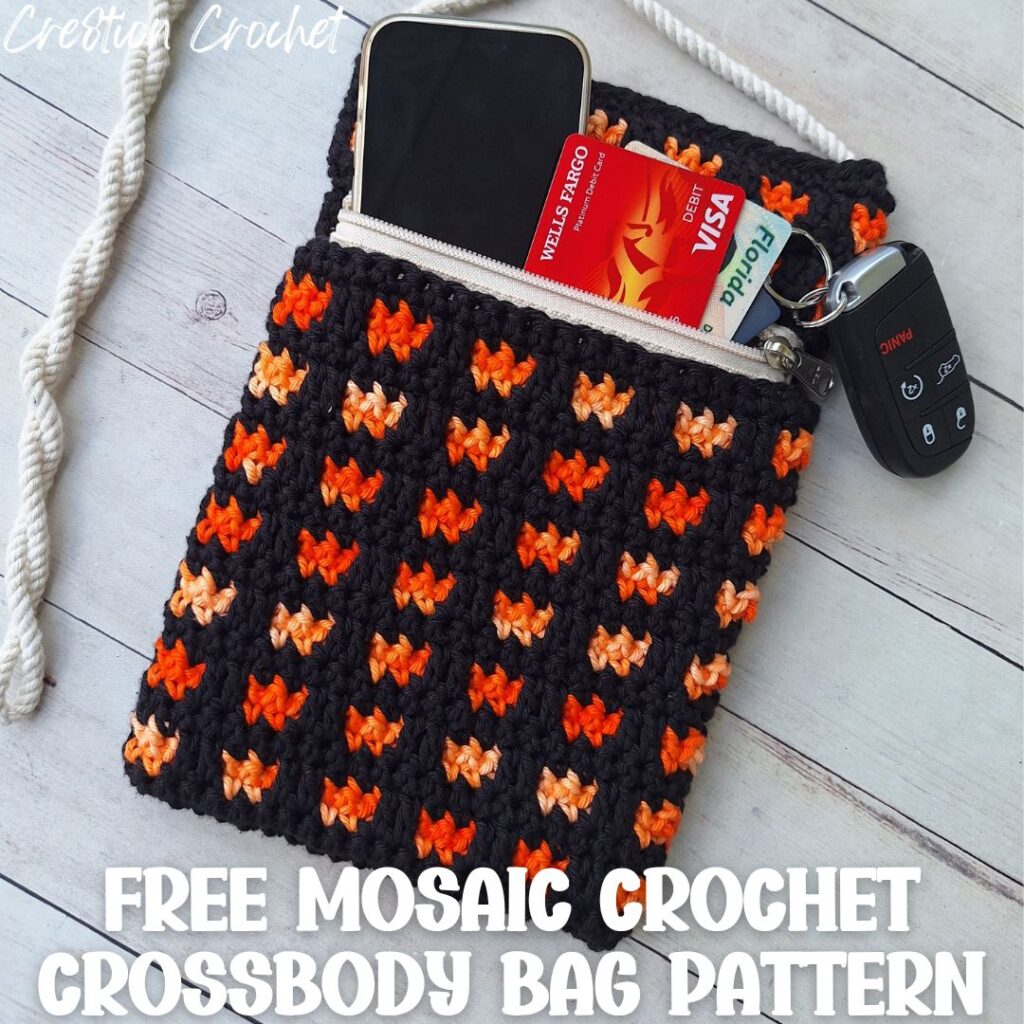
When I originally planned the 2025 Spooktacular Halloween Crafting Event, I knew I wanted to share a trick or treat bag and something to coordinate with it. After a little brainstorming, I thought “how cute would a matching bag for Mom be to hold her phone and keys while trick or treating with the kids?” and boom! My new favorite crocheted bag was born. It’s perfect for just the essentials – your phone, keys and a thin wallet
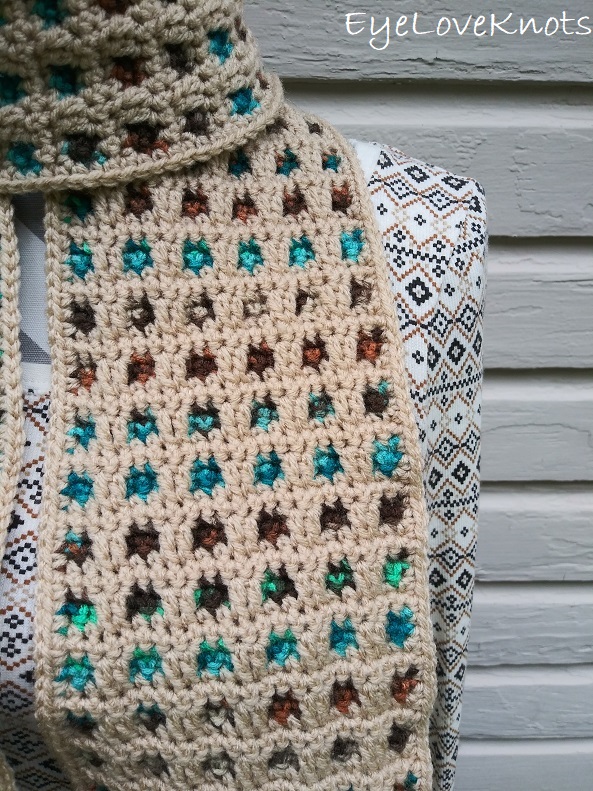
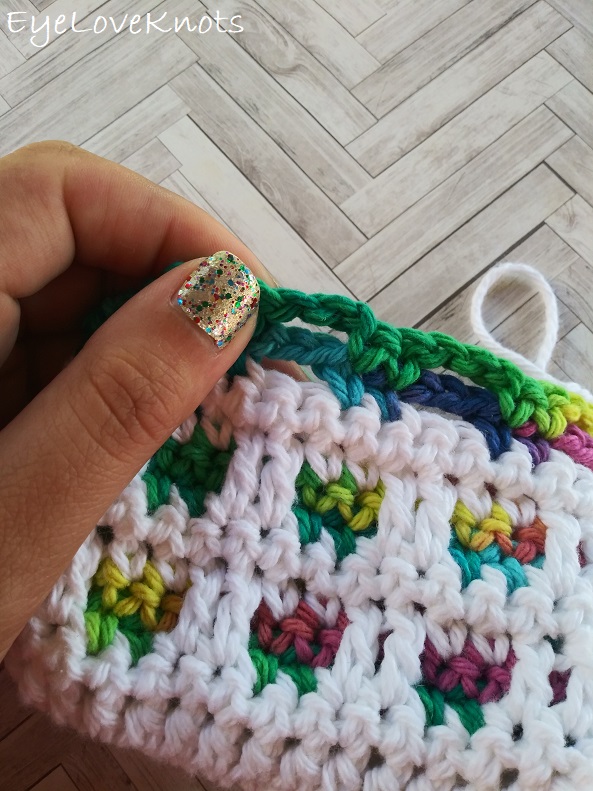
My favorite way to work this mosaic stitch pattern is by using a variegated yarn as the background color and a coordinating color over top of it as the main color, but over the years, I’ve enjoyed working many samples in a single solid color as the background color, or two solid colors to resemble stripes. The possibilities are endless!
Mosaic Crochet Patterns:
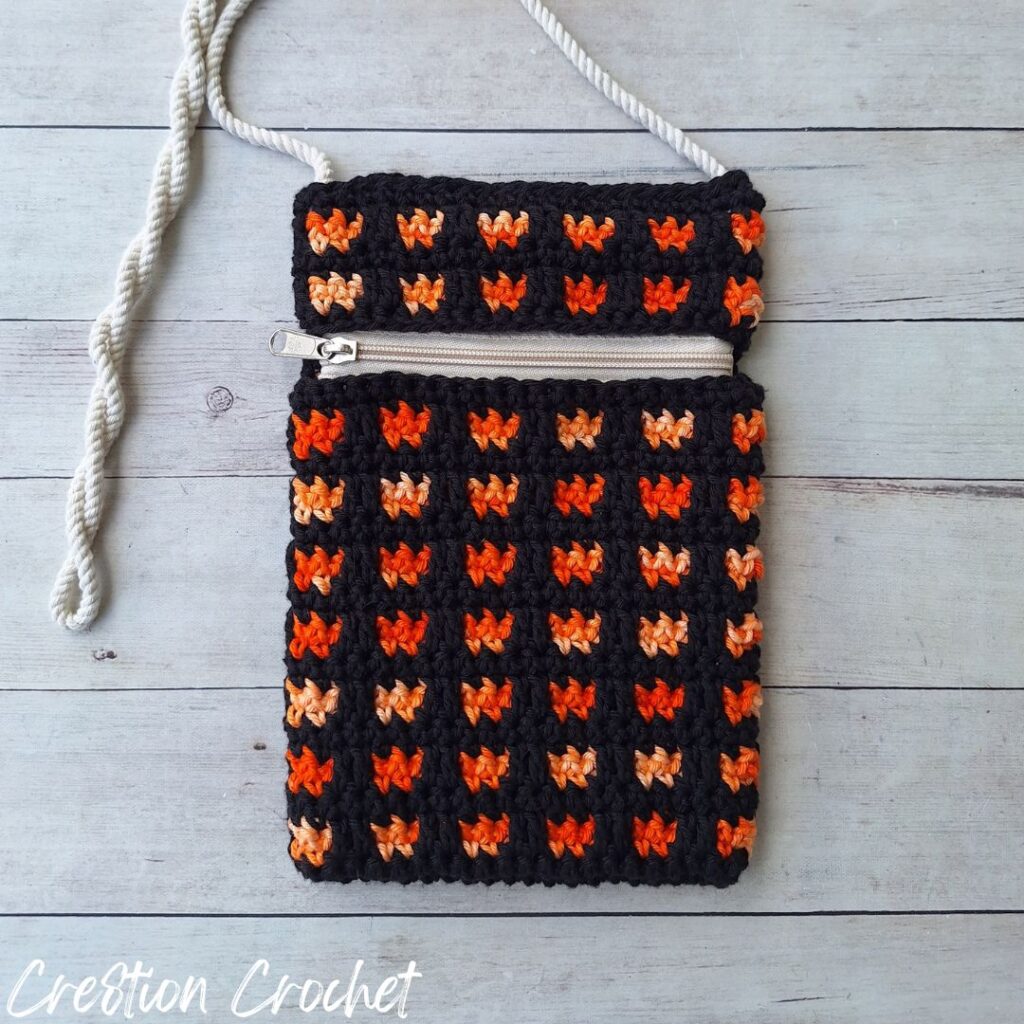
Through the Window is a fun crochet line that features inset mosaic crochet, a technique combining chains and single crochets with double crochets worked over the chains. With the main color worked on top of the fun, colored background boxes, it reminds me a window pane – the inspiration behind the name.
You’ll Love These Matching Pieces:

Through the Window Cosmetic Bag or Hook Pouch

Find more Through the Window accessory and home decor crochet patterns on EyeLoveKnots, and Through the Window accessory and wearables crochet patterns here on Cre8tion Crochet.
Ad-Free Printer Friendly PDF:

Cre8tion Crochet newsletter subscribers get access to Exclusive Subscriber Content, like the free PDF of this pattern via the Free File Library – you’ll find the tab on the top menu. The library is password protected so sign up for my newsletter and you’ll receive a Welcome email containing this month’s password, or if you are already a blog subscriber, reference your latest newsletter for this month’s password. From the library, you’ll be able to access the PDFs via Google Drive – you do not need to have a Google Drive account to view and download the PDF.
For a Limited Time…

Through 10/07/25 at 2:00pm EST, you can grab a free copy of the PDF for the Through the Window Crossbody Bag on Ravelry using code FREECROCHET202512. I earn my income from the number of pageviews my blog sees, so please do not share the code, but instead share the link to this post so others can find it. Thank you!
After 10/07/25 or for non-subscribers, if you would like a PDF version of this post, you may get one through either my Etsy Shop or Ravelry Shop for a small fee. This fee is to compensate for the views lost when you no longer need to return to the blog to for the information, as you will have your own copy. In a hurry? Pin this for later when you have more time!


Save this to your Favorites: AllFreeCrochet, FaveCrafts, Cheap Thrifty Living, DIYideaCenter, Crochet Pattern Bonanza, AllFreeHolidaysCrafts, Free Crochet Tutorials
What Do I Need to Crochet a Crossbody Bag?
- 173 Yards of Worsted Weight Yarn – I used Circulo Natural Cotton Maxcolor 4/6 – 104 Yards (84 Grams) of Black and 69 Yards (55 Grams) of Pumpkin
- H8/5mm Crochet Hook
- Tapestry Needle for Weaving in Ends
- Optional, Jewelry Pliers
- Optional, Blank Canvas Crossbody Bag with Zipper – zipper is across the front 2 1/4″ down from the top of the bag and the bag has a 1/4″ wide rope strap. Laid flat, the bag measures 5 3/4″ wide by 8 3/4″ tall (8 1/2″ usable space) with a 20″ tall strap.
- Optional, Glue – I used Titebond Quick & Thick for Multi-Surface or Sewing Needle & Thread
Material Notes:
The Circulo Natural Cotton Maxcolor 4/6 I used is a heavy worsted weight cotton yarn. Alternatively, I like WeCrochet Dishie and Queensland Coastal Cotton for my bags, though these are a lighter worsted weight cotton yarn. I am in the process of working another sample in the Dishie Yarn for the video tutorial. Originally, I thought I’d need to either size up on my crochet hook to meet gauge or add 4 – 8 stitches, but with the stretch of the yarn, it actually still worked out great following the pattern as is. My number one thing for picking a great 100% cotton yarn to work with is making sure it’s colorfast, which means the color is set so you don’t have to worry about the colors fading and bleeding, and I like to be able to wash my bags so colorfast is a must. All 3 of my recommendations here are colorfast.
Now, do you need to use a cotton yarn? Not at all! I love the durability and versatility of cotton yarn, but you can use your favorite worsted weight yarn from your stash. Keep in mind, cotton creates a more relaxed fabric, so if you opt for something like acrylic or wool, you’ll want to size up on your crochet hook.
I love my ergonomic clay hooks from SiennasBowtique and BronzeShepherdStudio! They both have so many fun designs – I have several from each shop because they’re so darn cute and nice to hold onto! We also have lots of beautiful, handcrafted crochet hooks in our Yarn Crafts and Coffee Yarn Shop as well!
Jewelry Pliers are an excellent tool to use to help weave in the ends of tough yarns, like cotton yarn or bulkier yarns, as it can be quite tough on the fingers when weaving in with just fingers and a tapestry needle.
You can find a cream and black Crossbody Bag option in my Yarn Crafts & Coffee shop, but you can also source bags like these, with or without the zipper, on Amazon and your local craft store in the aisle where Cricut or sublimation supplies can be found. Alternatively, you can sew your own lining.
Titebond Quick & Thick for Multi-Surface Glue is absolutely perfect for projects where you work with natural fibers. It does work with acrylic yarns as well, but it takes longer to hold. With cotton yarns, the glue adheres right away. This glue has no odor and is non-toxic. I used to sew in my linings, but now, I just use this glue and I haven’t had any issues with anything coming apart.
How Long Does it Take to Crochet a Crossbody Bag?
I had my bag ready in just over an hour and a half.
Crocheted Bag Measurements:
- Circulo Natural Cotton Maxcolor 4/6: 6 5/8″ Wide by 10″ Tall; 5 3/4″ Tall before Zipper Opening + 2 1/4″ Tall After Zipper Opening
- WeCrochet Dishie: 5 3/4″ Wide
If you’re using the Blank Canvas Bag, with the stretch of the yarn, a range of width sizes does work. If your fabric is measuring a little smaller than the canvas bag, that’s actually ideal as it will stretch nicely to fit. If your fabric is measuring a little larger than the canvas bag, it is okay as long as it’s not excessive as you don’t want it to be very baggy around the canvas bag or bunch up when you go to attach the lining.
Gauge:
In Pattern, Round 1:
- WeCrochet Dishie: 5″ Wide by 3/4″ Tall
- Circulo Natural Cotton Maxcolor 4/6: 5 7/8″ Wide by 7/8″ Tall
Measured Flat Across a Row 3 Repeat over 16 Stitches Starting from the 1st SC/Left SC across to the 2nd DC/Right DC in Pattern:
- WeCrochet Dishie: 16 stitches by 18 Rows = 4 3/8” Wide by 4” Tall
- Circulo Natural Cotton Maxcolor 4/6: 16 stitches by 18 Rows = 4 3/4” Wide by 4 1/8” Tall
Gauge is essential if you’ll be using a Blank Canvas Bag, like I did, to line your bag. If you don’t line your bag, or if you make your own, gauge is not essential.
Abbreviations (US Terms):
- HDC – Half Double Crochet (Photo Tutorial | Video Tutorial)
- DC – Double Crochet (Photo Tutorial)
- SC – Single Crochet (Photo Tutorial)
- FSC – Foundation Single Crochet
- How to FSC: Chain 2. Insert hook into the first chain, yarn over, pull through, yarn over, pull through first loop (to create foundation chain), yarn over, pull through two loops on hook. First chain and SC created. Looking at the stitch in your hand, you should see the top of the SC to the right, and parallel on the left side, it should look like the opposite side of the beginning foundation chain. You will be working in these stitches on the left. To create the next stitch and each stitch after, insert hook under both loops of the foundation chain (left side) yarn over, and pull through, yarn over, pull through first loop, yarn over, pull through 2 remaining loops.
Pattern Notes:
In the pattern, I will instruct to example, in Round 5 “DC into R3”. In the photo above, you can see how there is a skipped stitch in white, and two rows of chains above it. You will push those chains to the back, and work the double crochet just into that skipped stitch in white.
The stitch multiple is 4. If you want to adjust the stitch number for this project, however many chains you start with, you will have double the amount of single crochets crochet stitches at the end of Round 1 – you’ll just want to make sure this final stitch count is a multiple of 4.
Join to the first stitch of the round, making sure to move the previous color/s to the inside of the bag first so it won’t be visible from the right side (or front side) of the bag). When joining from the right side of the bag, pull the other color/s up along the inside of the bag to carry it/them and place over your crochet hook before joining. The chain 1 from the next round will secure it in place.
For the most seamless color change, after joining with the current color, turn to the new working side. Pull the new color through the loop on your hook, then pull the tail end of the original color tight – it will disappear. Continue working with the new color. If the original loop pops up at any time while you’re working, simply hold onto the fabric and give the tail end a tug, and it will disappear again. If you prefer the more common way of changing colors in the last yarn over of the previous stitch, feel free to substitute this method.
In Round 34, we use the Foundation Single Crochet to add stitches and easily be able to go back to working in the round.
Mosaic Crochet Crossbody Bag Video Tutorial:
Filming for the video is in progress, but in the meantime, you can follow the written instructions and reference the video tutorial for the Through the Window Cosmetic Bag or Hook Pouch to review the stitch pattern (up to Round 30 of the Crossbody Bag Pattern).
Mosaic Crochet Crossbody Bag Written Pattern:
In Black, chain 22. 2 SC into the 2nd chain, and the next 19, 3 SC into the last chain, SC into the next 19 along the opposite side of the foundation chain, SC into the 1st stitch. Join. (44 SC)
R2: Chain 1, turn. SC into the 1st SC, and into each SC around. Join with Pumpkin. (44 SC)
R3: In Pumpkin, chain 1, and turn. SC into the 1st SC, chain 3, skip the next 2 SC, (SC into each of the next 2 SC, chain 3, skip the next 2 SC) around, SC into the last stitch. Join.
R4: Chain 1, turn. SC into the 1st SC, chain 3, skip the chain space, (SC into each of the next 2 SC, chain 3, skip the chain space) around, SC into the last SC. Join with Black.
R5: In Black, chain 1, and turn. SC into the 1st SC, DC into each of the 2 open stitches from R3, (SC into each of the next 2 SC, DC into each of the next 2 stitches of R3) around, SC into the last SC. Join.
R6: Chain 1, turn. SC into the 1st stitch, and each around. Join with Pumpkin.
R7 – 30: Repeat Rows 3 – 6. Fasten off Black and Pumpkin after the last join of Row 30.
The pre-made canvas bag I’m using has a zipper 2 1/4″ from the top of the bag, which meets Row 31 so we will be leaving an opening in the front to accommodate it, and working a portion along the back in rows. If you are not using a lining, or making your own and it won’t have a zipper in this place, you can continue repeating Rows 3 – 6 until it’s as tall as you need.
R31: Flip to the back of the back. Attach Pumpkin at the far right stitch (will continue in pattern showing 2 rows above a background stitch). Chain 1. SC into each of the 1st 2 SC, (chain 3, skip the next 2 SC, SC into each of the next 2 SC) 4x. (10 SC and 4 chain spaces)
R32: Chain 1, and turn. SC into each of the 1st 2 SC, (chain 3, skip the chain space, SC into each of the next 2 SC) 4x. Join with Black in the last yarn over of the last SC. Fasten off Pumpkin.
R33: Chain 1, and turn. Lean to the Right and DC into the SC two rows below just to the right of the Pumpkin stitch on the end. SC into each of the next 2 SC, (DC into each of the 2 open stitches from R31, SC into each of the next 2 SC) 4x, DC into each of the next 2 SC from R31 just to the left of the last Pumpkin stitch on the end. (21 stitches)
R34: Chain 1, and turn. SC into the 1st stitch, and into each of the next 19 stitches, then FSC 22. Join to the 1st SC. (44 SC)
R35: Chain 1, and turn. Slip stitch into the next stitch. Yarn over with Pumpkin and pull through, pull on the tail end from the Black so the loop will disappear and drop it to the back. With Pumpkin, chain 1. SC into the 1st SC, chain 3, skip the next 2 SC, (SC into each of the next 2 SC, chain 3, skip the next 2 SC) around. SC into the last SC. Join.
R36: Chain 1, and turn. SC into the 1st SC, chain 3, skip the chain space, (SC into each of the next 2 SC, chain 3, skip the chain space) around, SC into the last SC. Join with Black.
R37: In Black, chain 1, and turn. SC into the 1st SC, DC into each of the 2 open stitches from R3, (SC into each of the next 2 SC, DC into each of the next 2 stitches of R3) around, SC into the last SC. Join.
R38: Chain 1, turn. SC into the 1st stitch, and each around. Join with Pumpkin.
R39: In Pumpkin, chain 1, and turn. SC into the 1st SC, chain 3, skip the next 2 SC, (SC into each of the next 2 SC, chain 3, skip the next 2 SC) around, SC into the last stitch. Join.
R40: Chain 1, turn. SC into the 1st SC, chain 3, skip the chain space, (SC into each of the next 2 SC, chain 3, skip the chain space) around, SC into the last SC. Join with Black and fasten off Pumpkin.
R41: In Black, chain 1, and turn. SC into the 1st SC, DC into each of the 2 open stitches from R3, (SC into each of the next 2 SC, DC into each of the next 2 stitches of R3) around, SC into the last SC. Join.
R42: Chain 1, turn. SC into the 1st stitch, and each around.
The next step is to seam the bag closed around the lining. Weave in all ends.
Place in the pre-made canvas lining, or your own lining if you’ve made one. The pre-made canvas bag I’m using has a 1/4″ wide rope strap that comes out on the right and left sides of the bag so we will be leaving a stitch unworked in Row 43 on both ends to accommodate the strap. If you are not using a lining, or making your own and it won’t have a strap in this place, consider how you will have your strap before finishing. If your bag has the zipper opening in the front but no strap (or you will remove the strap to replace it) and you will add some jump rings on the ends and attach a strap that has a lobster clasp on both ends, you can simply slip stitch through both layers into each stitch all the way across not leaving any unworked. If you are not using a lining or your lining does not have the zipper in the front and it’s open on the top, you can omit the next round and move onto creating your desired strap.
R43: Chain 1, turn. Slip stitch into the 1st stitch, then match up the stitches and slip stitch through both layers at the same time working all the way across leaving the last stitch unworked.
Fasten off, and weave in remaining end.

Feel free to use this information to make and sell your own items. When sharing, designer credit is appreciated, but not required. All Cre8tion Crochet Patterns, Photos and PDF’s are protected under copyright. They are not to be copied, distributed or sold – doing so is copyright infringement and stealing! DO NOT copy and paste my pattern anywhere, and DO NOT share the written pattern with others, share the link to the pattern instead so others can find it themselves.
Join one of our awesome Facebook groups to share your creations, and see what others are up to!
– Yarn Crafts & Coffee Community
– DIY Home On Rockwood Lane
– Alexandra Lane Lifestyle


Leave a Reply